- 記事一覧 >
- ブログ記事

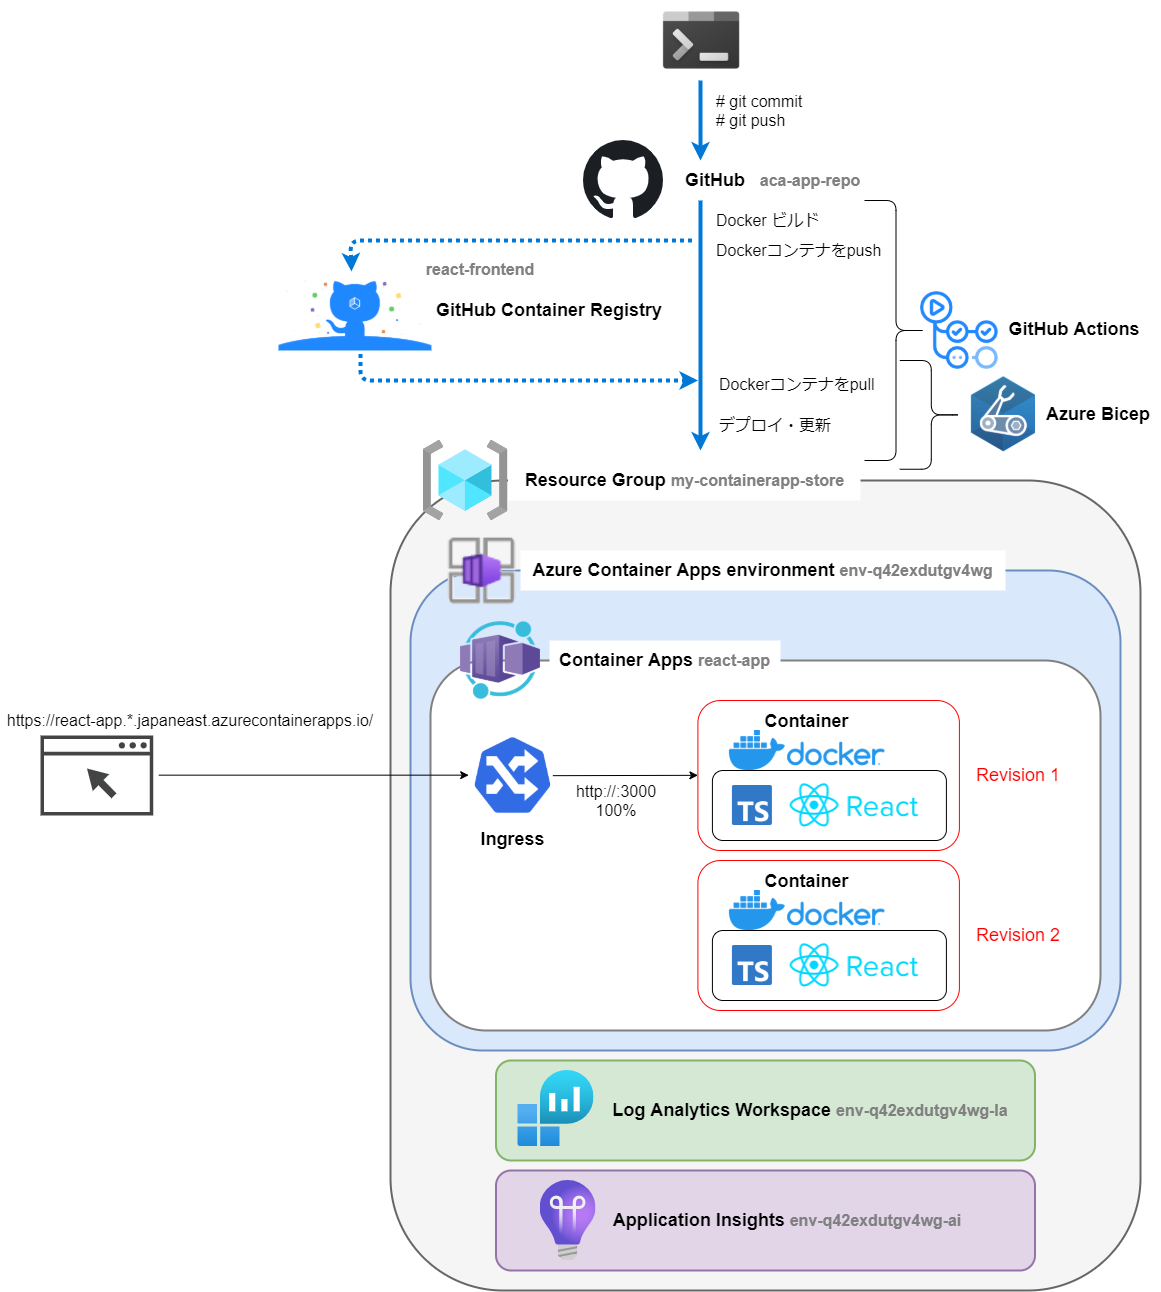
Azure Container Appsへbicep,GitHub Container Registry,GitHub Actionsを使ってデプロイ
はじめに
Azure Container Apps へ bicep、GitHub Container Registry、GitHub Actions を使って React Web アプリをデプロイしてみました。一連の手順を紹介していきたいと思います。
2022年11月15日 追記:
コンテナレジストリを GitHub Container Registry(GitHub Packages)から Azure Container Registry に変更した記事をアップしました。
「Azure Container Appsへbicep,Azure Container Registry,GitHub Actionsを使ってデプロイ」
Azure Container Apps:フル マネージド サーバーレス コンテナー サービスです。Azure Container Apps を使うと、Kubernetes のオーケストレーションやインフラストラクチャを気にすることなく、コンテナー化されたアプリケーションを実行できます。
bicep:Bicep は、宣言型の構文を使用して Azure リソースをデプロイするドメイン固有言語 (DSL) です。無人でAzure をいじるときに使うプログラミング言語のようなものです。
GitHub Actions:GitHub Actions は、GitHub が提供する CI/CD サービスです。 GitHub と高度に統合されており、GitHub に公開されたコードを自動でビルド・テスト・デプロイを行うのが主目的です。
GitHub Container Registry:GitHub Packages を構成する1つで Docker を始めとしたコンテナを扱えるレジストリです。
Web アプリ:create-react-app で作成したものそのままです。
パイプラインや CI/CD については、別記事「Kotlin + Spring Boot のアプリを GitLab CI/CD による Docker デプロイまで全手順」に詳しく書きましたので、こちらを参照してください。
【 コンテナレジストリ 】
Azure Container Registry、GitHub Container Registry(ghcr.io)、Docker Registry、etc...の内、今回は、GitHub Container Registry(ghcr.io) を使います。Azure Container Registry、GitHub Container Registry(ghcr.io)以外の場合、どうなるかは検証していません。
基本的には、learn.microsoft.com の「チュートリアル: Azure Container Apps に GitHub Actions を使用して Dapr アプリケーションをデプロイする」を見ながら進めましたが、参考にしただけで、同一ではありません。Dapr 未使用で、Azure Cosmos DB は作成せず、コンテナも一つで、かなり単純化しています。
本記事情報により何らかの問題が生じても、一切責任を負いません。
2022年11月現在、GitHub Container Registry(ghcr.io)を使わない方が良いかもしれません。詳細は、「注意点」のセクションを参照してください。
コンソールは、Ubuntu 20.04 LTS の bash で作業しています。
git コマンドや az コマンド、npx などはインストール済みで使えるものとします。
ソースコード準備
作成済みの全体ソースコードは、 https://github.com/itc-lab/azure-container-apps-bicep-example にアップしました。
create-react-app で作成
↓
コンテナビルドのための Dockerfile
↓
GitHub Actions ワークフローファイル .github/workflows/build-and-deploy.yaml
↓
Azure Container Apps 他、Azure へのリソースデプロイ用に ./deploy/main.bicep、./deploy/environment.bicep、./deploy/container-http.bicep
と準備していきます。
create-react-app
$ npx create-react-app aca-app --template typescript
$ cd aca-app
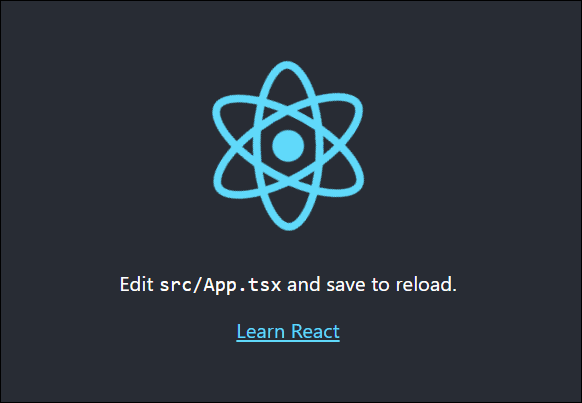
$ npm start自動的に最低限の Web アプリが作成されて、http://localhost:3000 で以下の画面が表示されます。
Dockerfile
yarn build した静的ファイルを nginx で参照する形のコンテナを作成するための、Dockerfile を準備します。
# Dockerマルチステージビルド
FROM node:16 as build

WORKDIR /app

COPY package.json /app/

RUN yarn

COPY . /app/

RUN yarn build


FROM nginx:latest

COPY --from=build /app/build /usr/share/nginx/html

COPY --from=build /app/nginx.conf /etc/nginx/conf.d/default.conf
nginx.conf を準備します。
3000 番ポートを開いています。
server {
  listen 3000;

  gzip on;
  gzip_vary on;
  gzip_min_length 10240;
  gzip_proxied expired no-cache no-store private auth;
  gzip_http_version 1.1;
  gzip_types text/plain text/css text/xml text/javascript application/javascript application/x-javascript application/xml image/png;
  gzip_disable "MSIE [1-6]\.";

  location / {
    root /usr/share/nginx/html;
    index index.html index.htm;
    try_files $uri $uri/ /index.html =404;
  }
  include /etc/nginx/extra-conf.d/*.conf;
}
build-and-deploy.yaml
GitHub Actions パイプラインのワークフローファイル .github/workflows/build-and-deploy.yaml を作成します。
意味は、中のコメントを見てください。
name: Build and Deploy
on:
  push:
    # mainブランチにpushまたは、v*.*.* タグがreleaseされたときに発動
    branches: [main]
    tags: ["v*.*.*"]
    # このファイルの変更だけの場合、パイプラインを実行しない。
    # パイプラインとは、一連の自動化処理のこと。GitHubでは、ワークフローと言っている。
    # ここに書いてある実行するかどうかの条件は、ワークフロー トリガーと言う。
    paths-ignore:
      - "README.md"
      - ".vscode/**"
      - "assets/**"
      - "build-and-run.md"
  # 手動実行(GUIからRun workflowボタン)有効
  workflow_dispatch:

env:
  # ワークフロー全体で使える環境変数
  # コンテナレジストリとして、GitHub Container Registry (ghcr.io)を使うため、環境変数に登録
  REGISTRY: ghcr.io
jobs:
  set-env:
    name: Set Environment Variables
    runs-on: ubuntu-latest
    outputs:
      # mainステップの実行結果を保存→他のjobで変数として使える。
      # needs.set-env.outputs.version のように参照
      version: ${{ steps.main.outputs.version }}
      created: ${{ steps.main.outputs.created }}
      repository: ${{ steps.main.outputs.repository }}
      appname: ${{ steps.main.outputs.appname }}
    steps:
      # $GITHUB_SHA:ワークフローをトリガーしたコミット SHA。
      # $GITHUB_REPOSITORY:リポジトリオーナー/リポジトリ名。例:octocat/Hello-World
      - id: main
        # set-outputコマンドを利用することで出力パラメータに値を代入することができたが、
        # set-outputの使用は非推奨になった。
        # echo "::set-output name={name}::{value}" で{name}に{value}を代入。
        # ↓
        # echo "{name}={value}" >> $GITHUB_OUTPUT で{name}に{value}を代入。
        # cut -c1-7 = 先頭7文字
        run: |
          echo version=$(echo ${GITHUB_SHA} | cut -c1-7) >> $GITHUB_OUTPUT
          echo created=$(date -u +'%Y-%m-%dT%H:%M:%SZ') >> $GITHUB_OUTPUT
          echo repository=$GITHUB_REPOSITORY >> $GITHUB_OUTPUT
          echo appname=react-frontend >> $GITHUB_OUTPUT

  # コンテナ build & コンテナレジストリへ push のジョブ
  package-services:
    # ランナー イメージ(ジョブを実行する仮想マシン)を指定。windows-latest、windows-2022、macos-12とかいろいろある。
    # ランナーは自分で作ることもできて、自分で作ったランナーをセルフホストランナー(self-hosted runners)という。
    runs-on: ubuntu-latest
    # needs=先行のジョブを指定(指定しないと、並列実行される。)
    # この場合、needs: set-env が無いと、set-envジョブと同時にpackage-servicesジョブが動く。
    needs: set-env
    # secrets.GITHUB_TOKENの権限を設定。このワークフローで必要な権限を設定。
    permissions:
      # ソースコードリポジトリは、読み取りのみ
      contents: read
      # コンテナレジストリは書き込み可
      packages: write
    outputs:
      # image-tagステップにて、echo image-${{ needs.set-env.outputs.appname }}=*・・・ が実行されていて、
      # その値をcontainerImage-reactという名称で、他ジョブでも使えるように出力している。
      containerImage-react: ${{ steps.image-tag.outputs.image-react-frontend }}
    steps:
      - name: Checkout repository
        # actions/checkout@v2アクション
        # pushされた時にはそのpushされたコードをチェックアウト
        # プルリク時には、そのプルリクされたコードをチェックアウト
        uses: actions/checkout@v2
      - name: Log into registry ${{ env.REGISTRY }}
        # プルリク以外だったら実行
        if: github.event_name != 'pull_request'
        # GitHub Container Registryにdocker imageをpushするためにdocker login。
        # docker/login-action@v1アクションを利用。
        # withでアクションに必要なパラメータを定義。
        uses: docker/login-action@v1
        with:
          # ログインするコンテナレジストリ。未指定の場合はDocker Hub(今回は、ghcr.ioだから指定しないといけない。)
          registry: ${{ env.REGISTRY }}
          # ghcr.ioにログインするユーザー。github.actorは、このワークフローを実行しているユーザー。
          username: ${{ github.actor }}
          # secrets.GITHUB_TOKEN は、Settings -> Developer settings -> Personal access tokens で設定するトークン
          password: ${{ secrets.GITHUB_TOKEN }}
      - name: Extract Docker metadata
        id: meta
        # docker/metadata-action@v3アクション
        # 動的なタグ生成を実施→docker build時に指示できる
        # ビルドされたimageが
        # ghcr.io/xxx/aaa:latest、ghcr.io/xxx/aaa:1.2.3、ghcr.io/xxx/aaa:1.2、ghcr.io/xxx/aaa:1、
        # ghcr.io/xxx/aaa:sha-ad132f5、ghcr.io/xxx/aaa:main
        # といったタグでpushされる。
        uses: docker/metadata-action@v3
        with:
          images: ${{ env.REGISTRY }}/${{ needs.set-env.outputs.repository }}/${{ needs.set-env.outputs.appname }}
          tags: |
            type=semver,pattern={{version}}
            type=semver,pattern={{major}}.{{minor}}
            type=semver,pattern={{major}}
            type=ref,event=branch
            type=sha
      - name: Build and push Docker image
        # docker/build-push-action@v2アクション
        # コンテナ build & コンテナレジストリへ push
        uses: docker/build-push-action@v2
        with:
          # context: Dockerfileが置いてある場所
          # 今回は、リポジトリ直下に置いているが、ディレクトリの中なら、'./frontend'、'./backend' とか。
          context: "."
          # コンテナレジストリにpushするかどうか。プルリク以外は、push。
          push: ${{ github.event_name != 'pull_request' }}
          # 上で設定したタグを適用
          tags: ${{ steps.meta.outputs.tags }}
          labels: ${{ steps.meta.outputs.labels }}
      - name: Output image tag
        id: image-tag
        # image-react-frontend = ghcr.io/<github-username>/aca-app/react-frontend:sha-<コミットSHA(先頭7文字)>
        # tr '[:upper:]' '[:lower:]' は、小文字化するLinuxコマンド
        run: |
          echo image-${{ needs.set-env.outputs.appname }}=${{ env.REGISTRY }}/$GITHUB_REPOSITORY/${{ needs.set-env.outputs.appname }}:sha-${{ needs.set-env.outputs.version }} | tr '[:upper:]' '[:lower:]' >> $GITHUB_OUTPUT

  deploy:
    runs-on: ubuntu-latest
    # package-servicesジョブ終了後に実行
    # 複数終了待ちの場合:[job1, job2] で job1とjob2 両方が終わっている必要があるという意味になる。
    needs: package-services
    steps:
      - name: Checkout repository
        # actions/checkout@v2アクション
        # リポジトリをチェックアウト
        uses: actions/checkout@v2

      - name: Azure Login
        # azure/login@v1アクション
        # Azureにログイン
        uses: azure/login@v1
        with:
          # サービス プリンシパル シークレット(事前にAzureに作成して、シークレットをGitHubのGUIで登録)
          # Azure CLI で bicep を実行、Azure Container Appsにデプロイする権限を得るために必要。
          creds: ${{ secrets.AZURE_CREDENTIALS }}

      - name: Deploy bicep
        # azure/CLI@v1アクション
        # Azure CLI (Azure内のターミナル)で実行
        uses: azure/CLI@v1
        with:
          # Azureリソースグループを東日本リージョン(japaneast)に作成
          # az deployment group create -g <リソース グループ> -f <bicepファイル> でAzureへのデプロイを開始。
          # -p は引数指定(main.bicep内で使うパラメータ)
          # minReplicas:最小レプリカ(Pod)数
          # reactImage:React App の containerImage
          # reactPort:React App の containerPort
          # containerRegistry:コンテナレジストリ。ここでは、GitHub Container Registry (ghcr.io)
          # containerRegistryUsername:コンテナレジストリのログインユーザー名(これを実行しているGitHubユーザー)
          # containerRegistryPassword:コンテナレジストリのパスワード(Personal access tokens)
          inlineScript: |
            az group create -g ${{ secrets.RESOURCE_GROUP }} -l japaneast
            az deployment group create -g ${{ secrets.RESOURCE_GROUP }} -f ./deploy/main.bicep \
              -p \
                minReplicas=0 \
                reactImage='${{ needs.package-services.outputs.containerImage-react }}' \
                reactPort=3000 \
                containerRegistry=${{ env.REGISTRY }} \
                containerRegistryUsername=${{ github.actor }} \
                containerRegistryPassword=${{ secrets.GITHUB_TOKEN }}
Bicep
Azure Container Apps 他、Azure へのリソースデプロイ用に ./deploy/main.bicep、./deploy/environment.bicep、./deploy/container-http.bicep を準備します。
これは、GitHub Actions の 最後に az deployment group create -g ${{ secrets.RESOURCE_GROUP }} -f ./deploy/main.bicep・・・ で実行されています。
// param <parameter-name> <parameter-data-type> = <default-value>
// 注意:=の右側 <default-value> は、-p で与えられなかった場合、適用される。
// 今回、build-and-deploy.yaml にて以下のように実行されている。
// -p \
// minReplicas=0 \
// reactImage='${{ needs.package-services.outputs.containerImage-react }}' \
// reactPort=3000 \
// containerRegistry=${{ env.REGISTRY }} \
// containerRegistryUsername=${{ github.actor }} \
// containerRegistryPassword=${{ secrets.GITHUB_TOKEN }}

// function resourceGroup(): resourceGroup
// 現在のリソース グループのスコープを返す
param location string = resourceGroup().location
// function uniqueString(... : string): string
// パラメータとして提供された値に基づいてハッシュ文字列を作成。戻り値は 13 文字。
param environmentName string = 'env-${uniqueString(resourceGroup().id)}'

param minReplicas int = 0

param reactImage string
param reactPort int = 3000
// var で始まる部分はコマンドライン等からは変更できないファイル内で利用する内部変数
var reactFrontendAppName = 'react-app'

param isPrivateRegistry bool = true

param containerRegistry string
param containerRegistryUsername string = 'testUser'
// function secure(): any
// @secure() 修飾子
// パラメーターの値はデプロイ履歴に保存されず、ログにも記録されない。
@secure()
param containerRegistryPassword string = ''
// コンテナレジストリシークレットのキー名
// ただのキー名だけど、"Password"という言葉に反応して、secure-secrets-in-params警告が出るため、
// #disable-next-line で沈黙させる。
#disable-next-line secure-secrets-in-params
param registryPassword string = 'registry-password'

// Container Apps 環境モジュール
// module <symbolic-name> '<path-to-file>' = {
//   name: '<linked-deployment-name>'
//   params: {
//     <parameter-names-and-values>
//   }
// }
// <path-to-file>は、テンプレートのようなもので、値を渡して何回も使用可能。
// 注意:今回は、1回しか使っていない。
// 各パラーメータの説明は、environment.bicep、ontainer-http.bicep 内に記載。
module environment 'environment.bicep' = {
  // function deployment(): deployment
  // 現在のデプロイメント操作に関する情報を返す。
  // ここでは、name: "main--environment" になる。
  name: '${deployment().name}--environment'
  params: {
    environmentName: environmentName
    location: location
    appInsightsName: '${environmentName}-ai'
    logAnalyticsWorkspaceName: '${environmentName}-la'
  }
}

// React App
module reactFrontend 'container-http.bicep' = {
  name: '${deployment().name}--${reactFrontendAppName}'
  dependsOn: [
    environment
  ]
  params: {
    enableIngress: true
    isExternalIngress: true
    location: location
    environmentName: environmentName
    containerAppName: reactFrontendAppName
    containerImage: reactImage
    containerPort: reactPort
    minReplicas: minReplicas
    isPrivateRegistry: isPrivateRegistry
    containerRegistry: containerRegistry
    registryPassword: registryPassword
    containerRegistryUsername: containerRegistryUsername
    revisionMode: 'Multiple'
    secrets: [
      {
        name: registryPassword
        value: containerRegistryPassword
      }
    ]
  }
}

output reactFqdn string = reactFrontend.outputs.fqdnparam environmentName string
param logAnalyticsWorkspaceName string
param appInsightsName string
param location string
// ログ分析ワークスペース 作成
// resource キーワードを使用してリソースを追加。
// リソースのシンボリック名を設定。シンボリック名はリソース名と同じものではない。
// シンボリック名は、Bicep ファイルの他の部分にあるリソースを参照するために使用。
// resource <symbolic-name> '<full-type-name>@<api-version>' = {
// <resource-properties>
// }
resource logAnalyticsWorkspace 'Microsoft.OperationalInsights/workspaces@2020-03-01-preview' = {
name: logAnalyticsWorkspaceName
location: location
properties: any({
// ワークスペースのデータ保持日数。 -1 は、Unlimited Sku の場合、無制限。
// 他のすべての Sku で許可される最大日数は 730 日。
retentionInDays: 30
// ?どこにもこの項目の説明が無い。
features: {
searchVersion: 1
}
// SKU(Stock Keeping Unit)
// Basic、Standardなどの課金形態のこと。
// 2018 年 4 月の価格モデルを選択したサブスクリプションで Log Analytics ワークスペースを作成または構成する場合、
// 有効な Log Analytics 価格レベルは PerGB2018 のみ。
sku: {
name: 'PerGB2018'
}
})
}
// Application Insights 作成
// Application Insights は Azure Monitor の拡張機能であり、
// アプリケーション パフォーマンス監視 ("APM" とも呼ばれる) 機能を提供。
// APM ツールは、開発、テスト、運用環境からアプリケーションを監視するのに役立つ。
resource appInsights 'Microsoft.Insights/components@2020-02-02' = {
name: appInsightsName
location: location
// このコンポーネントが参照するアプリケーションの種類。
// 任意の文字列で、値は通常、web、ios、other、store、java、phone のいずれか。
kind: 'web'
properties: {
// 監視アプリケーションの種類
Application_Type: 'web'
// データが取り込まれるログ分析ワークスペースのリソース ID
// (logAnalyticsWorkspace は上で作成しているリソースを参照している)
WorkspaceResourceId:logAnalyticsWorkspace.id
}
}
// マネージド環境(Azure Container Apps の環境)作成
resource environment 'Microsoft.App/managedEnvironments@2022-03-01' = {
// 環境名:'env-${uniqueString(resourceGroup().id)}'
name: environmentName
location: location
properties: {
// サービスをサービス通信テレメトリにエクスポートするために Dapr によって使用される Azure Monitor インストルメンテーション キー
// Application Insights インストルメンテーション キー。
// アプリケーションが Azure Application Insights に送信されるすべてのテレメトリの送信先を識別するために使用できる読み取り専用の値。
// この値は、新しい各 Application Insights コンポーネントの構築時に提供される。
// appInsightsは、上で作成しているApplication Insights。
// 今回は、Dapr を導入しないため、意味無いかも。
daprAIInstrumentationKey:appInsights.properties.InstrumentationKey
appLogsConfiguration: {
// ログ記録先。 現在、「log-analytics」のみがサポートされている。
destination: 'log-analytics'
logAnalyticsConfiguration: {
// Log AnalyticsのcustomerIdとsharedKey
customerId: logAnalyticsWorkspace.properties.customerId
// function list*([apiVersion: string], [functionValues: object]): any
// この関数の構文は、リスト操作の名前によって異なる。
// 一般的な使用法には、listKeys、listKeyValue、および listSecrets がある。
// 各実装は、リスト操作をサポートするリソース タイプの値を返す。
sharedKey: logAnalyticsWorkspace.listKeys().primarySharedKey
}
}
}
}
// output <name> <data-type> = <value>
// デプロイが成功すると、出力値はデプロイの結果で自動的に返される。
// Azure CLI または Azure PowerShell スクリプトでデプロイ履歴から出力値を参照できる。
// az deployment group show \
// -g <resource-group-name> \
// -n <deployment-name> \
// --query properties.outputs.resourceID.value
output location string = location
output environmentId string = environment.idparam containerAppName string
param location string
param environmentName string
param containerImage string
param containerPort int
param isExternalIngress bool
param containerRegistry string
param containerRegistryUsername string
param isPrivateRegistry bool
param enableIngress bool = true
@secure()
param registryPassword string
param minReplicas int = 0
param secrets array = []
param env array = []
param revisionMode string = 'Single'
// existing
// デプロイ済みのリソースを参照。→この後、environment.id で使っている。
// existing キーワードを使って参照した場合、リソースは再デプロイされない。
// 今回の場合、environment.bicepで作成される マネージド環境(Azure Container Apps の環境)への参照。
resource environment 'Microsoft.App/managedEnvironments@2022-03-01' existing = {
name: environmentName
}
var resources = [
{
cpu: '0.25'
memory: '0.5Gi'
}
{
cpu: '0.5'
memory: '1.0Gi'
}
{
cpu: '0.75'
memory: '1.5Gi'
}
{
cpu: '1.0'
memory: '2.0Gi'
}
{
cpu: '1.25'
memory: '2.5Gi'
}
{
cpu: '1.5'
memory: '3.0Gi'
}
{
cpu: '1.75'
memory: '3.5Gi'
}
{
cpu: '2.0'
memory: '4.0Gi'
}
]
// Azure Container Apps 作成
resource containerApp 'Microsoft.App/containerApps@2022-03-01' = {
name: containerAppName
location: location
properties: {
// コンテナー アプリの環境のリソース ID
managedEnvironmentId: environment.id
configuration: {
// activeRevisionsMode: 'Multiple' | 'Single' | string
// ActiveRevisionsMode は、コンテナー アプリのアクティブなリビジョンの処理方法を制御。
// Multiple: 複数のリビジョンをアクティブにできる。
// Single: 一度にアクティブにできるリビジョンは 1 つだけ。
// Singleモードでは、リビジョン ウェイトは使用できない。
// 値が指定されていない場合、Singleモードがデフォルト。(今回は、Multipleを指定)
activeRevisionsMode: revisionMode
// コンテナ アプリで使用されるシークレットのコレクション
// 今回は、main.bicepから以下が渡されている。docker pull するために必要。
// [
// {
// name: registryPassword
// value: containerRegistryPassword
// }
// ]
secrets: secrets
// コンテナー アプリで使用されるコンテナーのプライベート コンテナー レジストリ資格情報のコレクション
// 今回は、プライベート(非公開)で、isPrivateRegistry=trueのため、nullではなく、セットされる。
registries: isPrivateRegistry ? [
{
// GitHub Container Registry (ghcr.io)
server: containerRegistry
// containerRegistryUsername=${{ github.actor }}
username: containerRegistryUsername
// containerRegistryPassword=${{ secrets.GITHUB_TOKEN }}←Settings -> Developer settings -> Personal access tokens
passwordSecretRef: registryPassword
}
] : null
// イングレス設定
// Ingress:外部からのアクセス(主にHTTP)を管理するもの
// インターネット - イングレス - コンテナ
ingress: enableIngress ? {
// httpsのみ
allowInsecure: false
// インターネットに公開(true)
external: isExternalIngress
// コンテナ側のポート(3000)
targetPort: containerPort
// ポート転送方式(auto,http,http2,tcp)
transport: 'auto'
// トラフィック ルールを設定
traffic: [
{
// デプロイされた最新のリビジョン
latestRevision: true
// リビジョンに割り当てられたトラフィックの重み→100=トラフィック分割しない。
weight: 100
// weight: 70 //ブルーグリーン・デプロイメントする場合、ここに割り振っておく。
}
// {
// revisionName: 'react-app--prh39yx'←直近のリビジョン(自動で指定されるような工夫が必要だとは思うが、とりあえず、即値)
// weight: 30
// }
]
} : null
// Daprの設定
dapr: {
// Daprサイドカー無効
enabled: false
}
}
// コンテナー アプリのバージョン管理されたアプリケーション定義。
template: {
// コンテナ アプリのコンテナ定義のリスト。
containers: [
{
// カスタムイメージタグ
image: containerImage
// カスタムコンテナ名
name: containerAppName
// env: EnvironmentVar[]
// コンテナ環境変数。
// 今回は、特に設定しないが、
// env: [
// {
// name: 'HOGEHOGE'
// value: 'foobar'
// }
// ]
// とした場合、例えば、nodeアプリの場合、アプリ側ソースコードで、process.env.HOGEHOGE のように参照できる。
env: env
// cpu: '0.25' memory: '0.5Gi'
resources: resources[0]
// 正常性プローブ
// Container Apps では、次のプローブがサポートされている。
// Liveness: レプリカの全体的な正常性を報告。
// Readiness: レプリカがトラフィックを受け入れる準備ができていることを示す。
// Startup: startup probe を使用して、遅いアプリの健全性または準備状態のレポートを遅延。
probes: [
{
// プローブが成功した後に失敗したと見なされる最小連続失敗回数。
// デフォルトは 3。最小値は 1。最大値は 10。
// failureThreshold: 3
// 実行する http 要求を指定
httpGet: {
// 接続先のホスト名。デフォルトはポッド IP。
// host: 'string'
// リクエストに設定するカスタム ヘッダー。
// httpHeaders: [
// {
// name: 'string'
// value: 'string'
// }
// ]
// アクセス先のパス、ポート番号
path: '/'
port: 3000
// ホストへの接続に使用するスキーム。 デフォルトは HTTP
scheme: 'HTTP'
}
// liveness プローブが開始されるまでのコンテナーの起動後の秒数。 最小値は 1。最大値は 60。
initialDelaySeconds: 60
// プローブを実行する頻度 (秒単位)。 デフォルトは 10 秒。 最小値は 1。最大値は 240。
periodSeconds: 30
// プローブが失敗した後に成功したと見なされるための最小連続成功。デフォルトは 1。LivenessとStartupには 1 である必要がある。 最小値は 1。最大値は 10。
// successThreshold: 1
// TCPSocket は、TCP ポートに関するアクションを指定。 TCP フックはまだサポートされていない。
// tcpSocket: {
// host: 'string'
// port: int
// }
// プローブの失敗時に Pod が正常に終了する必要があるオプションの期間 (秒単位)。
// terminationGracePeriodSeconds: int
// プローブがタイムアウトになるまでの秒数。 デフォルトは 1 秒。 最小値は 1。最大値は 240。
timeoutSeconds: 10
// type: 'Liveness' | 'Readiness' | 'Startup' | string
// プローブの種類
type: 'Startup'
}
]
}
]
scale: {
// minReplicas: int
// オプション。 コンテナー レプリカの最小数。0を指定して、使われていないと、無課金の待機状態になる。
minReplicas: minReplicas
// オプション。 コンテナー レプリカの最大数。 設定されていない場合、デフォルトは 10。
maxReplicas: 1
}
}
}
}
// fqdn = ホスト名
// 今回、全コンテナ enableIngress=true のため、ホスト名が返る。
output fqdn string = enableIngress ? containerApp.properties.configuration.ingress.fqdn : 'Ingress not enabled'サービスプリンシパル作成
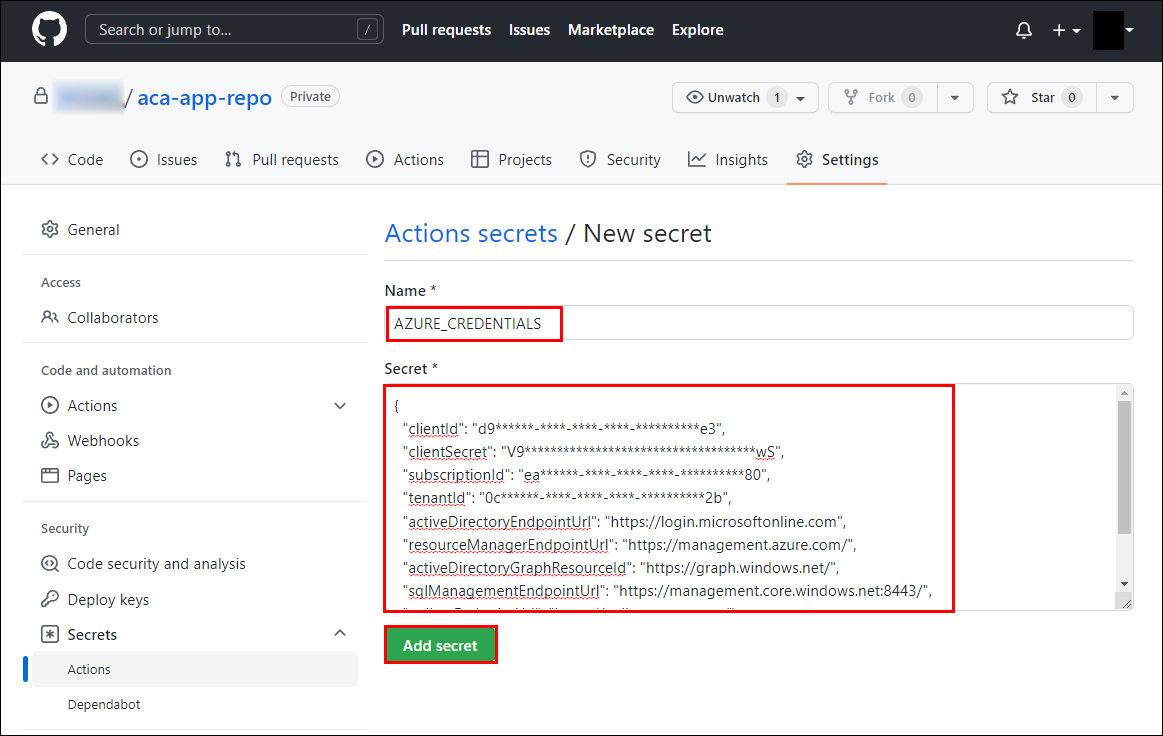
GitHub から Azure の操作を許すためにサービスプリンシパルを作成します。(Azure Active Direcotry の アプリの登録に相当します。)
Azure CLI で、サインインします。
$ az login --use-device-code
To sign in, use a web browser to open the page https://microsoft.com/devicelogin and enter the code H*******W to authenticate.
https://microsoft.com/devicelogin にブラウザでアクセスして、表示されているコード(H*******W)を入力して、サインインします。
Azure CLI 最新版を使っているか確認します。
$ az upgradeサービスプリンシパルを作成します。
$ az ad sp create-for-rbac \
  --name aca-app \
  --role "contributor" \
  --scopes /subscriptions/ea******-****-****-****-**********80 \
  --sdk-auth
aca-app は、アプリ名で、任意です。
ea******-****-****-****-**********80 は、サブスクリプション ID です。
サインインした後の "id": ・・・ に表示されます。
成功したら、以下のような出力が得られます。 この出力は後で使います。
{
  "clientId": "d9******-****-****-****-**********e3",
  "clientSecret": "V9************************************wS",
  "subscriptionId": "ea******-****-****-****-**********80",
  "tenantId": "0c******-****-****-****-**********2b",
  "activeDirectoryEndpointUrl": "https://login.microsoftonline.com",
  "resourceManagerEndpointUrl": "https://management.azure.com/",
  "activeDirectoryGraphResourceId": "https://graph.windows.net/",
  "sqlManagementEndpointUrl": "https://management.core.windows.net:8443/",
  "galleryEndpointUrl": "https://gallery.azure.com/",
  "managementEndpointUrl": "https://management.core.windows.net/"
}
GitHub 準備
リポジトリ作成
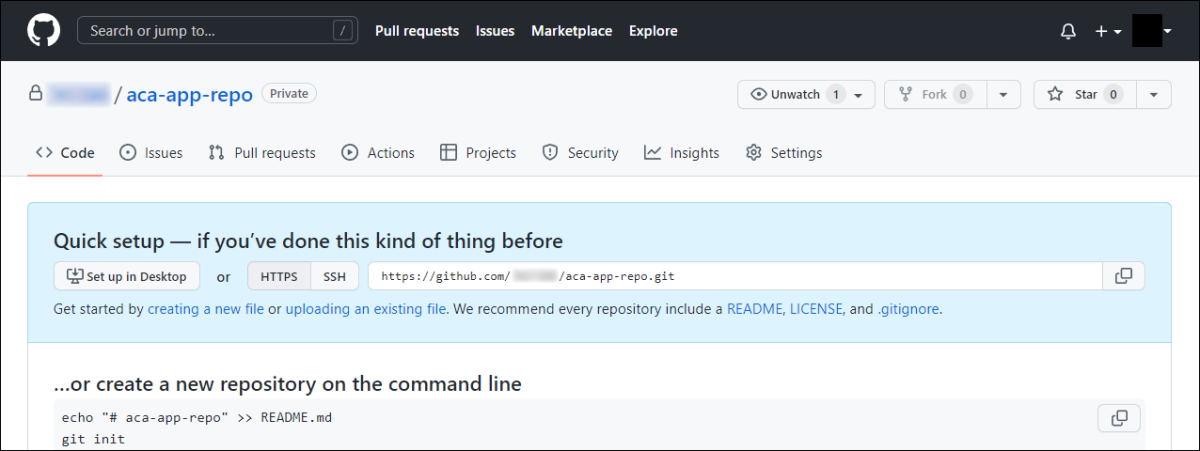
GitHub にプライベートリポジトリ aca-app-repo を作成します。(リポジトリの作り方については省略します。)
リポジトリ名は任意です。(サービスプリンシパルのアプリ名に合わせる必要もありません。)
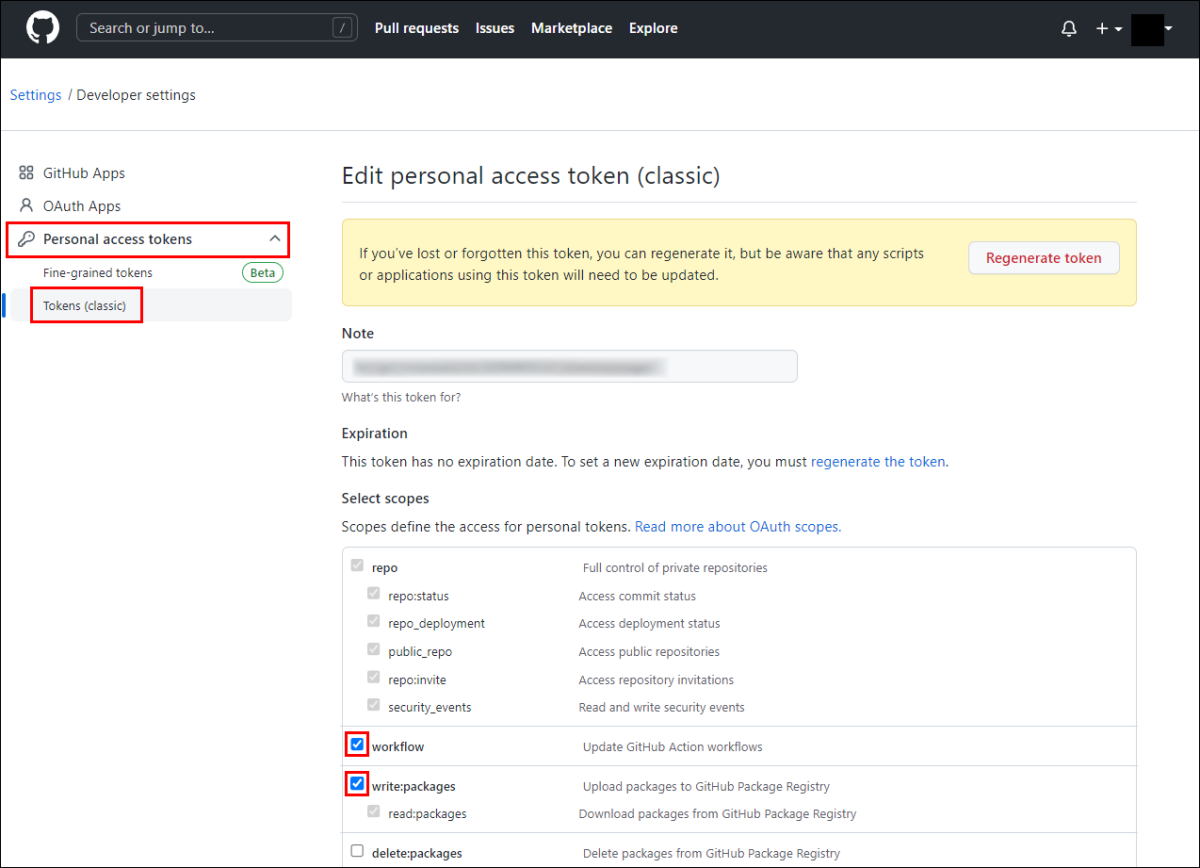
Personal access tokens
・GitHub ワークフロー実行権限(workflow)
・GitHub Container Registry への push 権限(write:packages)
を有効にします。
Settings -> 左下の Developer settings -> Personal access tokens -> Tokens (classic)
にて、workflow と write:packages にチェックを入れ、Update token をクリックします。


シークレット
シークレット(ワークフロー内で使う秘密の値)を設定します。
リポジトリ aca-app-repo に戻って、
Settings -> Secrets -> Actions -> New repository secret をクリックします。
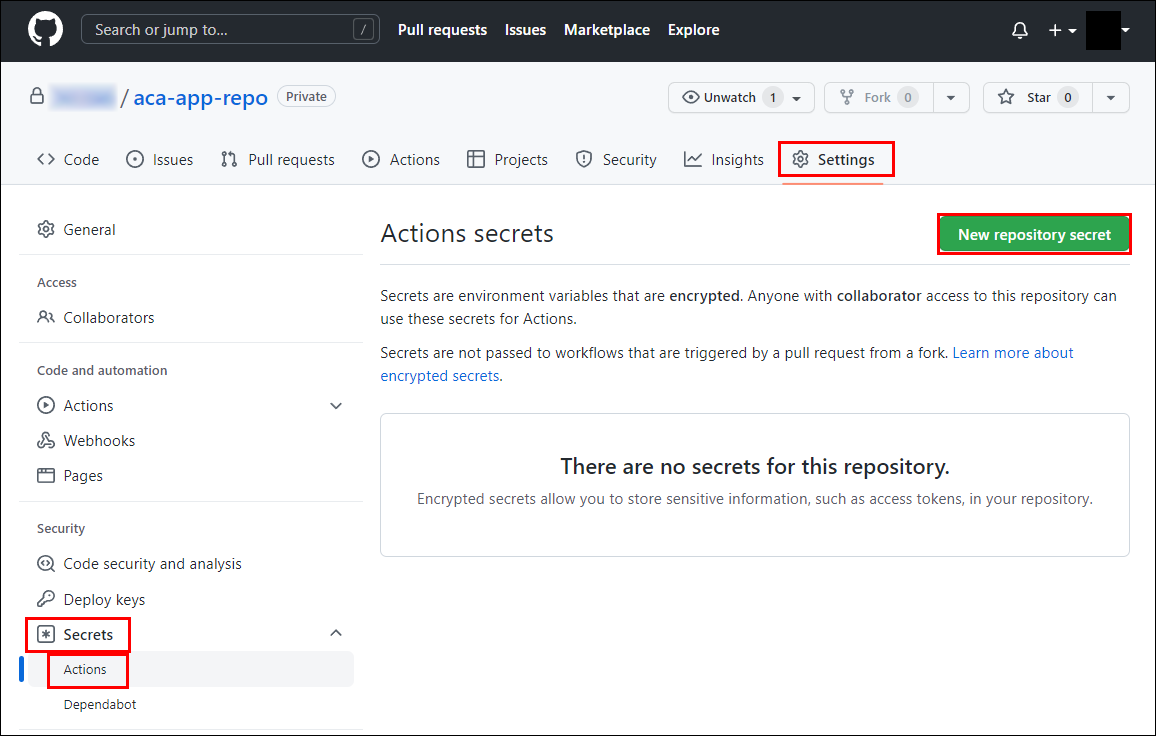
ここに、以下を設定します。
AZURE_CREDENTIALS:先ほどサービス プリンシパルの作成のときの JSON 出力
RESOURCE_GROUP:my-containerapp-store(Azure リソースグループ名。任意。)
commit & push
リポジトリ aca-app-repo main ブランチに push します。
$ git init
$ git config --local user.name "AAAAA BBBBB"
$ git config --local user.email "xxxxx@example.com"
$ git add .
$ git commit -m "first commit"
$ git branch -M main
$ git remote add origin https://github.com/<github user name>/aca-app-repo.git
$ git push -u origin main
<github user name> 部分は、GitHub ユーザー名です。
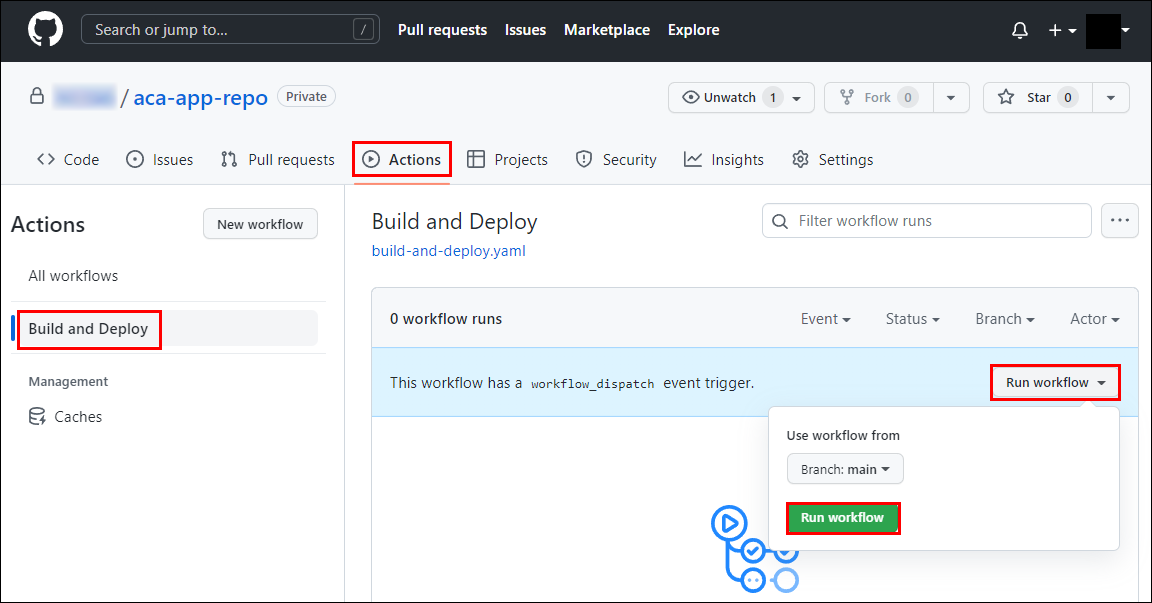
Run workflow
Actions -> Build and Deploy -> Run workflow
をクリックして、Branch: main のままにして、Run workflow をクリックします。
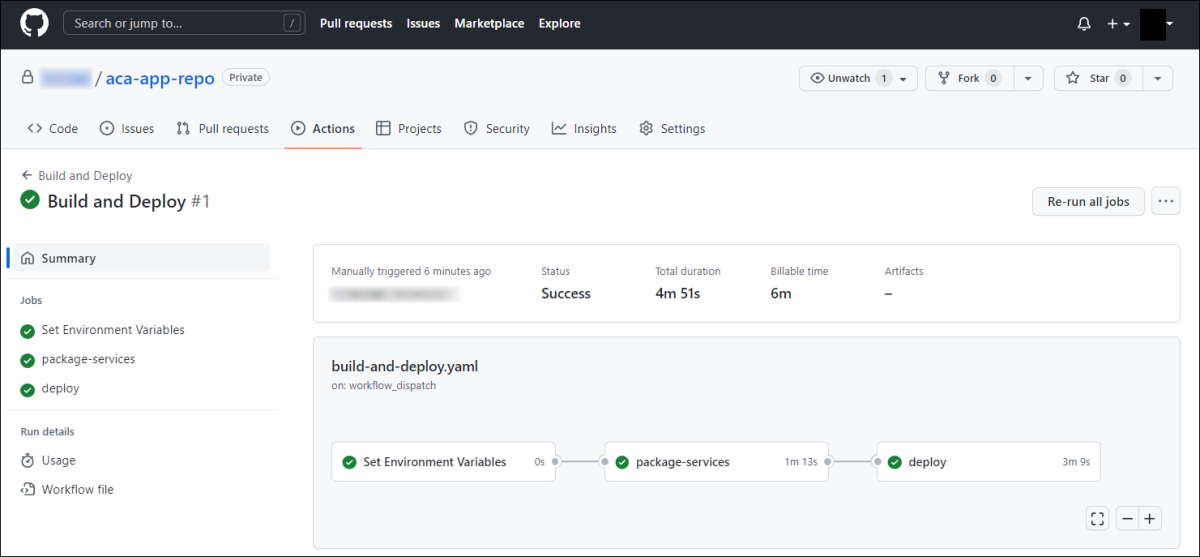
Set Environment Vairables ジョブ
後続のジョブで使用する値を生成しています。
↓
package-services ジョブ
docker コンテナをビルドして、コンテナレジストリ(ghcr.io)にビルドしたコンテナを push しています。
↓
deploy ジョブ
Azure リソースをデプロイしています。
(既にデプロイ済みの場合は、Azure Container Apps アプリreact-appのリビジョンが一つ増えます。)
と進んで、全て緑色のチェックが付いたら、デプロイ完了です。
deploy ジョブで作成されるリソースは、以下です。
・ログ分析ワークスペース
・Application Insights
・Azure Container Apps の環境
・Azure Container Apps のアプリ
Azure Container Apps アプリ react-app のアプリ名は、./deploy/main.bicep の
var reactFrontendAppName = 'react-app'
に書かれています。(アプリ名は任意です。)
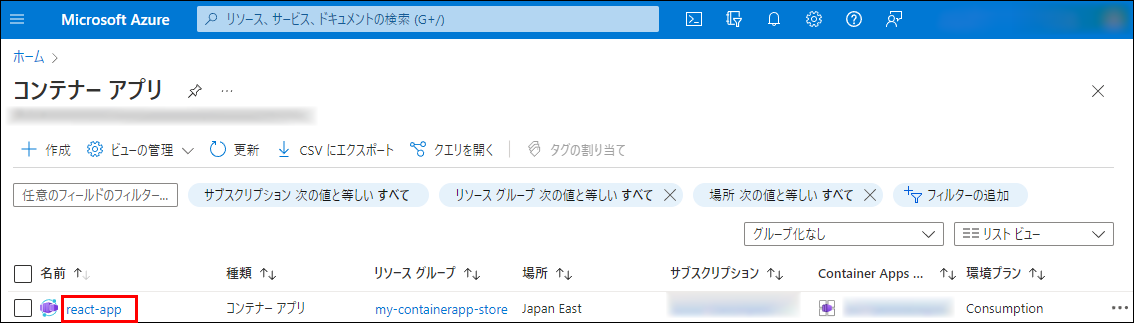
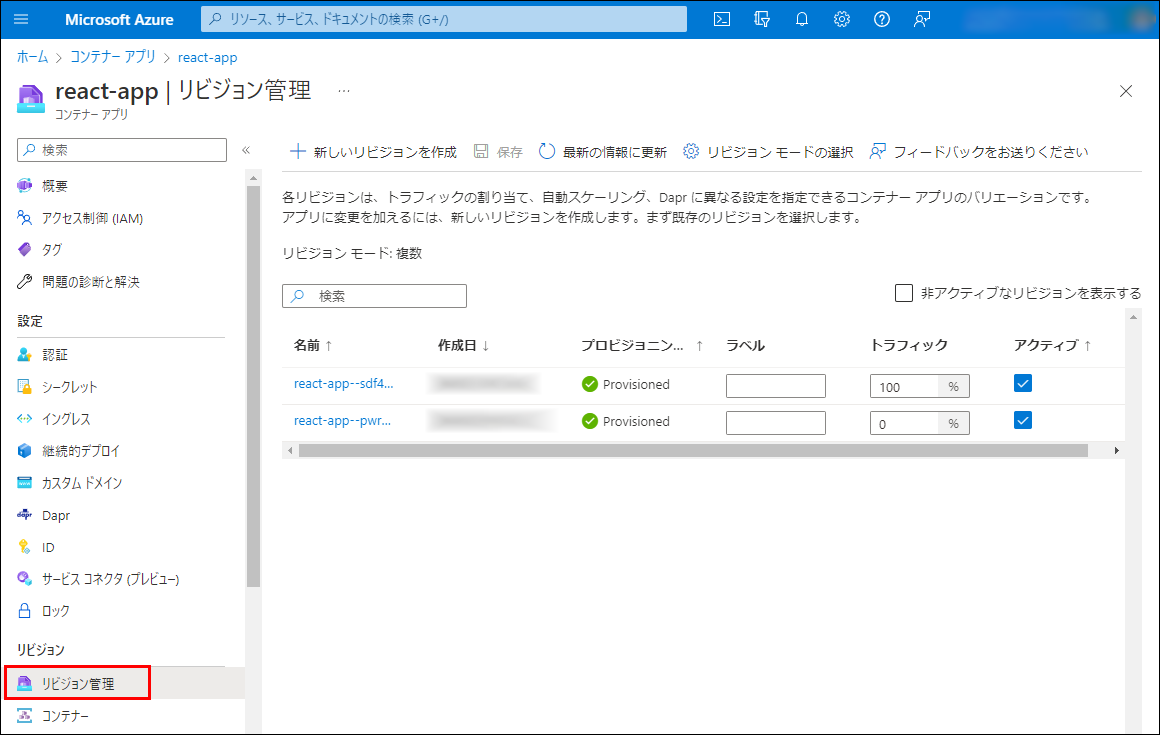
動作確認1
Azure Portal(https://portal.azure.com/) -> コンテナ― アプリ -> react-app -> リビジョン管理
を見ると、リビジョンが一つだけ有ることが分かります。
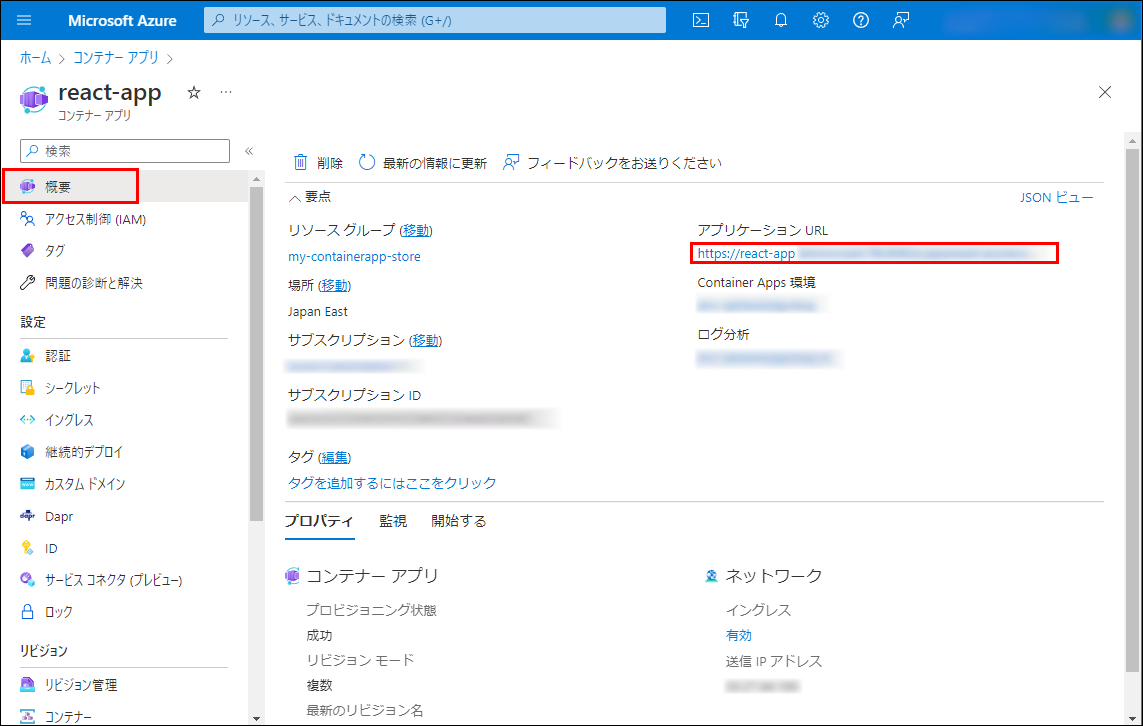
概要 から アプリケーション URL にアクセスすると、アプリが起動しています。
CI/CD
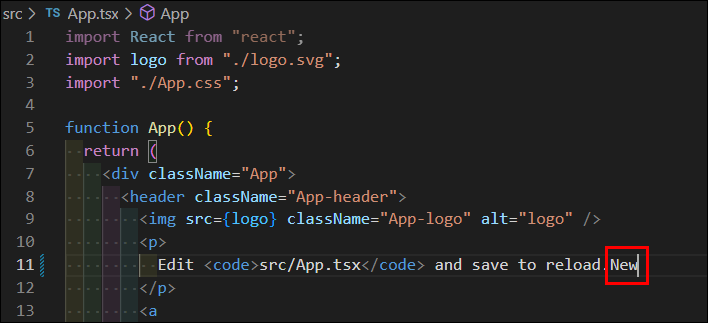
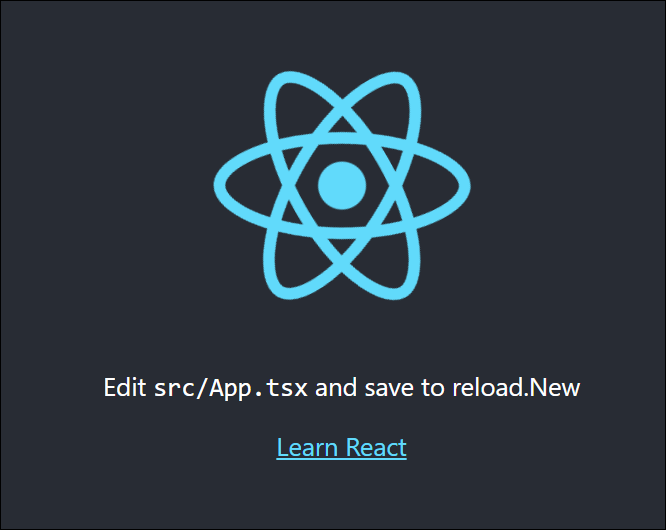
App.tsx のメッセージに "New" という言葉を足して、commit & push します。
$ git add .
$ git commit -m "second commit"
$ git push
動作確認2
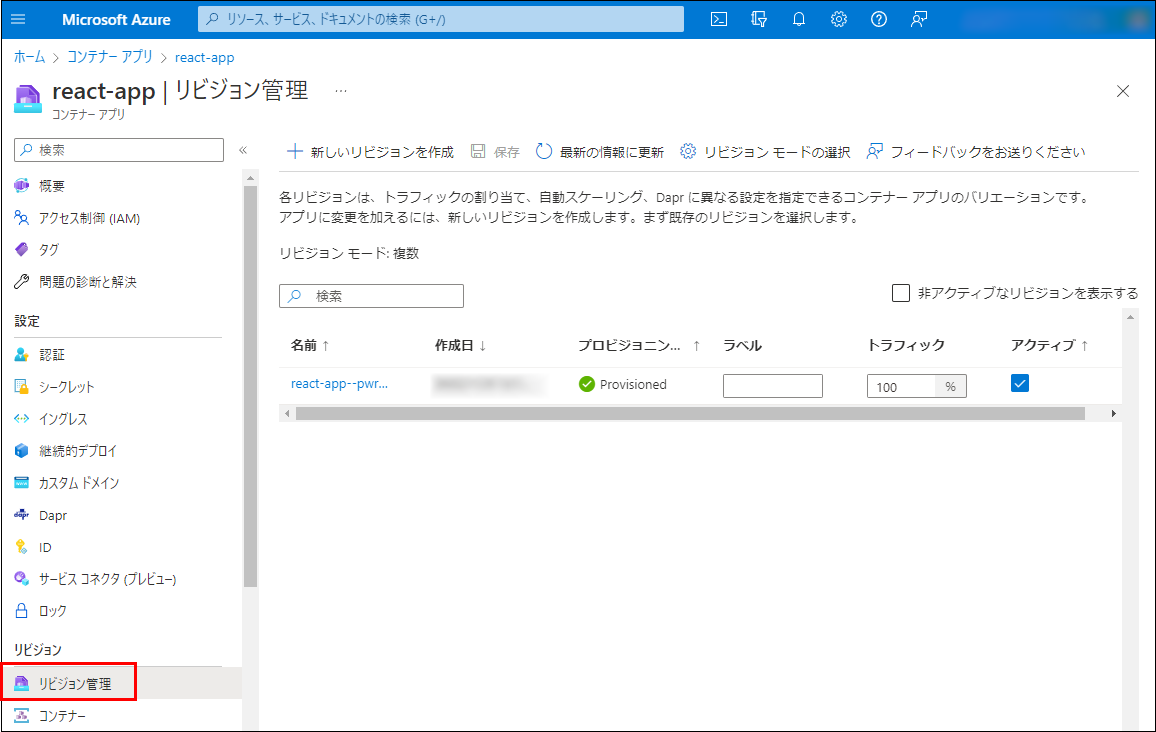
Azure Portal(https://portal.azure.com/) -> コンテナ― アプリ -> react-app -> リビジョン管理
を見ると、リビジョンが二つ有ることが分かります。
概要 から アプリケーション URL にアクセスすると、アプリが起動しています。"New" という言葉が反映された最新アプリということが分かります。
一連の作成物は、以下のコマンドでリソースグループごと削除することで、まとめて削除できます。
$ az group delete \
  --resource-group my-containerapp-store
注意点
シングルリビジョン、スケーリング 1Pod 固定(0Pod になることは無い)の場合、安定しましたが、マルチリビジョンでトラフィックの分割、ブルーグリーンデプロイメントを試そうかと思いましたが、問題が生じました。
2022年11月現在の情報です。ただ勘違いしているだけの可能性もありますので、ご了承ください。
初回起動に失敗することがある?
「チュートリアル: Azure Container Apps に GitHub Actions を使用して Dapr アプリケーションをデプロイする」
でも同じなのですが、初回起動に失敗し、リビジョン管理 - プロビジョニングの状態 が Failed になることがありました。
リビジョン管理→[リビジョン名] をクリックして、
リビジョンの詳細からコンソールログを見ると、Pod 起動直後に SIGQUIT されていました。
[notice] 1#1: signal 3 (SIGQUIT) received, shutting down
Microsoft.App/containerApps@2022-03-01 のところの template: { に Startup プローブを追加して、起動待ち時間を長くしたら、安定して起動するようになりました。(注意:そんな気がしただけかもしれません。)
    template: {
      containers: [
        {
          image: containerImage
          name: containerAppName
・・・
          probes: [
            {
              httpGet: {
                path: '/'
                port: 3000
                scheme: 'HTTP'
              }
              initialDelaySeconds: 60
              periodSeconds: 30
              timeoutSeconds: 10
              type: 'Startup'
            }
          ]
        }
      ]
      scale: {
・・・
      }
    }
Pod 更新時 pull できない?
アクティブを非アクティブにしたり、トラフィックを変更したりすると、以下のエラーになりました。
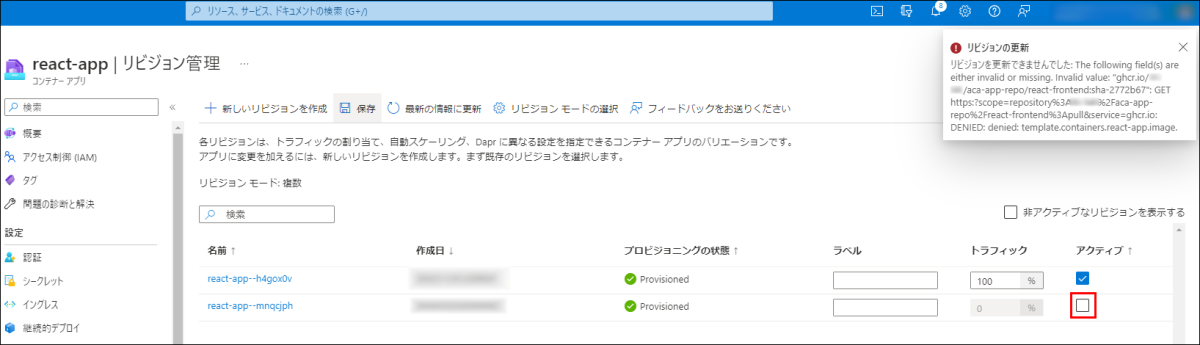
新しいリビジョンをデプロイできませんでした: The following field(s) are either invalid or missing. Invalid value: "ghcr.io/xxxxx/aca-app-repo/react-frontend:sha-86eefdb": GET https:?scope=repository%3Axxxxx%2Faca-app-repo%2Freact-frontend%3Apull&service=ghcr.io: DENIED: denied: template.containers.react-app.image.
Pod の再作成時、コンテナレジストリからの pull に失敗しているようでした。
また、しばらく何もしないと、Pod が 0 になり、アクセスすると、1 になるはずですが、そこでも pull に失敗し、アクセスできなくなりました。
GitHub Container Registry(ghcr.io)のコンテナを Private から Public に変更しても同様でしたので、権限の問題ではないように思えました。
Bicep 経由でトラフィックを変更すると、問題無く変更できましたが、pull に失敗する状況は改善しませんでした。
非アクティブにするのは、コマンドラインで実行すると、成功しましたが、やはり、pull に失敗する状況は改善しませんでした。
$ az containerapp revision deactivate \
  --revision react-app--8l8e708 \
  --resource-group my-containerapp-store
チュートリアルの通りの Bicep でエラー
2022年11月13日 追記:
以下のエラーは、Bicep CLI v0.12.1 → Bicep CLI v0.12.40 に更新にて、発生しなくなりました。【修正前】が正しい形になります。
検証時のタイミングが悪かったようです。
VSCodeのBicep拡張機能の方は、いつの間にか、v0.12.40になっていて、エラーにならなくなりました。(以前は、コードにエラー表示されていました。)
GitHub Actionsの方は、現在はエラーにならなくなっていました。
「チュートリアル: Azure Container Apps に GitHub Actions を使用して Dapr アプリケーションをデプロイする」
の Bicep でも発生しましたが、そのままの場合、
Error BCP070: Argument of type "null | object" is not assignable to parameter of type "Ingress | null".
のエラーになって、デプロイに失敗しました。
今回の場合、enableIngress は、常に true のため、【修正前】から、【修正後】に修正しました。
【修正前】
      ingress: enableIngress ? {
        external: isExternalIngress
        targetPort: containerPort
        transport: 'auto'
        traffic: [
          {
            latestRevision: true
            weight: 100
          }
        ]
      } : null
【修正後】
      ingress: {
        external: isExternalIngress
        targetPort: containerPort
        transport: 'auto'
        traffic: [
          {
            latestRevision: true
            weight: 100
          }
        ]
      }
enableIngress の true false により切り替える正解の形は分かりませんでした。
その他、宣伝、誹謗中傷等、当方が不適切と判断した書き込みは、理由の如何を問わず、投稿者に断りなく削除します。
書き込み内容について、一切の責任を負いません。
このコメント機能は、予告無く廃止する可能性があります。ご了承ください。
コメントの削除をご依頼の場合はXのDM等でご連絡ください。


