- 記事一覧 >
- ブログ記事

httpsのGitLabをDocker for Windowsでdocker run,docker-compose
はじめに
Docker for Windows を VMware Workstation 16 の Windows10 PRO にインストールして、GitLab CE を docker run で起動してみました。さらに、docker-compose up でも起動してみました。今回、その手順をDocker for Windows インストールのところから書きたいと思います。
目次
1.Docker for Windows インストール
2.データ領域変更 C:\->D:\
3.GitLab インストール(docker run 編)
4.GitLab インストール(docker-compose 編)
【ホストPC検証環境】
VMware Workstation 16 Pro
Windows 10 Pro 64-bit 20H2
Docker Desktop 4.3.2 (72729)
【Dockerコンテナ環境】
GitLab CE v14.6.3
この記事に「Dockerとは」「docker-composeとは」の説明はありませんが、知らないままでもできると思います。
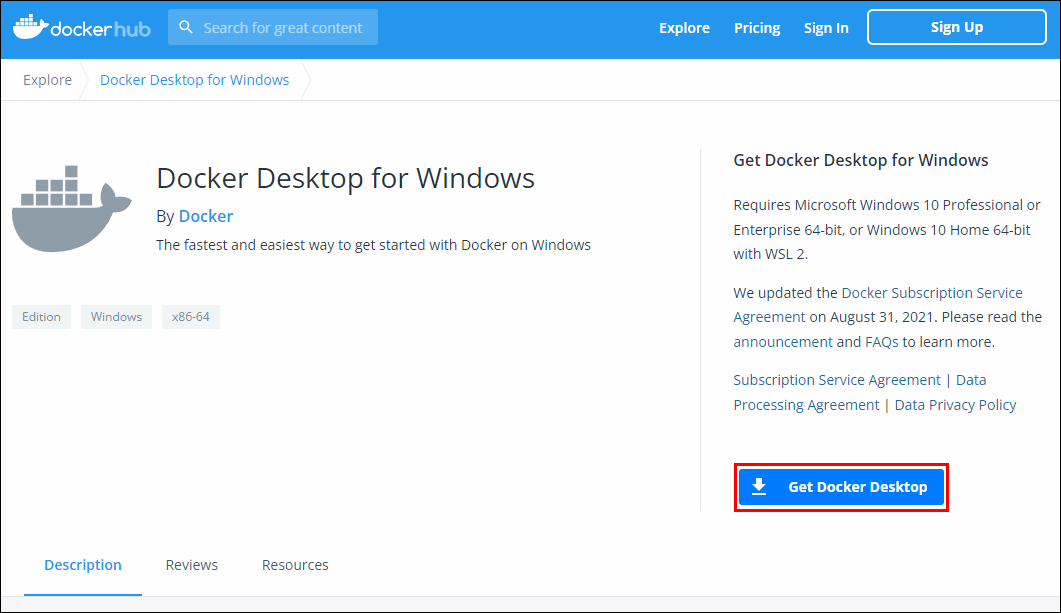
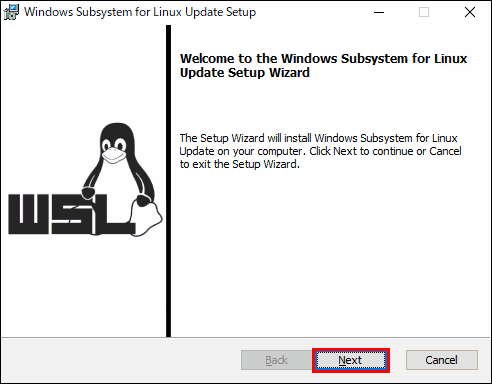
Docker for Windows インストール
Docker Desktop for Windows を以下からダウンロードします。
https://hub.docker.com/editions/community/docker-ce-desktop-windows/
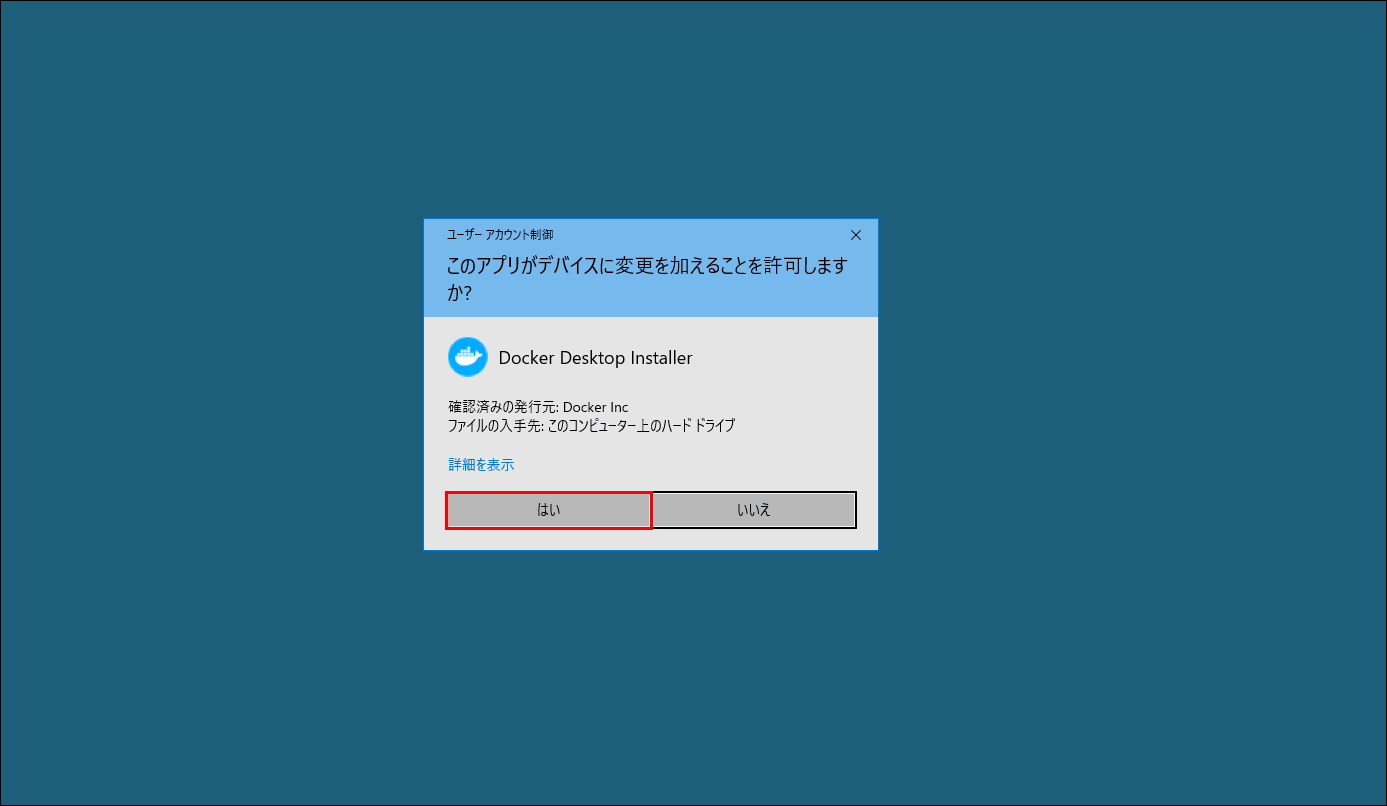
ダウンロードし終わったら、インストーラーを起動します。

Windows を再起動します。

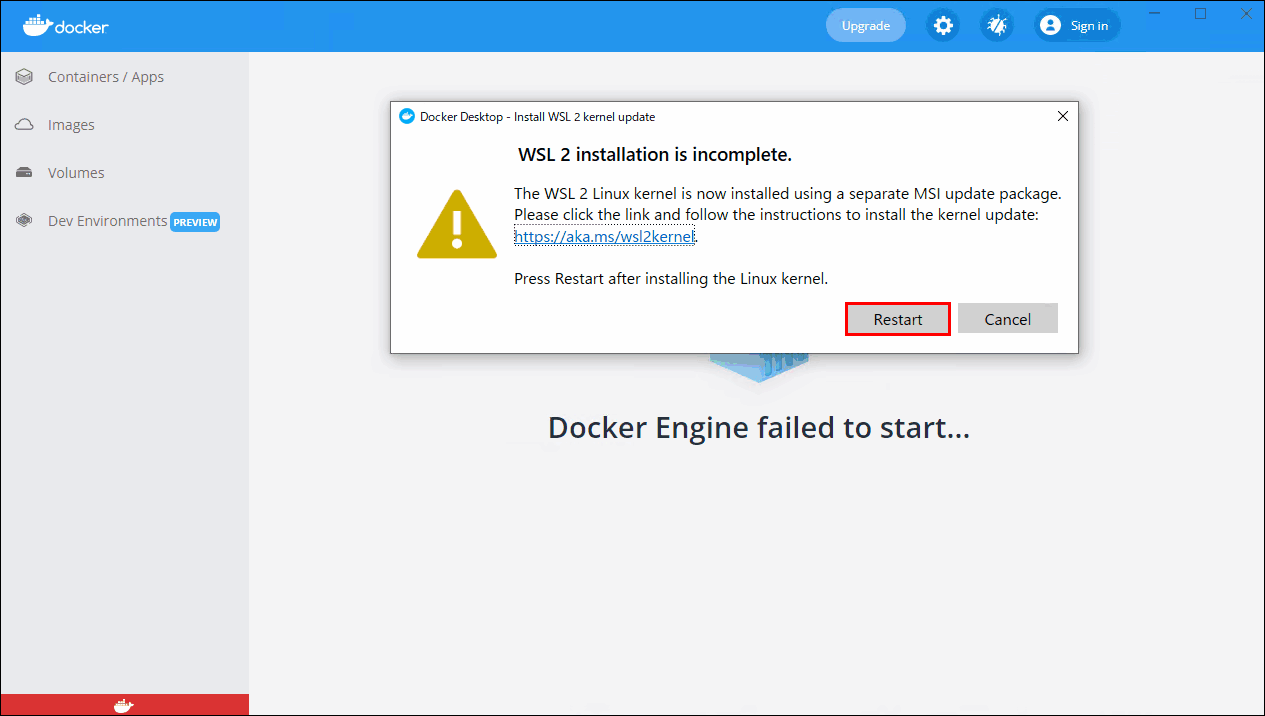
Docker for Windows が起動してきて、以下のエラーになりました。
WSL 2 installation is incomplete.
The WSL 2 Linux kernel is now installed using a separate MSI update package.
Please click the link and follow the instructions to install the kernel update:
https://aka.ms/wsl2kernel.
Press Restart after installing the Linux kernel.
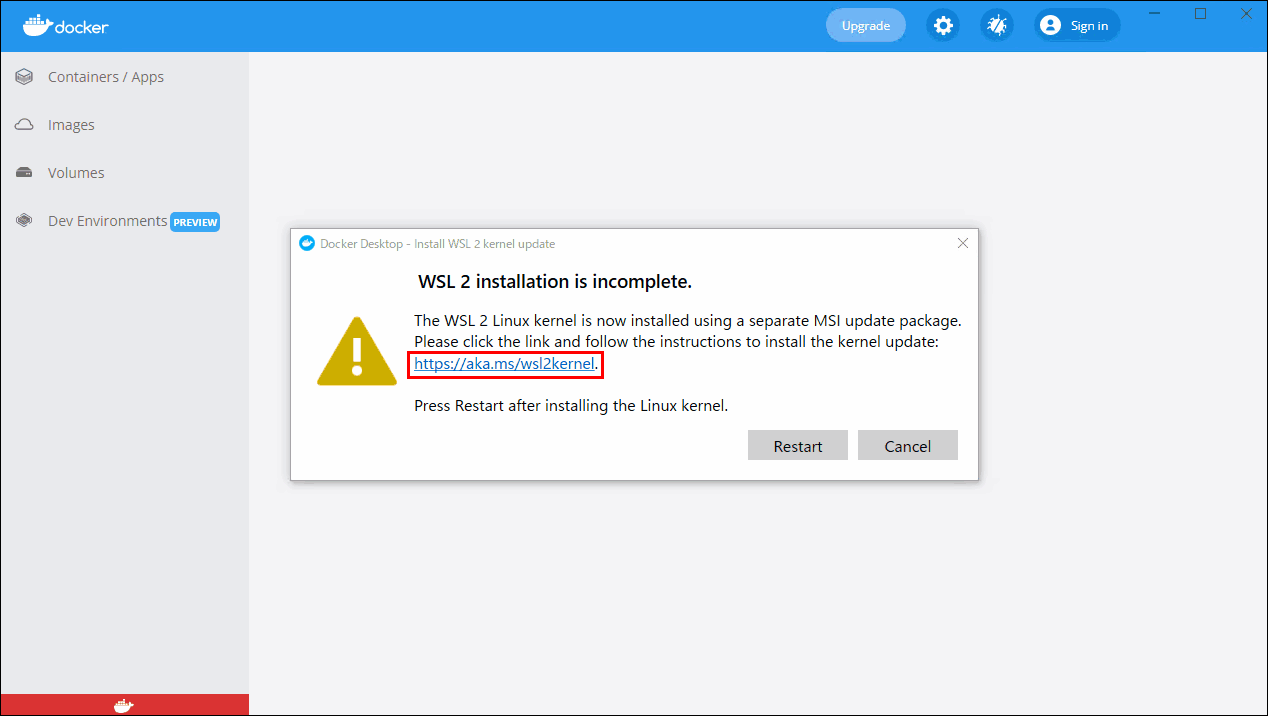
https://aka.ms/wsl2kernelへアクセスすると、ダウンロードするリンクがあります。
https://aka.ms/wsl2kernelのフルURLは、以下です。
https://docs.microsoft.com/ja-jp/windows/wsl/install-manual#step-4---download-the-linux-kernel-update-package

ダウンロードして、WSL 2 Linux kernel を更新します。

再び元のエラーダイアログに戻って、「Restart」をクリックします。
またエラーです。
System.InvalidOperationException:
Failed to deploy distro docker-desktop to C:\Users\admin\AppData\Local\Docker\wsl\distro: exit code: -1
stdout: Windows の仮想マシン プラットフォーム機能を有効にして、BIOS で仮想化が有効になっていることを確認してください。

エラー文言の通り、原因は、Windows10 仮想マシンの BIOS で仮想化支援機能 "ネストされた仮想化技術 (VT)" が有効になっていないからでした。
どういうことかと言うと、仮想マシンの Windows10 の中に仮想化支援機能が必要な Docker をインストールしようとしているからです。
「Quit」をクリックして閉じます。
一旦シャットダウンして、該当 Windows10 仮想マシンの *.vmx をエディタで編集します。
vhv.enable = "TRUE"
の1行を追加します。


追加したら、仮想マシンを起動します。

OKです!
"Skip tutorial"をクリックして、先に進めます。(初めての場合、チュートリアルをやった方が良いと思いますが。)

この状態になったら、インストール成功です。
もしかしたら、WSL 関係でいろいろ準備が必要かもしれませんが、今回の環境では、これで起動しました。
例えば、
> wsl --status
既定の配布: docker-desktop
既定のバージョン: 2で、バージョン: 1 になっている場合、
https://docs.microsoft.com/ja-jp/windows/wsl/install-manual の
「手順 5 - WSL 2 を既定のバージョンとして設定する」
> wsl --set-default-version 2が必要になるようです。
「手順 6 - 選択した Linux ディストリビューションをインストールする」は、必要無かったです。
Ubuntu とかインストールする必要は有りません。
> wsl --list
Linux 用 Windows サブシステム ディストリビューション:
docker-desktop (既定)
docker-desktop-data
データ領域変更 C:\->D:\
C ドライブは容量が少なかったため、D ドライブに変更しました。必須ではありません。
初期状態の時、Docker のデータ領域は、
%LOCALAPPDATA%\Docker\wsl\data
%LOCALAPPDATA%\Docker\wsl\distro
です。
今回の場合、
C:\Users\admin\AppData\Local\Docker\wsl\data
C:\Users\admin\AppData\Local\Docker\wsl\distro
でした。
何もしていない段階で、
data: 747 MB
distro: 137 MB
でした。
wsl --listで表示される2つの distro(ディストリビューション)の内、
docker-desktop は "bootstrapping distro" で、distro フォルダです。
docker-desktop-data は "data store distro" で、data フォルダです。
参考:https://www.docker.com/blog/new-docker-desktop-wsl2-backend/
※distro というのは、仮想マシンのような意味です。
今回、
C:\Users\admin\AppData\Local\Docker\wsl\data
↓
D:\Docker\wsl\data
C:\Users\admin\AppData\Local\Docker\wsl\distro
↓
D:\Docker\wsl\distro
と変更します。
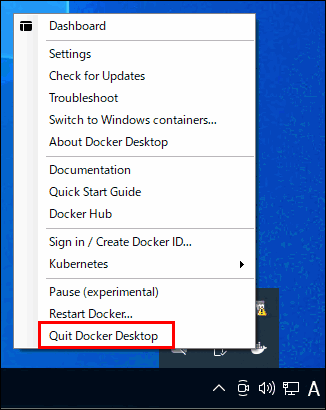
クジラアイコンを右クリックして、
「Quit Docker Desktop」をクリックし、
Docker Desktop を停止します。

クジラが潮を吹いている場合、裏で何かやっていますので、しばらく待つ必要があります。
> wsl --list --verbose
  NAME                   STATE           VERSION
* docker-desktop         Stopped         2
  docker-desktop-data    Stopped         2
Stopped になっていたら、作業を続行して構いません。
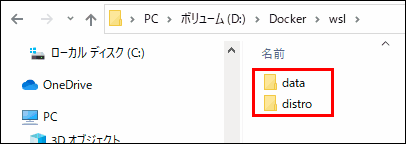
D:\Docker\wsl\data
D:\Docker\wsl\distro
フォルダを作成します。
現在の distro をエクスポートします。
> wsl --export docker-desktop "D:\Docker\wsl\docker-desktop-distro.tar"
> wsl --export docker-desktop-data "D:\Docker\wsl\docker-desktop-data.tar"
distro を削除します。
> wsl --unregister docker-desktop
> wsl --unregister docker-desktop-data
%LocalAppData%\Docker\wsl\distro\ext4.vhdx
%LocalAppData%\Docker\wsl\data\ext4.vhdx
が削除されます。
インポートします。
> wsl --import docker-desktop "D:\Docker\wsl\distro" "D:\Docker\wsl\docker-desktop-distro.tar" --version 2
> wsl --import docker-desktop-data "D:\Docker\wsl\data" "D:\Docker\wsl\docker-desktop-data.tar" --version 2
インポートされたか確認します。
> wsl --list --verbose
  NAME                   STATE           VERSION
* docker-desktop         Stopped         2
  docker-desktop-data    Stopped         2
docker-desktop と docker-desktop-data、2つ表示されたら成功です。
Docker を起動します。
> "C:\Program Files\Docker\Docker\Docker Desktop.exe"GitLab インストール(docker run 編)
コンテナ作成
ボリュームを作成します。
> docker volume create gitlab-data-vol
> docker volume create gitlab-log-vol
> docker volume create gitlab-config-vol
gitlab-ce 最新版コンテナを作成、起動します。コンテナの名前は、gitlab です。
> docker run --detach ^
  --publish 443:443 --publish 80:80 --publish 22:22 ^
  --name gitlab ^
  --restart always ^
  --volume gitlab-config-vol:/etc/gitlab ^
  --volume gitlab-log-vol:/var/log/gitlab ^
  --volume gitlab-data-vol:/var/opt/gitlab ^
  gitlab/gitlab-ce:latest
cmd.exeのコマンド例です。ハット
^の部分は、PowerShellの場合、バッククォート`です。
Digest: sha256:fcfd3bf76c60891fd8400e2984b706083739d49127b20eb788cd292b5e94846f
Status: Downloaded newer image for gitlab/gitlab-ce:latest
82d1b92b45181cc79e17bc2bcda5d9774eb7a904db2285d50ff6631fececd1e4
docker: Error response from daemon: Ports are not available: listen tcp 0.0.0.0:80: bind: An attempt was made to access a socket in a way forbidden by its access permissions.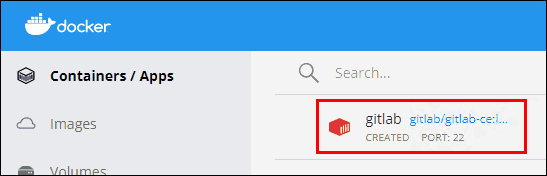
作成には成功しましたが、エラーが表示されて起動に失敗しました。
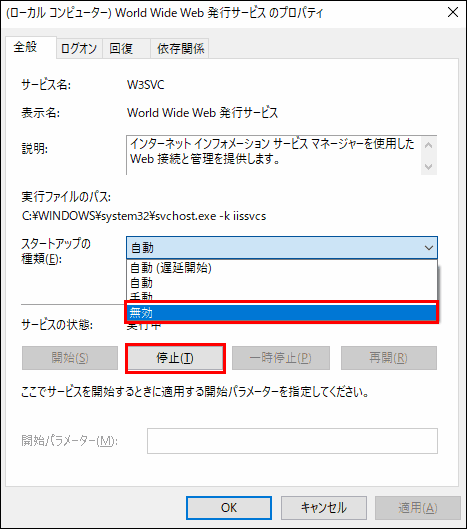
Windows の「World Wide Web 発行サービス」が 80 番ポートを使用しているためでした。
サービス管理画面で、停止、かつ、Windows 再起動時にサービスが再び立ち上がってこないように、無効にしておきます。
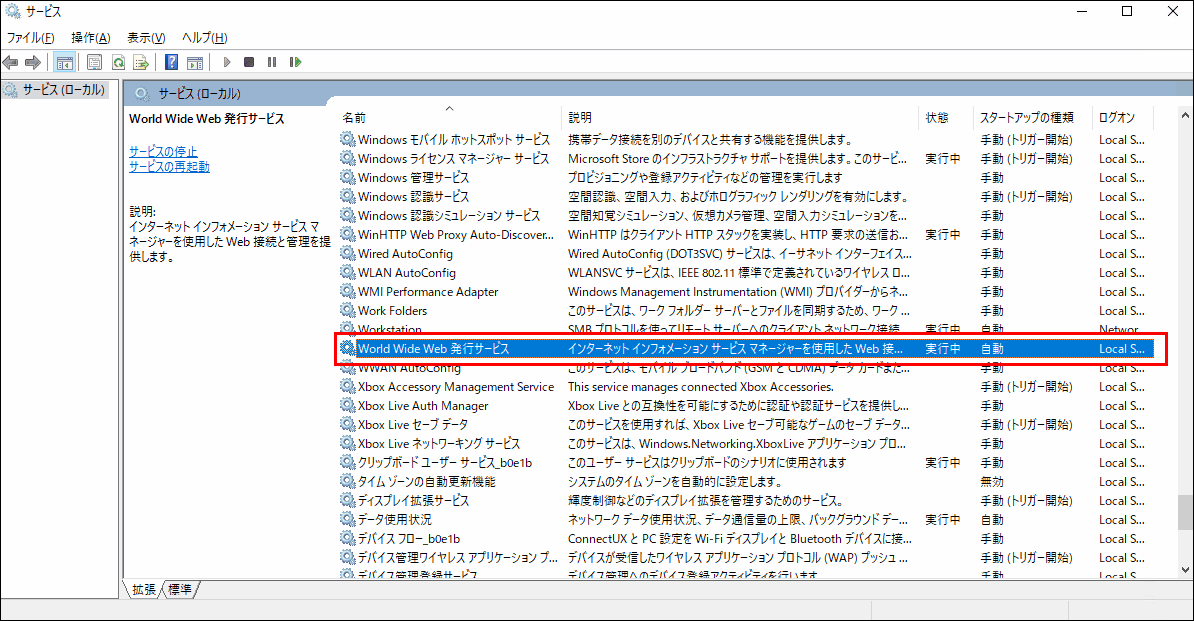
タスクマネージャーで見る場合、
名前: W3SVC
説明: World Wide Web 発行サービス
グループ: iissvcs
が同じサービスを指しています。
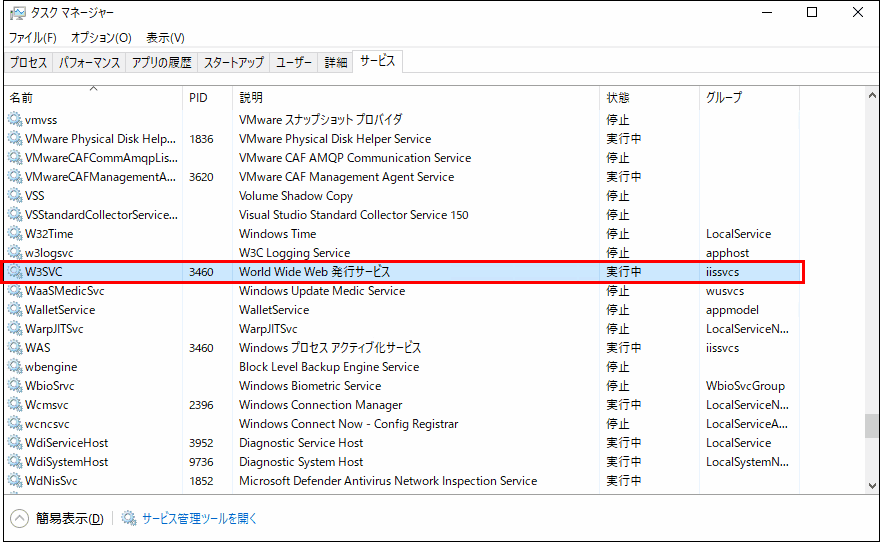
該当のサービス名が異なるなど、いろいろなケースがあると思いますが、今回は、それだけで続行できました。
コンテナは作られたので、runではなく、startで起動します。
> docker start gitlabホスト名設定
コンテナの中に入ります。コンテナ名は、"gitlab"です。
> docker exec -it gitlab /bin/bashGitLab の設定を変更します。
# vi /etc/gitlab/gitlab.rbGitLab のホスト名を設定します。
今回、
ホスト名:
gitlab-9.itccorporation.jpIPアドレス:
192.168.11.9とします。
# url and port of http(s) access
external_url 'http://gitlab-9.itccorporation.jp/'
# ssh access address, ssh port has another configuration item
gitlab_rails['gitlab_ssh_host'] = '192.168.11.9'
設定を反映します。
# gitlab-ctl reconfigure
# gitlab-ctl restarthttp://gitlab-9.itccorporation.jp/にアクセスして、ここまでで問題無いか確認してみます。
ヨシ!
メール設定
メールの設定を行います。
# vi /etc/gitlab/gitlab.rb設定は一例です。gmailの設定は、別記事
「Ubuntu 20.04.2.0にGitLabをインストール」にあります。
メールを利用しない場合は、スキップしても構いません。
gitlab_rails['smtp_enable'] = true
gitlab_rails['smtp_address'] = "mail.example.com"
gitlab_rails['smtp_port'] = 587
gitlab_rails['smtp_user_name'] = "foobar"
gitlab_rails['smtp_password'] = "password"
gitlab_rails['smtp_domain'] = "mail.example.com"
gitlab_rails['smtp_authentication'] = "plain"
gitlab_rails['smtp_enable_starttls_auto'] = false
gitlab_rails['smtp_tls'] = false

gitlab_rails['gitlab_email_from'] = 'gitlab-docker@example.com'
gitlab_rails['gitlab_email_reply_to'] = 'gitlab-docker@example.com'
設定を反映します。
# gitlab-ctl reconfigureメール設定が問題無いか確認します。
# gitlab-rails consolesmtp が有効かどうか確認します。以下のように表示されれば、問題ありません。
> ActionMailer::Base.delivery_method
=> :smtp
メール送信設定の設定状況を確認します。以下のように表示されれば、問題ありません。
> ActionMailer::Base.smtp_settings
=> {:authentication=>:plain, :user_name=>"foobar", :password=>"password", :address=>"mail.example.com", :port=>587, :domain=>"mail.example.com", :enable_starttls_auto=>false, :tls=>false, :ca_file=>"/opt/gitlab/embedded/ssl/certs/cacert.pem"}
メール送信テストをします。以下のように表示されて、実際にメールを受け取れれば問題ありません。
> Notify.test_email('foobar@example.com', 'Message Subject', 'Message Body').deliver_now
Delivered mail 61e65ef22a378_1b6e5adc594e7@94228cb76ed1.mail (611.5ms)
=> #<Mail::Message:154840, Multipart: false, Headers: <Date: Tue, 18 Jan 2022 14:39:18 +0000>, <From: GitLab <gitlab-docker@example.com>>, <Reply-To: GitLab <gitlab-docker@example.com>>, <To: foobar@example.com>, <Message-ID: <61e65ef22a378_1b6e5adc594e7@94228cb76ed1.mail>>, <Subject: Message Subject>, <Mime-Version: 1.0>, <Content-Type: text/html; charset=UTF-8>, <Content-Transfer-Encoding: 7bit>, <Auto-Submitted: auto-generated>, <X-Auto-Response-Suppress: All>>
SSL 設定
https://で稼働するように設定していきます。
自己署名証明書を作成します。
詳しい説明は省略します。詳しい説明は、別記事「CentOS8 & Apache の自己署名証明書作成と証明書エラー回避」にあります。
# openssl genrsa -out ca.key 2048
# openssl req -new -key ca.key -out ca.csr
Country Name (2 letter code) [AU]:JP
State or Province Name (full name) [Some-State]:Aichi
Locality Name (eg, city) []:Toyota
Organization Name (eg, company) [Internet Widgits Pty Ltd]:
Organizational Unit Name (eg, section) []:
Common Name (e.g. server FQDN or YOUR name) []:gitlab-9.itccorporation.jp
Email Address []:

Please enter the following 'extra' attributes
to be sent with your certificate request
A challenge password []:
An optional company name []:
# echo "subjectAltName=DNS:*.itccorporation.jp,IP:192.168.11.9" > san.txt
# openssl x509 -req -days 365 -in ca.csr -signkey ca.key -out ca.crt -extfile san.txt
Signature ok
subject=C = JP, ST = Aichi, L = Toyota, O = Default Company Ltd, CN = gitlab-9.itccorporation.jp
Getting Private key
# mkdir /etc/gitlab/ssl
# mv ca.crt /etc/gitlab/ssl/gitlab-9.itccorporation.jp.crt
# mv ca.key /etc/gitlab/ssl/gitlab-9.itccorporation.jp.key
# mv ca.csr /etc/gitlab/ssl/gitlab-9.itccorporation.jp.csr
URL をhttps://に変更します。
# vi /etc/gitlab/gitlab.rbexternal_url 'https://gitlab-9.itccorporation.jp'さらに以下も設定します。
nginx['redirect_http_to_https'] = true

nginx['ssl_certificate'] = "/etc/gitlab/ssl/gitlab-9.itccorporation.jp.crt"
nginx['ssl_certificate_key'] = "/etc/gitlab/ssl/gitlab-9.itccorporation.jp.key"
設定を反映します。
# gitlab-ctl reconfigure
# gitlab-ctl restarthttps://gitlab-9.itccorporation.jp/にアクセスして、ここまでで問題無いか確認してみます。
ヨシ!
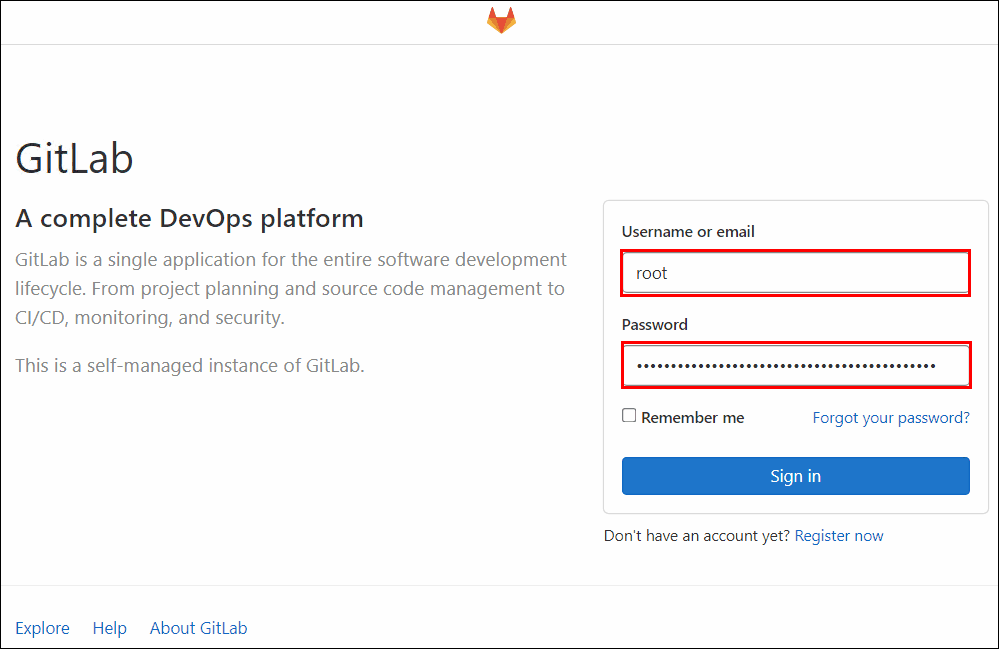
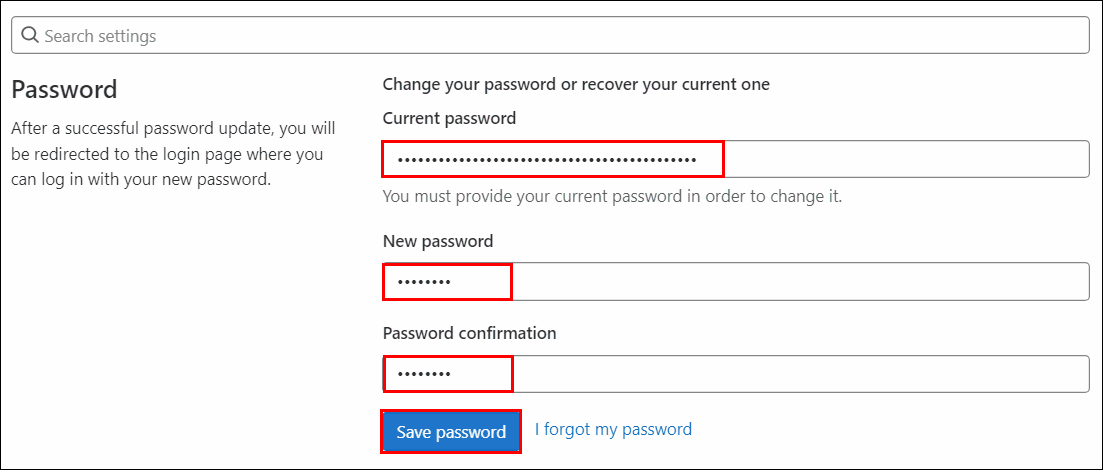
root パスワード変更
root ユーザーの初期パスワードを確認します。
# cat /etc/gitlab/initial_root_password# WARNING: This value is valid only in the following conditions
# 1. If provided manually (either via `GITLAB_ROOT_PASSWORD` environment variable or via `gitlab_rails['initial_root_password']` setting in `gitlab.rb`, it was provided before database was seeded for the first time (usually, the first reconfigure run).
# 2. Password hasn't been changed manually, either via UI or via command line.
#
# If the password shown here doesn't work, you must reset the admin password following https://docs.gitlab.com/ee/security/reset_user_password.html#reset-your-root-password.
Password: PFwQfi9XG1/JMMgeHBRefu7uAVMY273nKX4m8D2C1J0=のように表示されますので、これが初期パスワードになります。
User: root
Password: PFwQfi9XG1/JMMgeHBRefu7uAVMY273nKX4m8D2C1J0=
(イコール記号を含めてパスワード。)
でログインします。
右上アイコンクリック → Edit profile → Password
で任意のパスワードに変更しておきます。


以上です。
次は、docker-compose で同じことを行います。
GitLab インストール(docker-compose 編)
カレントフォルダに
gitlab-9.itccorporation.jp.crt
gitlab-9.itccorporation.jp.key
gitlab-9.itccorporation.jp.csr
があるものとします。(どこかで作成)
docker-compose.yamlを作成します。
これは、ここまでやってきたこと全てが記述されています。
なお、root のパスワードは、
gitlab_rails['initial_root_password'] = 'adminadmin'
で任意のパスワードにできます。
version: '3.6'
services:
  web:
    image: 'gitlab/gitlab-ce:latest'
    restart: always
    hostname: 'gitlab-9.itccorporation.jp'
    environment:
      GITLAB_OMNIBUS_CONFIG: |
        external_url 'https://gitlab-9.itccorporation.jp'
        gitlab_rails['gitlab_ssh_host'] = '192.168.11.9'
        gitlab_rails['smtp_enable'] = true
        gitlab_rails['smtp_address'] = "mail.example.com"
        gitlab_rails['smtp_port'] = 587
        gitlab_rails['smtp_user_name'] = "foobar"
        gitlab_rails['smtp_password'] = "password"
        gitlab_rails['smtp_domain'] = "mail.example.com"
        gitlab_rails['smtp_authentication'] = "plain"
        gitlab_rails['smtp_enable_starttls_auto'] = false
        gitlab_rails['smtp_tls'] = false
        gitlab_rails['gitlab_email_from'] = 'gitlab-docker@example.com'
        gitlab_rails['gitlab_email_reply_to'] = 'gitlab-docker@example.com'
        gitlab_rails['initial_root_password'] = 'adminadmin'
        nginx['redirect_http_to_https'] = true
        nginx['ssl_certificate'] = "/etc/gitlab/ssl/gitlab-9.itccorporation.jp.crt"
        nginx['ssl_certificate_key'] = "/etc/gitlab/ssl/gitlab-9.itccorporation.jp.key"
    ports:
      - '80:80'
      - '443:443'
      - '22:22'
    volumes:
      - './config:/etc/gitlab'
      - './logs:/var/log/gitlab'
      - './data:/var/opt/gitlab'
      - './gitlab-9.itccorporation.jp.crt:/etc/gitlab/ssl/gitlab-9.itccorporation.jp.crt'
      - './gitlab-9.itccorporation.jp.key:/etc/gitlab/ssl/gitlab-9.itccorporation.jp.key'
      - './gitlab-9.itccorporation.jp.csr:/etc/gitlab/ssl/gitlab-9.itccorporation.jp.csr'
    shm_size: '256m'
イメージ作成、コンテナ作成、起動します。
> docker-compose up -d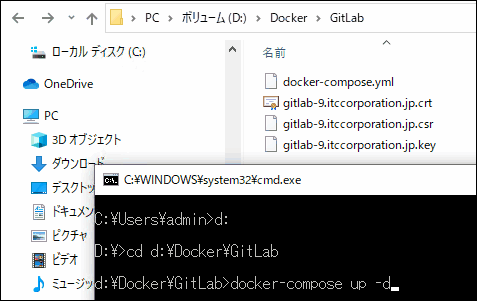
当たり前ですが、docker runで作成したコンテナを止めておかないとポートが確保できず、エラーになります。
↓
> docker-compose up
Creating network "gitlab_default" with the default driver
Creating gitlab_web_1 ...
Creating gitlab_web_1 ... error

ERROR: for gitlab_web_1  Cannot start service web: driver failed programming external connectivity on endpoint gitlab_web_1 (da056cd5d9931facd04ae01ac92fde704fd24fef172c3758025f74acad514528): Bind for 0.0.0.0:443 failed: port is already allocated

> docker stop gitlab
> docker-compose up
https://gitlab-9.itccorporation.jp/ にアクセスします。
ヨシ!!
アクセスするのが早すぎると、接続に失敗します。アクセスできるようになるまで数分かかるかもしれません。
以下のようなログの出力があるまで待つ必要があります。
↓
==> /var/log/gitlab/gitlab-exporter/current <==
2022-01-20_13:24:37.29381 Passing 'exists?' command to redis as is; blind passthrough has been deprecated and will be removed in redis-namespace 2.0 (at /opt/gitlab/embedded/lib/ruby/gems/2.7.0/gems/sidekiq-6.3.1/lib/sidekiq/api.rb:960:in `block (3 levels) in each')
2022-01-20_13:24:37.35583 127.0.0.1 - - [20/Jan/2022:13:24:36 UTC] "GET /sidekiq HTTP/1.1" 200 69839
2022-01-20_13:24:37.35614 - -> /sidekiq
ok: down: alertmanager: 0s, normally up

==> /var/log/gitlab/gitaly/current <==
{"gitaly":1402,"level":"warning","msg":"forwarding signal","pid":1494,"signal":15,"time":"2022-01-20T13:24:37.593Z","wrapper":1494}
{"gitaly":1402,"level":"warning","msg":"forwarding signal","pid":1494,"signal":18,"time":"2022-01-20T13:24:37.594Z","wrapper":1494}
gitlab_rails['initial_root_password'] = 'adminadmin'はdocker-compose upの後に変更できません。変更する場合は、コンテナ、イメージ、config、logs、data削除後、docker-compose upやり直しが必要です。
その他、宣伝、誹謗中傷等、当方が不適切と判断した書き込みは、理由の如何を問わず、投稿者に断りなく削除します。
書き込み内容について、一切の責任を負いません。
このコメント機能は、予告無く廃止する可能性があります。ご了承ください。
コメントの削除をご依頼の場合はXのDM等でご連絡ください。


