- 記事一覧 >
- ブログ記事

GitLabバンドルnginxを利用してphpの独自Webアプリを同居させる手順
はじめに
GitLab をインストールすると、nginx がインストールされています。GitLab のインストール方法は、別記事「Ubuntu 20.04.2.0 に GitLab をインストール」にあります。nginx の実体は、/opt/gitlab/embedded/sbin/nginxにインストールされます。
nginx は、以下の GitLab 構造図を見ると、80,443 ポートの窓口の役割になっています。

GitLab をインストールした環境に GitLab とは別の Web アプリを置きたいとなったとき、GitLab バンドル nginx の設定を変更して、同居が実現できます。
今回、php の独自 Web アプリを同居させる手順を書きます。(今回の記事中のゴールは、Web アプリ起動= phpinfo 表示です。)
「Ubuntu 20.04.2.0にGitLabをインストール」でインストールされた環境からスタートが前提です。
【検証環境】
Ubuntu 20.04.2 LTS
GitLab v13.11.2
nginx 1.18.0
PHP 8.0.13
【メモ】
・nginx の設定ファイル
/var/opt/gitlab/nginx/conf/nginx.conf
/var/opt/gitlab/nginx/conf/gitlab-download-app.conf
・php-fpm の設定ファイル
/etc/php/8.0/fpm/php-fpm.conf
・php の設定ファイル
/etc/php/8.0/fpm/php.ini
・コマンド
gitlab-ctl reconfigure
gitlab-ctl restart nginx
systemctl restart php8.0-fpm
PHP インストール
apt を更新します。
# apt update「Ubuntu 20.04.2.0にapache2,php,postgresqlをインストール」に詳しい説明付きの手順がありますので、詳しい説明は、端折ります。
PHP8 をインストールします。(拡張モジュールは適当です。)
# apt -y install software-properties-common
# add-apt-repository ppa:ondrej/php
Press [ENTER] to continue or Ctrl-c to cancel adding it.
エンター
# apt update
# apt -y install php8.0 php8.0-gd php8.0-mbstring php8.0-common
# apt -y install curl
# apt -y install php8.0-curl
# php -v
PHP 8.0.13 (cli) (built: Nov 22 2021 09:50:43) ( NTS )
Copyright (c) The PHP Group
Zend Engine v4.0.13, Copyright (c) Zend Technologies
    with Zend OPcache v8.0.13, Copyright (c), by Zend Technologies
# curl -V
curl 7.68.0 (x86_64-pc-linux-gnu) libcurl/7.68.0 OpenSSL/1.1.1f zlib/1.2.11 brotli/1.0.7 libidn2/2.2.0 libpsl/0.21.0 (+libidn2/2.2.0) libssh/0.9.3/openssl/zlib nghttp2/1.40.0 librtmp/2.3
apache2 が同時インストールされますが、今回要らないため、削除します。
# apt list --installed | grep apache2

WARNING: apt does not have a stable CLI interface. Use with caution in scripts.

apache2-bin/focal-updates,now 2.4.41-4ubuntu3.8 amd64 [インストール済み、自動]
apache2-data/focal-updates,focal-updates,now 2.4.41-4ubuntu3.8 all [インストール済み、自動]
apache2-utils/focal-updates,now 2.4.41-4ubuntu3.8 amd64 [インストール済み、自動]
apache2/focal-updates,now 2.4.41-4ubuntu3.8 amd64 [インストール済み、自動]
libapache2-mod-php8.0/focal,now 8.0.14-1+ubuntu20.04.1+deb.sury.org+1 amd64 [インストール済み、自動]
# apt -y remove apache2-*
php-fpm をインストールします。
# apt install -y php-fpm【 php-fpm 】
php-fpmとは fpmはFastCGI Process Managerの略でPHP5.4.0から公式サポートされたPHP標準のアプリケーションサーバです。
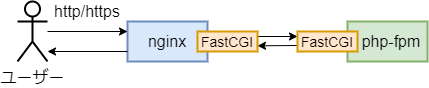
【 FastCGI 】
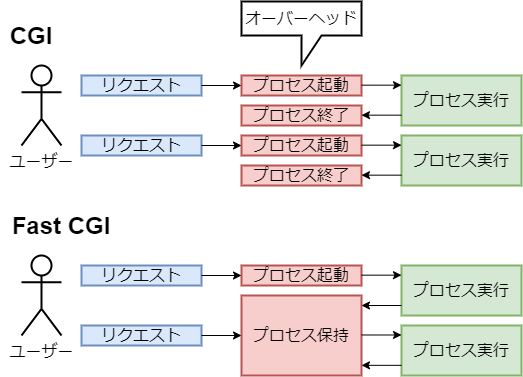
FastCGIとは、Webサーバ上でユーザプログラムを動作させるためのインタフェース仕様の一つです。プロセスの起動/終了を省略することで、負荷を軽減しています。
php-fpm 設定
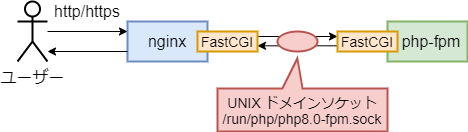
UNIX ソケットを利用する設定にします。
# vi /etc/php/8.0/fpm/pool.d/www.conflisten = /run/php/php8.0-fpm.sock※デフォルトでなっていました。(その場合は、確認のみ。)
【 UNIXドメインソケット 】
UNIXドメインソケットはBSDソケットの一種であり、単一マシン上でのプロセス間通信を目的としています。
単一マシン上の通信である(=インターネットを介さない)ことを生かした高効率な通信を可能にしています。
php8.0-fpm が systemctl のサービスとして有効かどうか確認します。
# systemctl list-unit-files --type=service | grep phpphp8.0-fpm.service enabled enabled
phpsessionclean.service static enabled※デフォルトで有効になっていました。(その場合は、確認のみ。)
【
systemctl list-unit-files】定義されているサービス一覧を表示します。
--type=serviceが無ければ、全てのユニットを表示します。左側が現状、右側がVENDOR PRESET、つまり、デフォルトの状態です。
有効になっていない場合、有効化します。
# systemctl enable php8.0-fpmfastcgi_params に環境変数を登録します。(ここに書いたものが php の$_SERVERとして使える環境変数になります。)
# vi /var/opt/gitlab/nginx/conf/fastcgi_paramsfastcgi_param QUERY_STRING $query_string;
fastcgi_param REQUEST_METHOD $request_method;
fastcgi_param CONTENT_TYPE $content_type;
fastcgi_param CONTENT_LENGTH $content_length;
fastcgi_param SCRIPT_FILENAME $document_root$fastcgi_script_name;
fastcgi_param SCRIPT_NAME $fastcgi_script_name;
fastcgi_param PATH_INFO $fastcgi_path_info;
fastcgi_param PATH_TRANSLATED $document_root$fastcgi_path_info;
fastcgi_param REQUEST_URI $request_uri;
fastcgi_param DOCUMENT_URI $document_uri;
fastcgi_param DOCUMENT_ROOT $document_root;
fastcgi_param SERVER_PROTOCOL $server_protocol;
fastcgi_param GATEWAY_INTERFACE CGI/1.1;
fastcgi_param SERVER_SOFTWARE nginx/$nginx_version;
fastcgi_param REMOTE_ADDR $remote_addr;
fastcgi_param REMOTE_PORT $remote_port;
fastcgi_param SERVER_ADDR $server_addr;
fastcgi_param SERVER_PORT $server_port;
fastcgi_param SERVER_NAME $server_name;
fastcgi_param HTTPS $https;
# PHP only, required if PHP was built with --enable-force-cgi-redirect
fastcgi_param REDIRECT_STATUS 200;nginx 設定
PHP Web アプリの置き場所を/opt/gitlab-download-app/www/htmlとします。/opt/gitlab-download-app/www/htmlは任意です。
root ディレクトリ、ログディレクトリを作成します。
# mkdir -p /opt/gitlab-download-app/www/html
# chown -R gitlab-www:gitlab-www /opt/gitlab-download-app
# mkdir /var/log/gitlab-download-app
chown -R gitlab-www:gitlab-wwwは、/etc/gitlab/gitlab.rbに nginx 起動ユーザーが以下のように定義してあるからです。(コメントアウト=デフォルト値)
# web_server['username'] = 'gitlab-www'
# web_server['group'] = 'gitlab-www'
PHP Web アプリ用の設定ファイルを新規追加します。
# vi /var/opt/gitlab/nginx/conf/gitlab-download-app.confサーバー名:gitlab-download-app.itccorporation.jpとします。
server
{
  listen 80;
  server_name gitlab-download-app.itccorporation.jp;
  access_log /var/log/gitlab-download-app/access.log;
  error_log /var/log/gitlab-download-app/error.log;

  root /opt/gitlab-download-app/www/html;

  location /
  {
    index index.html index.htm index.php;
  }

  location ~ [^/]\.php(/|$)
  {
    fastcgi_split_path_info ^(.+?\.php)(/.*)$;
    if (!-f $document_root$fastcgi_script_name)
    {
      return 404;
    }

    client_max_body_size 100m;

    # Mitigate https://httpoxy.org/ vulnerabilities
    fastcgi_param HTTP_PROXY "";

    # fastcgi_pass 127.0.0.1:9000;
    fastcgi_pass unix:/run/php/php8.0-fpm.sock;
    fastcgi_index index.php;

    # include the fastcgi_param setting
    include fastcgi_params;

    # SCRIPT_FILENAME parameter is used for PHP FPM determining
    #  the script name. If it is not set in fastcgi_params file,
    # i.e. /etc/nginx/fastcgi_params or in the parent contexts,
    # please comment off following line:
    # fastcgi_param  SCRIPT_FILENAME   $document_root$fastcgi_script_name;
  }
}gitlab-download-app.confが GitLab バンドルの nginx に読み込まれるように、以下のように設定します。
# vi /etc/gitlab/gitlab.rbnginx['custom_nginx_config'] = "include gitlab-download-app.conf;"GitLab の設定再読み込みを行います。
# gitlab-ctl reconfigureこれにより、何が起きるかというと、GitLab バンドルの nginx の設定ファイル/var/opt/gitlab/nginx/conf/nginx.confにinclude gitlab-download-app.conf;の行が追加されます。
テンプレートとして以下の eRuby ファイルが置いてあり、以下のような経緯で配置されます。
/opt/gitlab/embedded/cookbooks/gitlab/templates/default/nginx.conf.erb
↓
gitlab-ctl reconfigure
↓
nginx.conf.erb の<%= @custom_nginx_config %>が置換される
↓
/var/opt/gitlab/nginx/conf/nginx.conf更新
gitlab-ctl reconfigureの度にこれを繰り返すため、/var/opt/gitlab/nginx/conf/nginx.confを直接編集すると、次のgitlab-ctl reconfigureで直接編集した内容は消えます。変更を固定化したい場合、/opt/gitlab/embedded/cookbooks/gitlab/templates/default/nginx.conf.erbを書き換えると、固定化できます。(今回はその必要が無いです。)
【 .erb 】
.erbは、eRubyのファイルの拡張子です。
eRuby(embedded Ruby)とは、Rubyの周辺技術の一つで、HTMLへRubyスクリプトを埋め込む事を可能とする技術です。
php-fpm 起動~動作確認
エラーが発生した場合、画面に表示されるようにします。(任意です。)
# vi /etc/php/8.0/fpm/php.inidisplay_errors = On
display_startup_errors = OnFPM プロセスのユーザーと UNIX ドメインソケットのユーザーを nginx のユーザーに合わせます。デフォルトは、www-data です。
# vi /etc/php/8.0/fpm/pool.d/www.confuser = gitlab-www
group = gitlab-wwwと
listen.owner = gitlab-www
listen.group = gitlab-www
GitLab と PHP Web アプリが名前解決できない場合、hosts に追加します。
# vi /etc/hosts192.168.12.111 gitlab.itccorporation.jp
192.168.12.111 gitlab-download-app.itccorporation.jpnginx と php-fpm をリスタートします。
# gitlab-ctl restart nginx
# systemctl restart php8.0-fpm
【 gitlab-ctl 】
GitLab Omnibus(いろいろバンドルされたもののこと)の1つのコンポーネントを再起動するには、
gitlab-ctl restart <component>を実行します。したがって、Nginxを再起動するにはgitlab-ctl restart nginxです。
gitlab-ctl tailとすると、すべてのGitLabログを表示できます。gitlab-ctl tail nginxはnginxログのみをtailします。
テストアプリを作成します。(アプリが既に有る場合、目的のアプリをここに配置します。)
# vi /opt/gitlab-download-app/www/html/info.php<?php
phpinfo();hosts を192.168.12.111 gitlab-download-app.itccorporation.jpとし、
http://gitlab-download-app.itccorporation.jp/info.php で確認します。
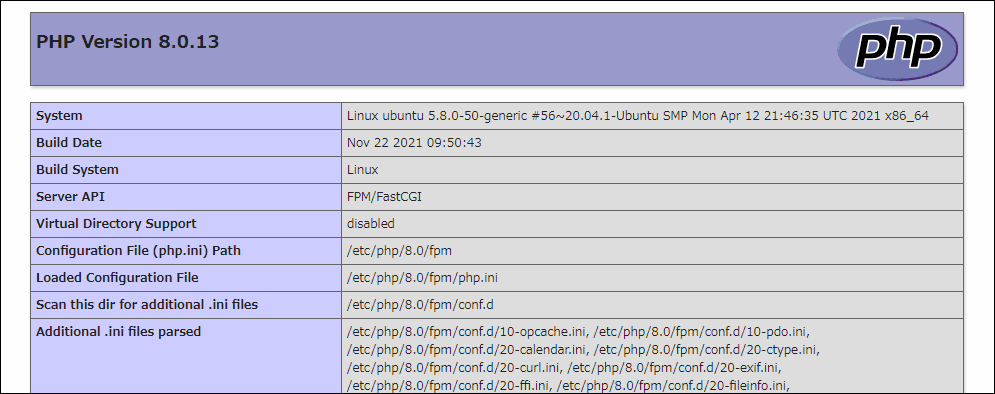
ヨシ!

その他、宣伝、誹謗中傷等、当方が不適切と判断した書き込みは、理由の如何を問わず、投稿者に断りなく削除します。
書き込み内容について、一切の責任を負いません。
このコメント機能は、予告無く廃止する可能性があります。ご了承ください。
コメントの削除をご依頼の場合はXのDM等でご連絡ください。


