- 記事一覧 >
- ブログ記事

Next.js, graphql-codegen, React Query, Apollo Server v4 で簡易BFF作成(1/2)
はじめに
Next.js v13、graphql-codegen 2.16.1、React v18、TypeScript、TanStack Query v4(React Query)、Apollo Server v4 で簡易 BFF を作成しました。
その全手順とソースコードを何も無い状態から書いていこうと思います。
ベストプラクティス的なつもりはなく、とりあえず動くところまでがゴールです。
2022 年 12 月現在、あまりに情報が少なく(特に Apollo Server v4 の場合)、とりあえずのとっかかりになれば幸いに思います。
長くなるため、2編に分けました。
1.codegen 利用からサーバーサイドの実装、動作確認(今回の記事)
2.クライアントサイドの実装、動作確認(次回の記事)
になります。
【検証環境】
Ubuntu 20.04.2 LTS
node v14.20.0
npm 6.14.17/code>
@apollo/server 4.3.0
graphql 16.6.0
next 13.1.1
react 18.2.0
typescript 4.9.4
@graphql-codegen/cli 2.16.2
Windows 10 Pro x64
Visual Studio Code 1.74.2
前置きが長いです。作業開始は、こちらからになります。
↓
利用技術・用語
まず、GraphQL、Next.js、graphql-codegen、TanStack Query(React Query)、graphql-request、Apollo Server、BFF について、簡単に説明します。
注意:図は、あくまで今回の場合です。
GraphQL
GraphQL は API 向けに作られたクエリ言語およびランタイムです。GraphQL では、クライアントが必要なデータの構造を定義することができ、サーバーからは定義したのと同じ構造のデータが返されます。
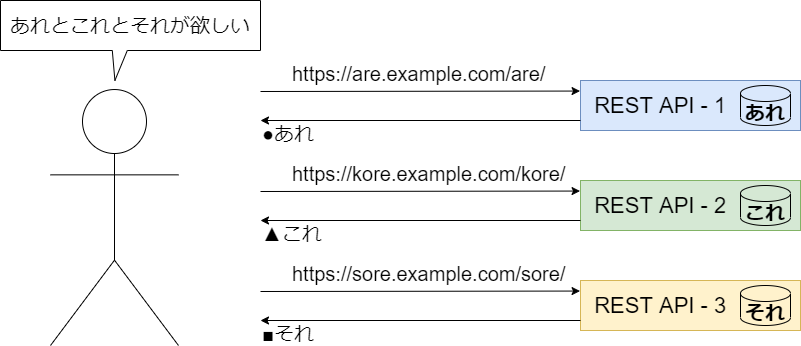
REST API と異なり、エンドポイント(呼び出し先 URL)が一つです。
Next.js
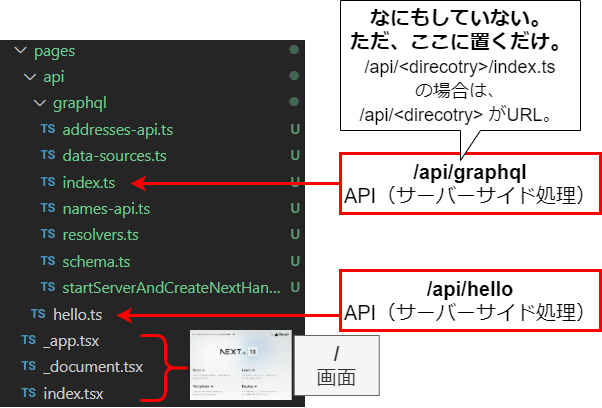
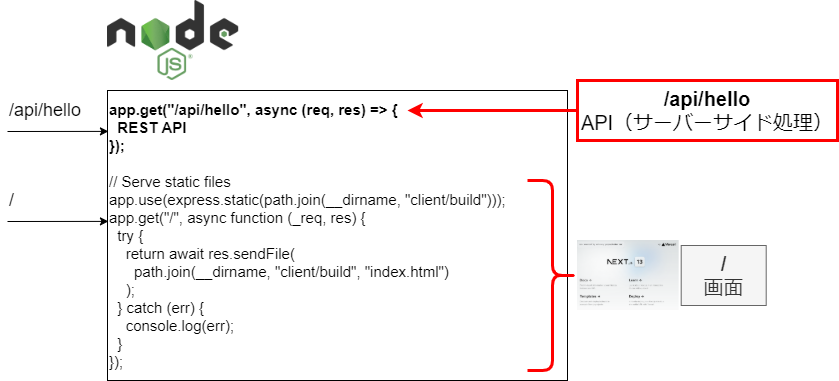
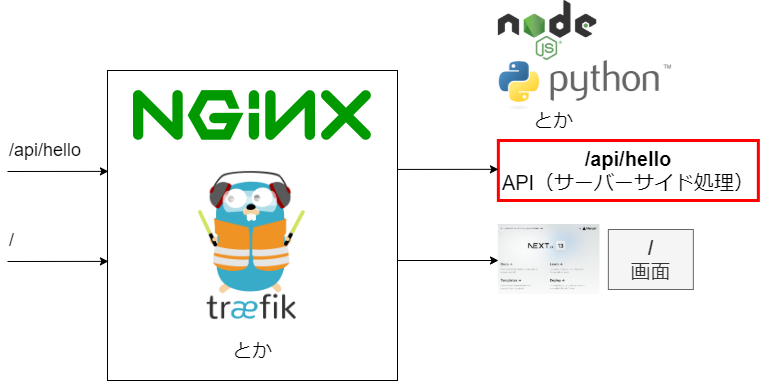
Next.js を選定した理由は、以下の図のようにフロントエンドとサーバーサイドの API が簡単に同時に実装できるためです。pages/api/xxx に実装すれば、それが API として振る舞います。ルーティングの設定は不要です。
もちろん、以下のように別の方法はいろいろ考えられます。
React、TypeScript
React、TypeScript については、言わずもがなと思うので、簡単に言及します。
React は、Next.js を使うからには、使う以外選択肢がありません。Next.js が React ベースのフレームワークだからです。
TypeScript は、型安全に実装したいため、選択しました。
graphql-codegen
graphql-codegen は、GraphQL のスキーマから TypeScript の型が自動生成されます。さらに、ドキュメントから React Hooks が自動生成されます。(React Hooks は次回に活用します。)
上記の説明は、正しくは、そういう設定したらという場合で、いろいろな自動生成パターンが考えられます。
TanStack Query(React Query)
サーバー側のデータの取得と操作を容易にするために使用されるライブラリです。 React Query を使用すると、React アプリケーションでのサーバー状態の取得、キャッシュ、同期、および更新を簡単に行うことができます。
TanStack Query は、TS/JS、React、Solid、Vue で使えます。(Svelte も対応予定にあるようですが、2022 年 12 月現在まだ開発中のようです。)
graphql-request
シンプルかつ軽量な GraphQL クライアントです。プロミス(非同期処理の最終的な完了もしくは失敗を表すオブジェクト)に対応しています。TypeScript をサポートしています。Node のサーバーサイド/ブラウザ側で使用できます。今回は、ブラウザ側で使用しています。
Apollo Server
Apollo Server は、オープンソースで仕様に準拠した GraphQL サーバーであり、Apollo Client を含むすべての GraphQL クライアントと互換性があります。
GET でアクセスすると、実装したサーバーに対して、GraphQL のクエリを直接実行できる画面が表示されます。
なお、今回、v4(apollo-serverではなく、@apollo/server)を使います。
BFF
BFF は、Backend For Frontend の略です。特定の言語やアプリケーションを指すのではなく、概念的なことです。
クライアントとバックエンドの間に位置して、クライアントが望むようにデータを加工して返します。
例えば、今回の場合、2つの REST API からデータを取得しますが、フロントエンドは、この BFF に1回だけ要求すると2つの REST API の結果を受け取ることができます。
今回の要件
名前を返す API(http://localhost:4000/names)と住所を返す API(http://localhost:5000/addresses)があるとします。
・フロントエンドから一つのエンドポイントに対してリクエスト
・一度のリクエストで、名前を返す API と住所を返す API の結果を一度に受け取る
・名前を返す API だけデータの追加、更新ができる
・名前を返す API だけから全データ取り出すことができる
・名前を返す API に id(何番目か)を指定して、指定の名前を1つだけ取り出すことができる
・住所を返す API だけから全データ取り出すことができる
・住所を返す API に id(何番目か)を指定して、指定の住所を1つだけ取り出すことができる
両 API を用いて実現できることについて、実用的な意味は無いです。今回の場合、BFF によって、Rest API 群(場合によっては、gRPC などを使ったマイクロサービス群など)を束ねるというのが趣旨です。
今回では、BFF と称するのは大げさですが、以下のようにキャッシュの仕組みを組み込んだり、データソース(データの出どころ)が REST だったり、gRPC だったり、DB だったり、文字通りフロントエンドのためにいろいろできると思います。
今回は、一つでも余計な事をしようとすると、それだけで一記事になりますので、何もテクニカルな工夫をしていませんし、何も意味を持たせていません。
BFF の規模が大きくなると、Next.js ではかえって対応しにくくなるかもしれません。
Next.js プロジェクト作成
create-next-app で TypeScript 対応 Next.js 雛形プロジェクトを作成します。Would you like to use ESLint with this project? は Yes を選択します。
プロジェクト名は、 next-bff-app とします。
$ npx create-next-app@latest next-bff-app --typescript
npx: installed 1 in 1.854s
? Would you like to use ESLint with this project? … No / Yesこの時点では、以下のようになっています。(node_modules/ は除外)
next-bff-app
├── next.config.js
├── next-env.d.ts
├── package.json
├── package-lock.json
├── pages
│   ├── api
│   │   └── hello.ts
│   ├── _app.tsx
│   ├── _document.tsx
│   └── index.tsx
├── public
│   ├── favicon.ico
│   ├── next.svg
│   ├── thirteen.svg
│   └── vercel.svg
├── README.md
├── styles
│   ├── globals.css
│   └── Home.module.css
└── tsconfig.json
pages/api/hello.ts が存在します。
これは、http://localhost:3000/api/hello で起動する API です。
$ cd next-bff-app
$ npm run dev
$ curl http://localhost:3000/api/hello
{"name":"John Doe"}npm インストール
graphql-codegen 他、必要なものをインストールします。
ただし、今回サーバー側の実装だけのため、サーバー側に必要なものだけインストールしています。
フロントエンドで必要なものは、次回記事で、追加インストールします。
$ npm install --save-dev @graphql-codegen/cli
$ npm install graphql @apollo/server @apollo/datasource-rest graphql-tag
@apollo/serverにより Apollo Server v4 が入ります。
apollo-serverとか、apollo-server-microにすると、v4 未満(Deprecated)になります。
graphql-codegen init
graphql-codegen 初期化作業を行います。
$ npx graphql-codegen initここで、以下のように回答します。
What type of application are you building? Application built with React
Where is your schema?: (path or url) pages/api/graphql/schema.ts
Where are your operations and fragments?: graphql/**/*.graphql
Where to write the output: generated/resolvers.d.ts
Do you want to generate an introspection file? Yes
How to name the config file? codegen.yml
What script in package.json should run the codegen? codegen
codegen.tsorcodegen.ymlが生成されて package.json に"codegen": "graphql-codegen --config codegen.yml"が書き込まれます。
各質問内容の意味は、以下です。
What type of application are you building?
どのフレームワーク/ライブラリを使ったアプリかを回答します。今回は、React のため、Application built with React です。
Where is your schema?: (path or url)
スキーマの場所を回答します。
スキーマとは、以下のような GraphQL 独自の型定義(RDB でいうテーブル定義のようなもの)です。
type Human implements Character {
  id: ID!
  name: String!
  friends: [Character]
  appearsIn: [Episode]!
  starships: [Starship]
  totalCredits: Int
}

type Droid implements Character {
  id: ID!
  name: String!
  friends: [Character]
  appearsIn: [Episode]!
  primaryFunction: String
}
対象となる GraphQL サーバーの URL から直接取得できますが、今回、その GraphQL サーバーを作るところから始めますので、GraphQL サーバーのソースコード内から取り込まれるようにします。
import { gql } from "graphql-tag";

export const typeDefs = gql`
  type Name {
    name: String!
  }
・・・略・・・
  type Mutation {
    addName(input: NameInput!): Name!
    updateName(id: ID!, input: NameInput!): Name!
  }
`;
Where are your operations and fragments?operations and fragments がどこにあるか回答します。operations and fragments とは、documents: のことで、ドキュメントとは、すなわち、クライアントから GraphQL サーバーに対して、どのようなクエリーを使うつもりかが書かれたものです。
例えば、この質問に src/**/*.tsx と回答する場合、codegen.yml にdocuments: src/**/*.tsx が設定されて、
const allFilmsWithVariablesQueryDocument = graphql(/* GraphQL */ `
  query allFilmsWithVariablesQuery($first: Int!) {
    allFilms(first: $first) {
      edges {
        node {
          ...FilmItem
        }
      }
    }
  }
`);
のような実装がある場合、
query allFilmsWithVariablesQuery($first: Int!) {
  allFilms(first: $first) {
    edges {
      node {
        ...FilmItem
      }
    }
  }
}
の部分がドキュメントとして、取り込まれます。
src/**/*.tsxの ** は、0~複数階層ディレクトリがあるという意味で、src/xxx.tsx、src/aaa/xxx.tsx、src/aaa/bbb/xxx.tsx などがマッチします。
ドキュメントは、直接書いても良いため、今回の場合、直接書きます。
Where to write the output
生成物をどこに出力するかを設定します。
とりあえず、resolvers の型定義ファイル生成先 generated/resolvers.d.ts を設定します。
(詳細は、後の設定の説明を見てください。)
Do you want to generate an introspection file?
introspection 用のファイルを生成するかどうかを回答します。
introspection とは、特殊なクエリで、GraphQL サーバー自身が持っている内部情報(データの型、使えるクエリなどの情報)を返す機能です。
必須ではないですが、生成することにします。
introspection file生成無しにしても Apollo Serverで問い合わせて、introspection が取得できました。出力された json について、どう活用するのか良く分かりませんでした。
How to name the config file?
graphql-codegen の設定ファイル名を回答します。codegen.ts と設定すると、TypeScript 形式で設定を書くことになりますが、yaml で書きたいため、codegen.yml としました。
What script in package.json should run the codegen?
graphql-codegen を起動するときのコマンド、npm run codegen の "codegen" の部分を回答します。npm run codegen で良いため、codegen と回答しました。
codegen.yml 設定
codegen.yml が自動生成されていますので、これを編集します。
overwrite: true
schema: "pages/api/graphql/schema.ts"
documents: "graphql/**/*.graphql"
generates:
  generated/resolvers.d.ts:
    preset: "client"
    plugins: []
  ./graphql.schema.json:
    plugins:
- "introspection"自動生成されたpreset: "client"
については、プリセット設定で、これにより React、Svelte、Vue、その他クライアント用のコードが生成されるようですが、今のところ情報が少なく、特に問題無かったため、採用を見送りました。
したがって、ここでは、削除して、書き換えます。
$ vi codegen.yml# 既に生成物がある場合、上書き
overwrite: true
# スキーマファイルの場所
schema: pages/api/graphql/schema.ts
generates:
# resolvers(サーバー側)の TypeScript 型定義生成設定
./generated/resolvers.d.ts:
plugins:
- typescript
# @graphql-codegen/typescript-resolvers
# resolvers の TypeScript 型定義を生成するプラグイン
- typescript-resolvers
config:
# Apollo Serverを使う場合
# useIndexSignature: true
# にする
# ...と書いてあるが、正確な意味は不明。
# https://the-guild.dev/graphql/codegen/plugins/typescript/typescript-resolvers
useIndexSignature: true
# context(Apollo Serverの共通処理や値。すなわち、今回の場合、dataSources)に型が付く。
# 生成される resolvers.d.ts に
# import { Context } from '../../../pages/api/graphql/resolvers';
# が追加されて、
# export type AddressResolvers<ContextType = any,・・・
# が
# export type AddressResolvers<ContextType = Context,・・・
# になる。
# 生成される resolvers.d.ts から相対パスで、指定。
# resolvers#Contextは、resolvers.tsのtype Contextを見てねという意味。
contextType: ../../pages/api/graphql/resolvers#Context
# generated/graphql.ts:は、クライアント側に必要。
# クライアント側のTypeScript型定義とReact Hooksコード生成設定
./generated/graphql.ts:
documents: "graphql/**/*.graphql"
plugins:
- typescript
# @graphql-codegen/typescript-resolvers
# documents から TypeScript 型定義を生成するプラグイン
- typescript-operations
# documents から React Hooksコード生成するプラグイン
- typescript-react-query
config:
# React Hooks の fetcher に graphql-request を使用
# 指定しないと fetch が使われる。
fetcher: graphql-request
# Hooks を生成するか否か。true,falseにしても生成された。(?)何も変わらないので、コメントアウトしておく。
# isReactHook: true
# 生成物に useGetNameQuery.getKey = (variables: GetNameQueryVariables) => ['getName', variables];
# のように QueryKey を取り出すことができるメソッドが追加される。(['getName', {id: '0'}]のような値がキーとして返る。)
# react-query は QueryKey を使用してキャッシュを管理する。
# setQueryData や getQueryData などのメソッドには、このキーが必要。
# 今回直接react-queryを使っていないため、結局使わない。
exposeQueryKeys: true
# introspectionファイルを作成
./graphql.schema.json:
plugins:
- "introspection"自動で package.json に追加された @graphql-codegen/client-preset は不要なので、削除します。(末尾のカンマに注意。)
$ vi package.json "devDependencies": {
"@graphql-codegen/cli": "2.16.2",
"@graphql-codegen/introspection": "2.2.3",
"@graphql-codegen/client-preset": "1.2.4"
}↓
  "devDependencies": {
    "@graphql-codegen/cli": "2.16.2",
    "@graphql-codegen/introspection": "2.2.3"
  }
schema 作成
schema として指定した schema.ts を作成します。
$ mkdir pages/api/graphql
$ vi pages/api/graphql/schema.tsimport { gql } from "graphql-tag";
export const typeDefs = gql`
type Name {
name: String!
}
input NameInput {
name: String!
}
type Address {
address: String!
}
type Query {
names: [Name!]
name(id: ID!): Name
addresses: [Address!]
address(id: ID!): Address
}
type Mutation {
addName(input: NameInput!): Name!
updateName(id: ID!, input: NameInput!): Name!
}
`;
gqlは、Apollo Server v4 からimport { gql } from 'apollo-server';ではなくなり、graphql-tag からインポートが必要です。
documents 作成
クライアント側の documents を作成します。
今回は、サーバー側のみ実装を行いますので、必要ありませんが、次回のクライアント作成編に使うため、作成します。
Query と Mutation があるため、2ファイルに分けます。(1ファイルに全部書いても、もっと細分化しても構いません。)
$ mkdir graphql
$ vi graphql/queries.graphql
$ vi graphql/mutations.graphqlquery getNames {
names {
name
}
}
query getName($id: ID!) {
name(id: $id) {
name
}
}
query getAddresses {
addresses {
address
}
}
query getAddress($id: ID!) {
address(id: $id) {
address
}
}
query getNamesAndAddresses {
names {
name
}
addresses {
address
}
}
query getNameAndAddress($id: ID!) {
name(id: $id) {
name
}
address(id: $id) {
address
}
}mutation addName($input: NameInput!) {
addName(input: $input) {
name
}
}
mutation updateName($id: ID!, $input: NameInput!) {
updateName(id: $id, input: $input) {
name
}
}codegen 実行
generated/resolvers.d.ts
generated/graphql.ts
graphql.schema.json
を生成します。
生成コマンドは、graphql-codegen --config codegen.yml ですが、package.json に自動的に追加されています。
  "scripts": {
    "dev": "next dev",
    "build": "next build",
    "start": "next start",
    "lint": "next lint",
    "codegen": "graphql-codegen --config codegen.yml"
  },
したがって、graphql-codegen 起動方法は、npm run codegen になります。
その前に、このままの場合、
Unable to find template plugin matching 'typescript-react-query'
のようにエラーになります。
plugins に指定したパッケージを --save-dev でインストールします。
$ npm install --save-dev @graphql-codegen/typescript-operations
$ npm install --save-dev @graphql-codegen/typescript-react-query
$ npm install --save-dev @graphql-codegen/typescript-resolvers
$ mkdir generated
$ npm install
$ npm run codegen
Next.js Apllo Server 実装
http://localhost:3000/api/graphql を Apllo Server(GraphQL エンドポイント)として仕立てていきます。
Apllo Server v4 未満の情報しか無く、ここが一番困りましたが、
@as-integrations/next(https://github.com/apollo-server-integrations/apollo-server-integration-next) というドンピシャな npm を見つけました。
startServerAndCreateNextHandler.ts から startServerAndCreateNextHandler を import すれば良いため、今回は丸ごと拝借することにします。
$ vi pages/api/graphql/startServerAndCreateNextHandler.tsimport {
ApolloServer,
BaseContext,
ContextFunction,
HeaderMap,
} from "@apollo/server";
import type { WithRequired } from "@apollo/utils.withrequired";
import { NextApiHandler } from "next";
import { parse } from "url";
interface Options<Context extends BaseContext> {
context?: ContextFunction<Parameters<NextApiHandler>, Context>;
}
const defaultContext: ContextFunction<[], any> = async () => ({});
function startServerAndCreateNextHandler(
server: ApolloServer<BaseContext>,
options?: Options<BaseContext>
): NextApiHandler;
function startServerAndCreateNextHandler<Context extends BaseContext>(
server: ApolloServer<Context>,
options: WithRequired<Options<Context>, "context">
): NextApiHandler;
function startServerAndCreateNextHandler<Context extends BaseContext>(
server: ApolloServer<Context>,
options?: Options<Context>
) {
server.startInBackgroundHandlingStartupErrorsByLoggingAndFailingAllRequests();
const contextFunction = options?.context || defaultContext;
const handler: NextApiHandler = async (req, res) => {
const headers = new HeaderMap();
for (const [key, value] of Object.entries(req.headers)) {
if (typeof value === "string") {
headers.set(key, value);
}
}
const httpGraphQLResponse = await server.executeHTTPGraphQLRequest({
context: () => contextFunction(req, res),
httpGraphQLRequest: {
body: req.body,
headers,
method: req.method || "POST",
search: req.url ? parse(req.url).search || "" : "",
},
});
for (const [key, value] of httpGraphQLResponse.headers) {
res.setHeader(key, value);
}
res.statusCode = httpGraphQLResponse.status || 200;
if (httpGraphQLResponse.body.kind === "complete") {
res.send(httpGraphQLResponse.body.string);
} else {
for await (const chunk of httpGraphQLResponse.body.asyncIterator) {
res.write(chunk);
}
res.end();
}
};
return handler;
}
export { startServerAndCreateNextHandler };このままの場合、
Type 'HeaderMap' can only be iterated through when using the '--downlevelIteration' flag or with a '--target' of 'es2015' or higher.ts(2802)
エラーになります。
$ vi tsconfig.jsontsconfig.json の compilerOptions セクションに
"downlevelIteration": true,を追加します。
【 "downlevelIteration": true 】
for..of 構文などの ES6 から追加されたイテレーション系の記法をコンパイルします。
pages/api/graphql/index.ts を作成します。
これは、http://localhost:3000/api/graphql で呼ばれたときに、最初に呼ばれる部分です。
$ vi pages/api/graphql/index.tsimport { typeDefs } from "./schema";
import { dataSources } from "./data-sources";
import { resolvers } from "./resolvers";
import { ApolloServer } from "@apollo/server";
import { startServerAndCreateNextHandler } from "./startServerAndCreateNextHandler";
const apolloServer = new ApolloServer({ typeDefs, resolvers });
export default startServerAndCreateNextHandler(apolloServer, {
context: async (req, res) => ({ req, res, dataSources: dataSources() }),
});const apolloServer = new ApolloServer({ (コンフィグ), (resolvers) });export default startServerAndCreateNextHandler(apolloServer);
でOKですが、今回は、外部からの情報(2つの REST API)を使うため、options の context に dataSources を適用しています。
Apollo Server v4 により、以下の方法ではなくなりましたので、注意が必要です。
const server = new ApolloServer({
  typeDefs,
  resolvers,
  dataSources: () => ({
    givefood: new GiveFoodDataSource(),
  }),
});
RESTDataSource を拡張して、REST API でデータを操作するクラスを2つ作成します。
名前の取得、変更ができる NamesAPI です。
$ vi pages/api/graphql/names-api.tsimport { RESTDataSource } from "@apollo/datasource-rest";
export type Name = {
name: string;
};
type MutationResponse = { status: string; data: Name };
export default class NamesAPI extends RESTDataSource {
constructor() {
super();
this.baseURL = process.env.NAMES_REST_URL || "http://localhost:4000/";
}
async getName(nameId: number) {
return this.get<Name>(`names/${nameId}`);
}
async getNames() {
return this.get<Name[]>(`names`);
}
async postName(name: Name) {
return this.post<MutationResponse>(`names`, { body: name }).then(
(resp) => resp.data
);
}
async putName(nameId: number, name: Name) {
return this.put<MutationResponse>(`names/${nameId}`, {
body: name,
}).then((resp) => resp.data);
}
}住所の取得ができる AddressesAPI です。(データの変更はできない仕様とします。)
$ vi pages/api/graphql/addresses-api.tsimport { RESTDataSource } from "@apollo/datasource-rest";
export type Address = {
address: string;
};
export default class AddressesAPI extends RESTDataSource {
constructor() {
super();
this.baseURL = process.env.ADDRESSES_REST_URL || "http://localhost:5000/";
}
async getAddress(addressId: number) {
return this.get<Address>(`addresses/${addressId}`);
}
async getAddresses() {
return this.get<Address[]>(`addresses`);
}
}2つのデータソースを束ねます。
$ vi pages/api/graphql/data-sources.tsimport NamesAPI from "./names-api";
import AddressesAPI from "./addresses-api";
export const dataSources = () => ({
namesAPI: new NamesAPI(),
addressesAPI: new AddressesAPI(),
});
export type DataSources = ReturnType<typeof dataSources>;GraphQL リゾルバを定義します。
【 リゾルバ(Resolver) 】
特定のフィールドのデータを返す関数(メソッド)です。例えば、nameフィールドがクエリに含まれていた場合、何を返すか定義する場合、
name: 処理内容あるいは値そのものです。今回の場合、全ての操作において、第三引数 context(= GraphQL operation の resolver 全体で共有されるオブジェクト。)で外部の REST API を使う共通処理を受け取っています。
$ vi pages/api/graphql/resolvers.tsimport { Resolvers } from "../../../generated/resolvers";
import { DataSources } from "./data-sources";
export type Context = { dataSources: DataSources };
export const resolvers: Resolvers = {
Query: {
// context = GraphQL operation の resolver 全体で共有されるオブジェクト。
// context = 外部のデータ取得処理 = data-sources.ts に書かれている。
// { dataSources } = context.dataSources と同意。
// context は resolver の第三引数に渡され、アクセスできる。
// その処理内容(クラス名.メソッド)は、names-api.ts、address-api.ts にある。
name: async (_parent, { id }, { dataSources }) =>
dataSources.namesAPI.getName(parseInt(id)),
names: async (_parent, _args, { dataSources }) =>
dataSources.namesAPI.getNames(),
address: async (_parent, { id }, { dataSources }) =>
dataSources.addressesAPI.getAddress(parseInt(id)),
addresses: async (_parent, _args, { dataSources }) =>
dataSources.addressesAPI.getAddresses(),
},
Mutation: {
addName: async (_parent, { input }, { dataSources }) =>
dataSources.namesAPI.postName({ ...input }),
updateName: async (_parent, { id, input }, { dataSources }) =>
dataSources.namesAPI.putName(parseInt(id), { ...input }),
},
};完成です!
動作確認その1
$ npm run devで、http://localhost:3000 にアクセスします。
当然ですが、pages/_app.tsxpages/index.tsx
を何も変更していないため、
Next.js デフォルトのフロントエンドの画面が表示されます。

http://localhost:3000/api/graphql にアクセスします。
Apollo Server が表示されました!
クエリを実行します。
query getNamesAndAddresses {
  names {
    name
  }
  addresses {
    address
  }
}
接続エラーになりました!
それもそのはず、
NamesAPI: http://localhost:4000
AddressesAPI: http://localhost:5000
をまだ作っていません...。
作ります。
REST API サーバー作成
node(ts-node)の express で REST API サーバーをサクッと作成します。
NamesAPI
プロジェクト初期化は、何も考えずに、TypeScript 公式サイト(https://typescript-jp.gitbook.io/deep-dive/nodejs)Node.js & TypeScript のプロジェクト作成 の手順を実施しています。
$ mkdir rest-api-names
$ cd rest-api-names
$ npm init -y
$ npm install typescript --save-dev
$ npx tsc --init --rootDir src --outDir lib --esModuleInterop --resolveJsonModule --lib es6,dom --module commonjs
$ npm install ts-node body-parser express @types/express
$ vi package.json
"start": "ts-node src/index.ts", を追加します。
  "scripts": {
    "start": "ts-node src/index.ts",
    "test": "echo \"Error: no test specified\" && exit 1"
  },
NamesAPI REST API サーバープログラムを作成します。
ここで、この API の仕様は、4000 番ポートで起動し、以下の実装内容とします。
| method | path | 動作内容 |
|---|---|---|
| GET | /names | 保持している全ての名前を返す。 |
| GET | /name/[id] | id(何番目か)に該当する名前を返す。 |
| POST | /name | パラメータの name を追加する。 |
| PUT | /name | パラメータの id(何番目か)に該当する名前をパラメータの name に変更する。 |
データの初期値は、この後作成する
names-data.jsonです。POSTで追加、PUTで追加可能ですが、jsonを書き換えるのではなく、メモリを書き換えています。サーバーを停止すると、変更内容は失われます。
$ mkdir src
$ vi src/index.tsimport express from "express";
import bodyParser from "body-parser";
import names from "./names-data.json";
type Name = typeof names[0];
const port = 4000;
const app = express();
let dataStore = [...names];
app.use(bodyParser.json());
app.get<{}, Name[]>("/names", (req: any, res: any) => {
res.json(dataStore);
});
app.get<{ nameId: string }, Name>("/names/:nameId", (req: any, res: any) => {
res.json(dataStore[parseInt(req.params.nameId)]);
});
app.post<{}, { status: string; data: Name }, Name>(
"/names",
(req: any, res: any) => {
dataStore.push(req.body);
const newNameId = dataStore.length - 1;
res.json({ status: "ok", data: dataStore[newNameId] });
}
);
app.put<{ nameId: string }, { status: string; data: Name }, Name>(
"/names/:nameId",
(req: any, res: any) => {
const nameIdToChange = parseInt(req.params.nameId);
dataStore = dataStore.map((name, nameId) => {
if (nameId === nameIdToChange) {
return req.body;
}
return name;
});
res.json({ status: "ok", data: dataStore[nameIdToChange] });
}
);
app.listen(port, () => {
console.log(`API server started at http://localhost:${port}`);
});NamesAPI REST API サーバーのデータ初期値を作成します。
$ vi src/names-data.json[
{
"name": "John Titor"
},
{
"name": "Werner Karl Heisenberg"
},
{
"name": "Walter White"
}
]起動します。
$ npm startAddressesAPI
$ mkdir rest-api-addresses
$ cd rest-api-addresses
$ npm init -y
$ npm install typescript --save-dev
$ npx tsc --init --rootDir src --outDir lib --esModuleInterop --resolveJsonModule --lib es6,dom --module commonjs
$ npm install ts-node body-parser express @types/express
$ vi package.json
"start": "ts-node src/index.ts", を追加します。
  "scripts": {
    "start": "ts-node src/index.ts",
    "test": "echo \"Error: no test specified\" && exit 1"
  },
AddressesAPI REST API サーバープログラムを作成します。
ここで、この API の仕様は、5000 番ポートで起動し、以下の仕様とします。
| method | path | 動作内容 |
|---|---|---|
| GET | /addresses | 保持している全ての住所を返す。 |
| GET | /address/[id] | id(何番目か)に該当する住所を返す。 |
データの初期値は、この後作成する
addresses-data.jsonです。AddressesAPI REST API の方は、データの更新は無しとします。
$ mkdir src
$ vi src/index.tsimport express from "express";
import bodyParser from "body-parser";
import addresses from "./addresses-data.json";
type Address = typeof addresses[0];
const port = 5000;
const app = express();
let dataStore = [...addresses];
app.use(bodyParser.json());
app.get<{}, Address[]>("/addresses", (req: any, res: any) => {
res.json(dataStore);
});
app.get<{ addressId: string }, Address>(
"/addresses/:addressId",
(req: any, res: any) => {
res.json(dataStore[parseInt(req.params.addressId)]);
}
);
app.listen(port, () => {
console.log(`API server started at http://localhost:${port}`);
});Addresses REST API サーバーのデータ初期値を作成します。
$ vi src/addresses-data.json[
{
"address": "568 Blueberry Blvd, Indian Island, ME 04468"
},
{
"address": "PO Box 230, Skan Falls, NY 13153"
},
{
"address": "224 Blueberry Ct #837, Harkeyville, TX 76877"
}
]起動します。
$ npm start動作確認その2
再び、http://localhost:3000/api/graphql でクエリを実行してみます。
ヨシ!
名前を追加してみます。
ヨシ!
一番目の名前を変更してみます。
ヨシ!
もう一度全体を確認します。
ヨシッ!!
続きは、こちらへ(GraphQL フロントエンドの実装を行います。)
↓
Next.js, graphql-codegen, TanStack Query, Apollo Server v4 で簡易 BFF 作成(2/2)

その他、宣伝、誹謗中傷等、当方が不適切と判断した書き込みは、理由の如何を問わず、投稿者に断りなく削除します。
書き込み内容について、一切の責任を負いません。
このコメント機能は、予告無く廃止する可能性があります。ご了承ください。
コメントの削除をご依頼の場合はTwitterのDM等でご連絡ください。


