- 記事一覧 >
- ブログ記事

Nginx&SimpleSAMLphpをOIDC対応RP化してAzure AD(Entra ID)認証
はじめに
前回記事「Nginx&SimpleSAMLphp で SAML の SP を構築 Azure AD で認証」にて、SimpleSAMLphp の SAML における SP(Service Provider) を構築して、Azure AD で認証まで行いました。
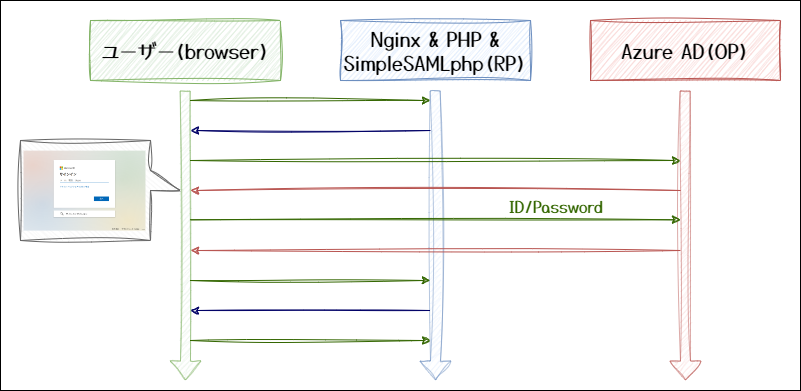
今回は、SimpleSAMLphp で OpenID Connect(OIDC) の Relying Party(RP) を構築して、OpenID Provider(OP) は、Azure AD(Microsoft Entra ID) とし、Azure AD のユーザーアカウントで認証まで行います。
Web アプリケーション作成から Azure AD の設定、SSO 認証実現までの全手順を紹介していきます。
なお、
・Web アプリケーション環境構築
・SimpleSAMLphp Web コンソール環境作成
・SimpleSAMLphp Web コンソール初期設定
までは前回記事と被りますので、実施内容だけ書いて、説明無しでいきます。
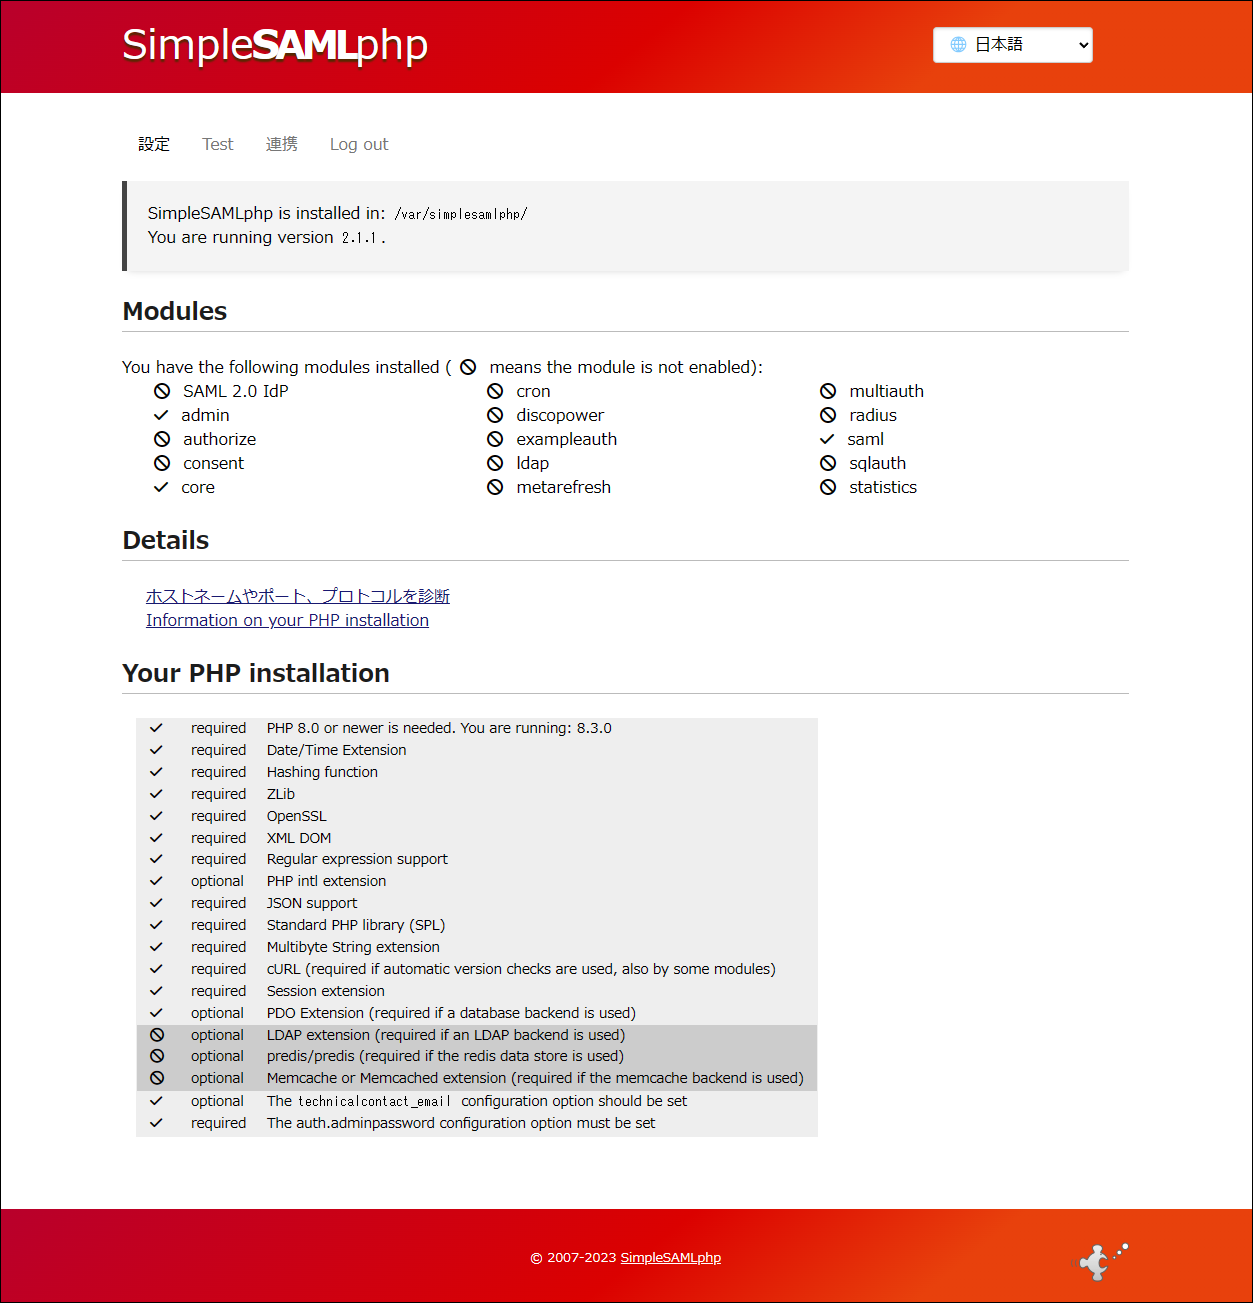
この記事の本題は、SimpleSAMLphp の Web コンソール管理者画面を表示したところからスタートです。
説明が必要な場合、前回記事を参照してください。
Azure AD(Azure Active Directory)は、Microsoft Entra ID に名称が変わりましたが、この記事では、Azure AD 表記のままでいきます。
【検証環境】
Ubuntu 22.04.3 LTS
Nginx 1.18.0
PHP 8.3.0
SimpleSAMLphp 2.1.1
Web アプリケーション環境構築
今回、Web アプリケーションサーバーの URI は、
https://webapps-php.example.com/info.phpとします。
# apt update
# add-apt-repository ppa:ondrej/php -y
# apt update
# apt -y install php8.3 php8.3-gd php8.3-mbstring php8.3-common php8.3-curl
# php -v
PHP 8.3.0 (cli) (built: Nov 24 2023 08:50:08) (NTS)
Copyright (c) The PHP Group
Zend Engine v4.3.0, Copyright (c) Zend Technologies
    with Zend OPcache v8.3.0, Copyright (c), by Zend Technologies
# apt list --installed | grep apache2

WARNING: apt does not have a stable CLI interface. Use with caution in scripts.

apache2-bin/jammy-updates,jammy-security,now 2.4.52-1ubuntu4.7 amd64 [インストール済み、自動]
apache2-data/jammy-updates,jammy-updates,jammy-security,jammy-security,now 2.4.52-1ubuntu4.7 all [インストール済み、自動]
apache2-utils/jammy-updates,jammy-security,now 2.4.52-1ubuntu4.7 amd64 [インストール済み、自動]
apache2/jammy-updates,jammy-security,now 2.4.52-1ubuntu4.7 amd64 [インストール済み、自動]
libapache2-mod-php8.3/jammy,now 8.3.0-1+ubuntu22.04.1+deb.sury.org+1 amd64 [インストール済み、自動]
# apt -y remove apache2-*
# apt install -y php-fpm
# apt install nginx -y
# nginx -v
nginx version: nginx/1.18.0 (Ubuntu)
# vi /etc/nginx/fastcgi_paramsfastcgi_param SCRIPT_NAME $fastcgi_script_name;
↓
fastcgi_param SCRIPT_FILENAME $document_root$fastcgi_script_name;
fastcgi_param SCRIPT_NAME $fastcgi_script_name;# mkdir -p /opt/webapps/php
# chown -R www-data: /opt/webapps
# mkdir -p /var/log/webapps/php
# vi /opt/webapps/php/info.php<?php
phpinfo();# openssl genrsa -out ca.key 2048
# openssl req -new -key ca.key -out ca.csr
Country Name (2 letter code) [AU]:JP
State or Province Name (full name) [Some-State]:Aichi
Locality Name (eg, city) []:Toyota
Organization Name (eg, company) [Internet Widgits Pty Ltd]:
Organizational Unit Name (eg, section) []:
Common Name (e.g. server FQDN or YOUR name) []:webapps-php.example.com
Email Address []:
Please enter the following 'extra' attributes
to be sent with your certificate request
A challenge password []:
An optional company name []:
# echo "subjectAltName=DNS:*.example.com,IP:192.168.12.200" > san.txt
# openssl x509 -req -days 365 -in ca.csr -signkey ca.key -out ca.crt -extfile san.txt
Signature ok
subject=C = JP, ST = Aichi, L = Toyota, O = Default Company Ltd, CN = webapp.example.com
Getting Private key
# mkdir -p /etc/pki/tls/certs
# mkdir /etc/pki/tls/private
# mv ca.crt /etc/pki/tls/certs/webapps-php.crt
# mv ca.key /etc/pki/tls/private/webapps-php.key
# mv ca.csr /etc/pki/tls/private/webapps-php.csr
# vi /etc/nginx/conf.d/webapps-info.confserver # サーバーブロックの開始
{
listen 443 ssl; # サーバーが待ち受けるポート番号
ssl_certificate /etc/pki/tls/certs/webapps-php.crt; # TLS証明書
ssl_certificate_key /etc/pki/tls/private/webapps-php.key; # TLS秘密鍵
server_name webapps-php.example.com; # サーバーの名前
access_log /var/log/webapps/php/access.log; # アクセスログのパス
error_log /var/log/webapps/php/error.log; # エラーログのパス
root /opt/webapps/php; # サーバーのルートディレクトリ
location / # ルートディレクトリに対する設定
{
index index.html index.htm index.php; # デフォルトで使用するインデックスファイル
}
location ~ [^/]\.php(/|$) # .phpで終わるリクエストに対する設定
{
fastcgi_split_path_info ^(.+?\.php)(/.*)$; # パス情報を分割
if (!-f $document_root$fastcgi_script_name) # スクリプトファイルが存在しない場合
{
return 404; # 404エラーを返す
}
client_max_body_size 100m; # クライアントからの最大ボディサイズ
# Mitigate https://httpoxy.org/ vulnerabilities
fastcgi_param HTTP_PROXY ""; # HTTP_PROXYを空に設定してhttpoxy脆弱性を緩和
# fastcgi_pass 127.0.0.1:9000;
fastcgi_pass unix:/run/php/php8.3-fpm.sock; # FastCGIサーバーへのパス
fastcgi_index index.php; # デフォルトのFastCGIスクリプト
# include the fastcgi_param setting
include fastcgi_params; # FastCGIパラメータの設定を含む
# SCRIPT_FILENAME parameter is used for PHP FPM determining
# the script name. If it is not set in fastcgi_params file,
# i.e. /etc/nginx/fastcgi_params or in the parent contexts,
# please comment off following line:
# fastcgi_param SCRIPT_FILENAME $document_root$fastcgi_script_name; # スクリプト名を決定するためのパラメータ
}
}# vi /etc/php/8.3/fpm/php.inidate.timezone = Asia/Tokyo
# 新規設定
display_errors = On
display_startup_errors = On
# 確認(最初から設定されている。)# vi /etc/hosts
192.168.12.200 webapps-php.example.com今回、Web アプリケーションサーバーの IP アドレスは、192.168.12.200 とします。
# systemctl restart nginx
# systemctl restart php8.3-fpm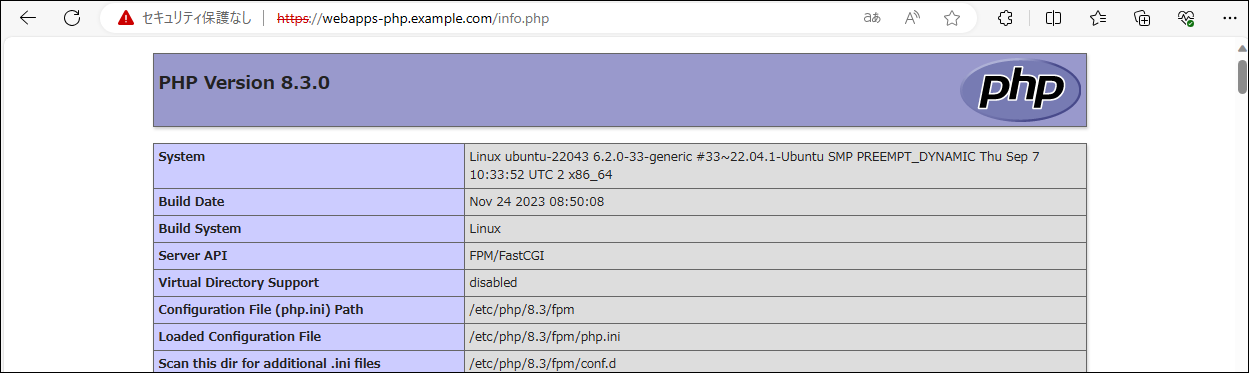
SimpleSAMLphp Web コンソール環境作成
# apt install -y php8.3-dom php8.3-xml
# tar xzf simplesamlphp-2.1.1-full.tar.gz
# mv simplesamlphp-2.1.1 /var/simplesamlphp
今回、SimpleSAMLphp Web コンソールの URL は、
https://ssp2.example.com/simplesaml/とします。
# openssl genrsa -out ca.key 2048
# openssl req -new -key ca.key -out ca.csr
Country Name (2 letter code) [AU]:JP
State or Province Name (full name) [Some-State]:Aichi
Locality Name (eg, city) []:Toyota
Organization Name (eg, company) [Internet Widgits Pty Ltd]:
Organizational Unit Name (eg, section) []:
Common Name (e.g. server FQDN or YOUR name) []:ssp2.example.com
Email Address []:

Please enter the following 'extra' attributes
to be sent with your certificate request
A challenge password []:
An optional company name []:
# echo "subjectAltName=DNS:*.example.com,IP:192.168.12.200" > san.txt
# openssl x509 -req -days 365 -in ca.csr -signkey ca.key -out ca.crt -extfile san.txt
Signature ok
subject=C = JP, ST = Aichi, L = Toyota, O = Default Company Ltd, CN = webapp.example.com
Getting Private key
# mv ca.crt /etc/pki/tls/certs/ssp2.example.com.crt
# mv ca.key /etc/pki/tls/private/ssp2.example.com.key
# mv ca.csr /etc/pki/tls/private/ssp2.example.com.csr
# vi /etc/nginx/conf.d/simplesaml.confserver {
listen 443 ssl;
server_name ssp2.example.com;
ssl_certificate /etc/pki/tls/certs/ssp2.example.com.crt;
ssl_certificate_key /etc/pki/tls/private/ssp2.example.com.key;
ssl_protocols TLSv1.3 TLSv1.2;
ssl_ciphers EECDH+AESGCM:EDH+AESGCM;
location ^~ /simplesaml {
index index.php;
alias /var/simplesamlphp/public;
location ~^(?<prefix>/simplesaml)(?<phpfile>.+?\.php)(?<pathinfo>/.*)?$ {
include fastcgi_params;
# fastcgi_pass $fastcgi_pass;
fastcgi_pass unix:/run/php/php8.3-fpm.sock;
fastcgi_param SCRIPT_FILENAME $document_root$phpfile;
# Must be prepended with the baseurlpath
fastcgi_param SCRIPT_NAME /simplesaml$phpfile;
fastcgi_param PATH_INFO $pathinfo if_not_empty;
}
}
}# chown -R www-data: /var/simplesamlphp
# vi /etc/hosts
192.168.12.200 ssp2.example.com
# systemctl restart nginx
# systemctl restart php8.3-fpm
# cd /var/simplesamlphp
# cp config/config.php.dist config/config.php
# cp config/authsources.php.dist config/authsources.php
# cp metadata/saml20-idp-hosted.php.dist metadata/saml20-idp-hosted.php
# cp metadata/saml20-idp-remote.php.dist metadata/saml20-idp-remote.php
# cp metadata/saml20-sp-remote.php.dist metadata/saml20-sp-remote.php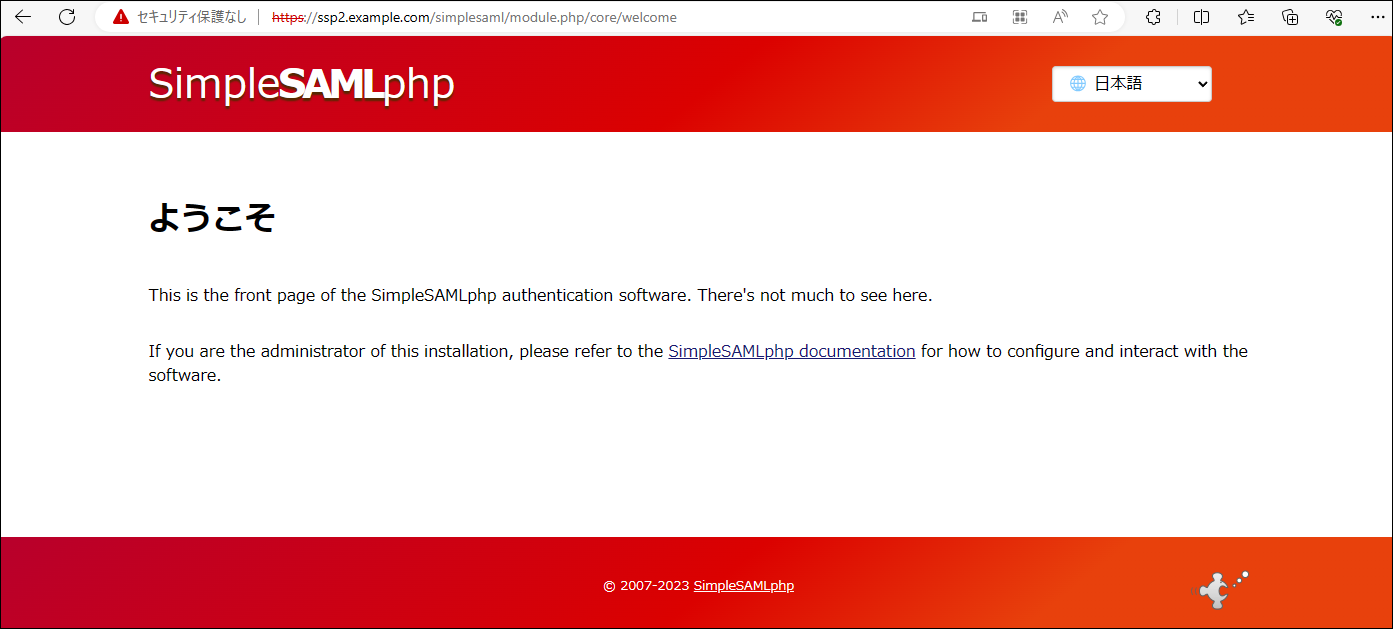
SimpleSAMLphp Web コンソール初期設定
# openssl rand -base64 32
RCN2jfGolAsfOb1J4UXQrbrwevYIyz/O/o9sJWRzxTc=
# vi /var/simplesamlphp/config/config.php//'secretsalt' => 'defaultsecretsalt',
// ↓ 変更
'secretsalt' => 'RCN2jfGolAsfOb1J4UXQrbrwevYIyz/O/o9sJWRzxTc=',
//'auth.adminpassword' => '123',
// ↓ 変更
'auth.adminpassword' => 'admin',
//'timezone' => null,
// ↓ 変更
'timezone' => 'Asia/Tokyo',
// 'technicalcontact_name' => 'Administrator',
// 'technicalcontact_email' => 'na@example.org',
// ↓ 変更
'technicalcontact_name' => 'Administrator',
'technicalcontact_email' => 'admin@ssp2.example.com',
simplesamlphp-module-authoauth2 インストール
PHP のパッケージ管理システム composer で SimpleSAMLphp 用 OpenID Connect Relying Party(RP) 対応拡張モジュール simplesamlphp-module-authoauth2 をインストールします。
ソースコードは、
https://github.com/simplesamlphp/simplesamlphp-module-oidcにあります。
README に 「SSP」, 「SSP2」 とありますが、それぞれ、SimpleSAMLphp v1.x.x, SimpleSAMLphp v2.x.x のことです。(最初何のことだか分かりませんでした。)
OP(OpenID Provider)を構築するときに使用するのは、以下です。
https://github.com/simplesamlphp/simplesamlphp-module-oidc今回は、Relying Party(RP) を構築するため、使いません。説明もしません。
# cd /var/simplesamlphp
# apt update -y
# apt install composer -y
次に行う composer で依存関係エラーになるため、先に足りないモジュールインストールします。
# apt install php8.3-sqlite3 -y
# apt install php8.3-ldap -y
# apt install php8.3-intl -y
依存関係エラーの内容は以下です。
Problem 1
- Root composer.json requires PHP extension ext-pdo_sqlite _ but it is missing from your system. Install or enable PHP's pdo_sqlite extension.
Problem 2
- simplesamlphp/simplesamlphp-module-ldap is locked to version v2.2.1 and an update of this package was not requested.
- simplesamlphp/simplesamlphp-module-ldap v2.2.1 requires ext-ldap _ -> it is missing from your system. Install or enable PHP's ldap extension.
PHP Fatal error: Uncaught Error: Class "Normalizer" not found in /usr/share/php/Symfony/Component/String/AbstractUnicodeString.php:31
composer でインストールします。
# composer require cirrusidentity/simplesamlphp-module-authoauth2
...
  - Installing symfony/translation (v6.0.19): Extracting archive
Generating autoload files
66 packages you are using are looking for funding.
Use the `composer fund` command to find out more!
> php bin/translations translations:update:binary
simplesamlphp-module-authoauth2 インストール成功です!
Azure AD - アプリの登録
OP(Azure AD)側の設定を行います。
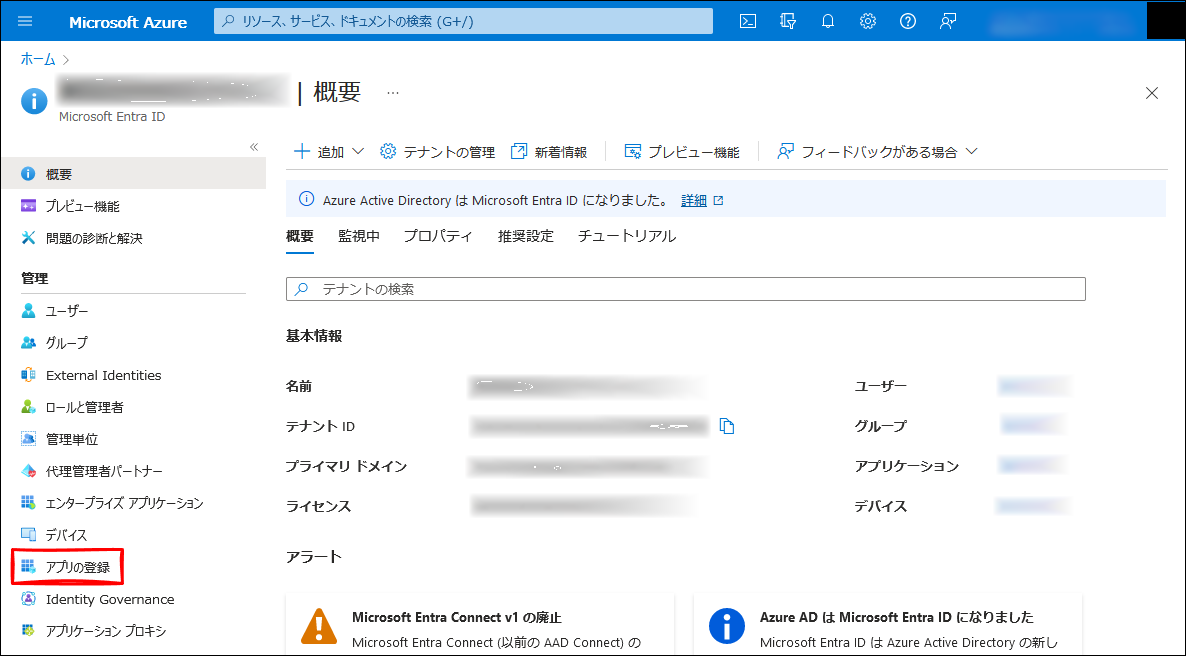
Azure ポータルから、Microsoft Entra ID に移動して、アプリの登録 をクリックします。

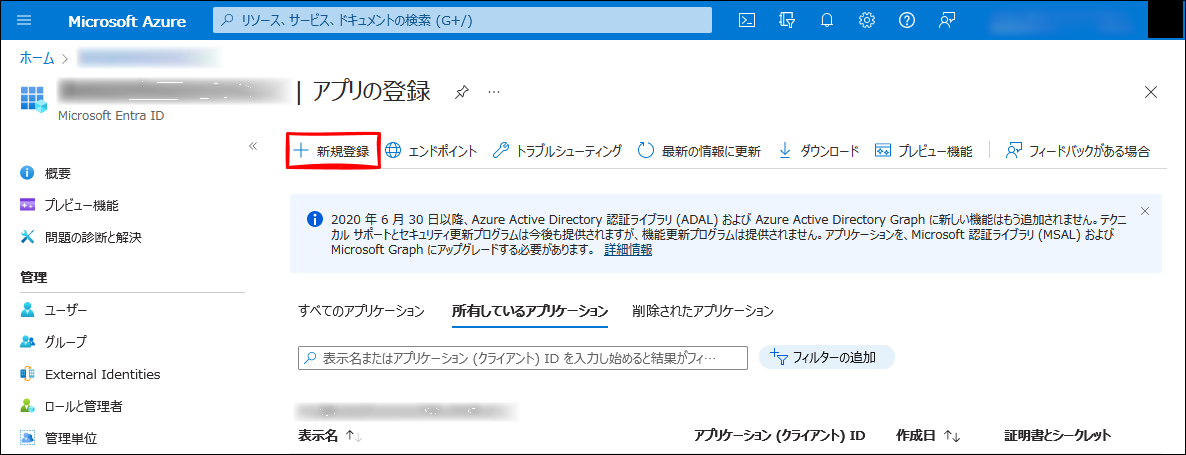
+新規作成 をクリックします。
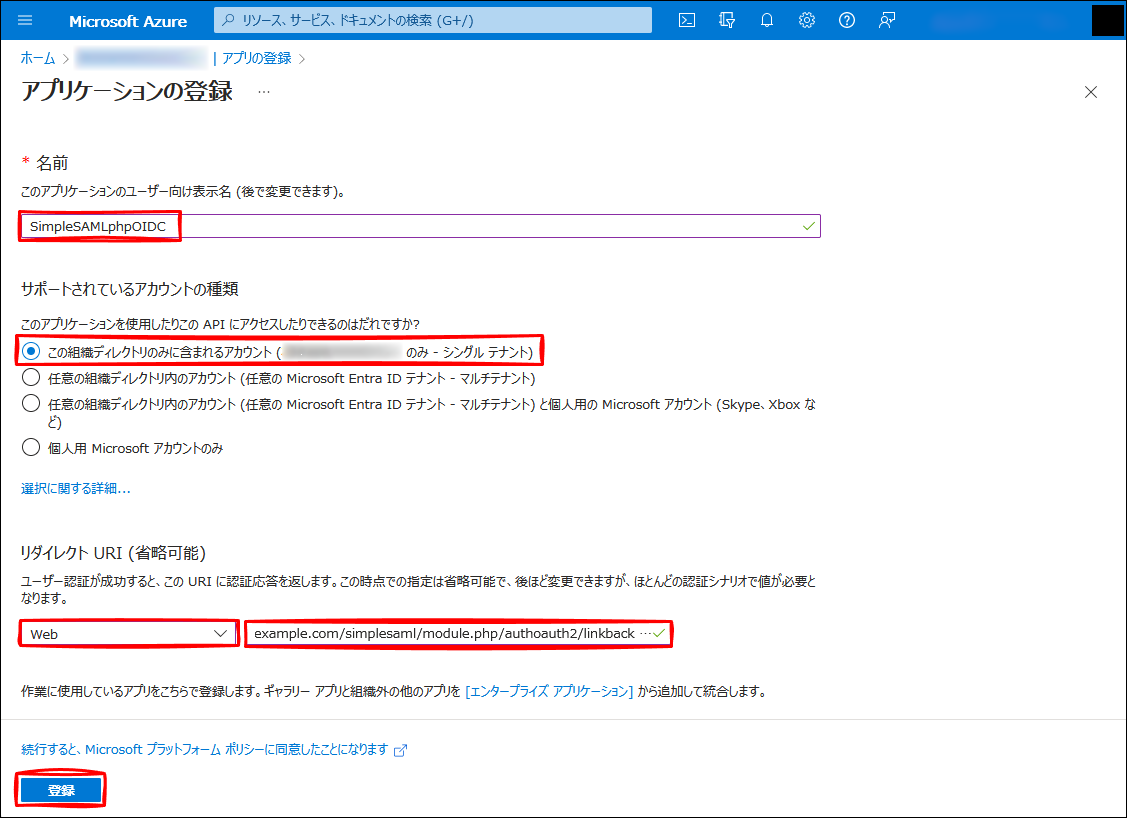
アプリ情報を入力し、登録 をクリックします。
名前: SimpleSAMLphpOIDC(任意です。)
サポートされているアカウントの種類:この組織ディレクトリのみに含まれるアカウント (<テナント名> のみ - シングル テナント)
リダイレクト URI (省略可能):Web https://ssp2.example.com/simplesaml/module.php/authoauth2/linkback.php
リダイレクト URI については、simplesamlphp-module-authoauth2 の README に
https://hostname/SSP_PATH/module.php/authoauth2/linkback.phpと指示があります。
概要 をクリックして、
アプリケーション (クライアント) ID から clientId(後で行う SimpleSAMLphp 側設定項目)を確認しておきます。

証明書とシークレット をクリックし、+新しいクライアント シークレット をクリックします。
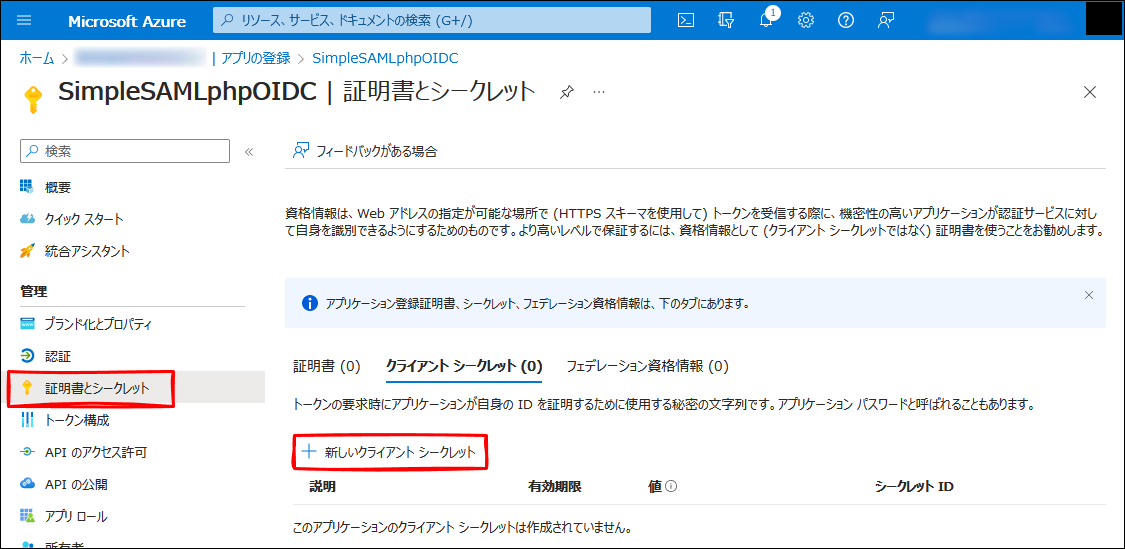
説明、有効期限 を任意の値に設定し、追加 をクリックします。
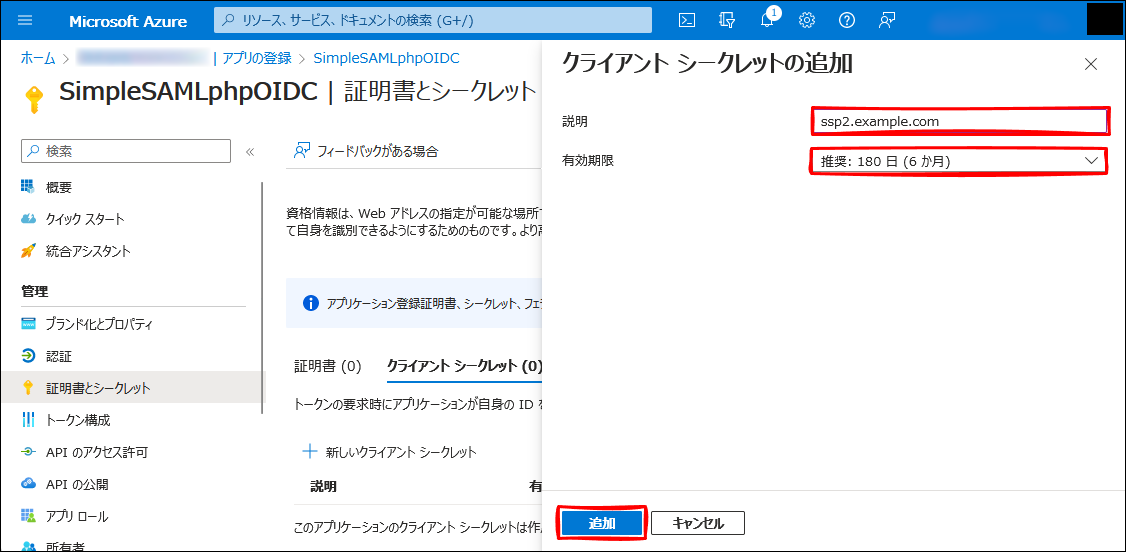
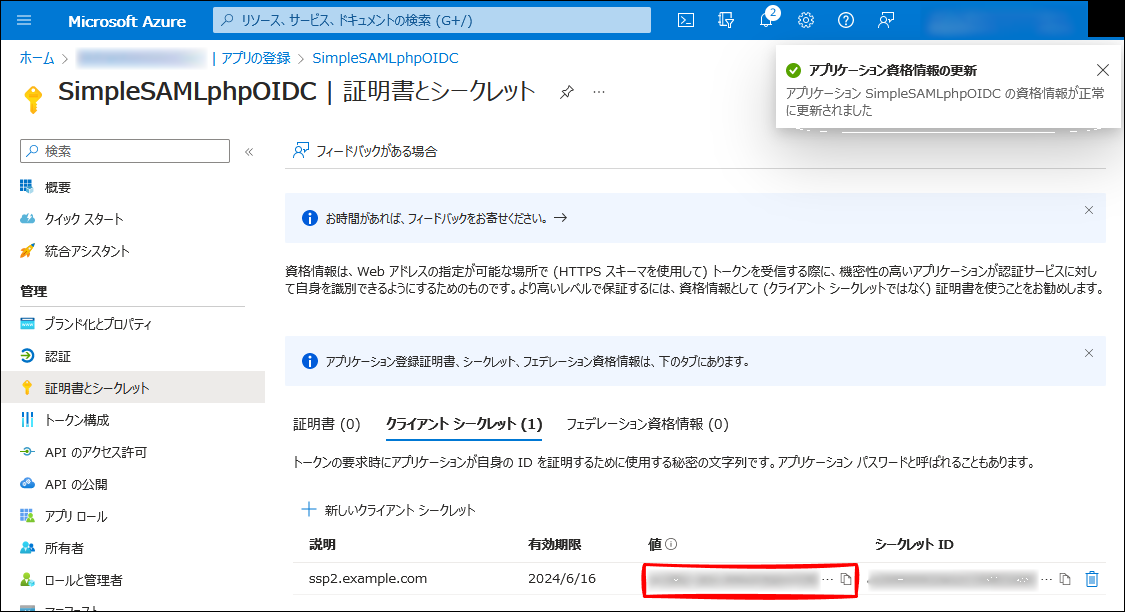
ここで出てくる 値 の文字列が clientSecret(後で行う SimpleSAMLphp 側設定項目)の文字列になります。(シークレット ID の方ではありません。)
二度と表示されないため、ここで、メモっておきます。
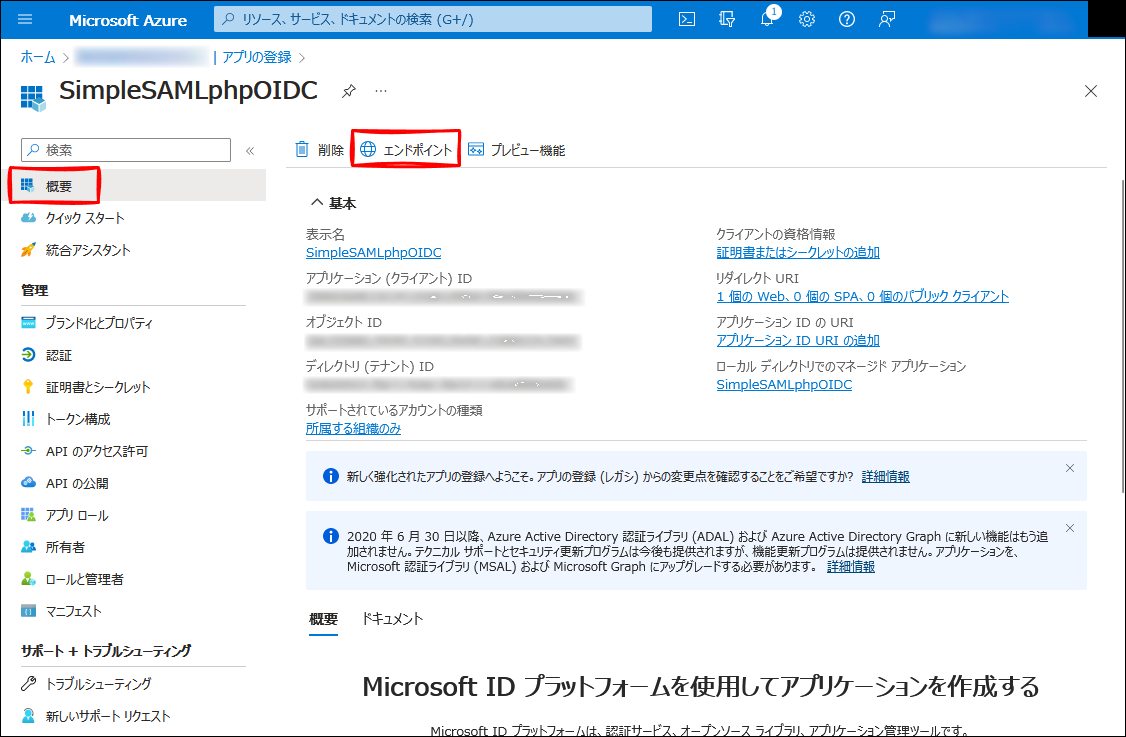
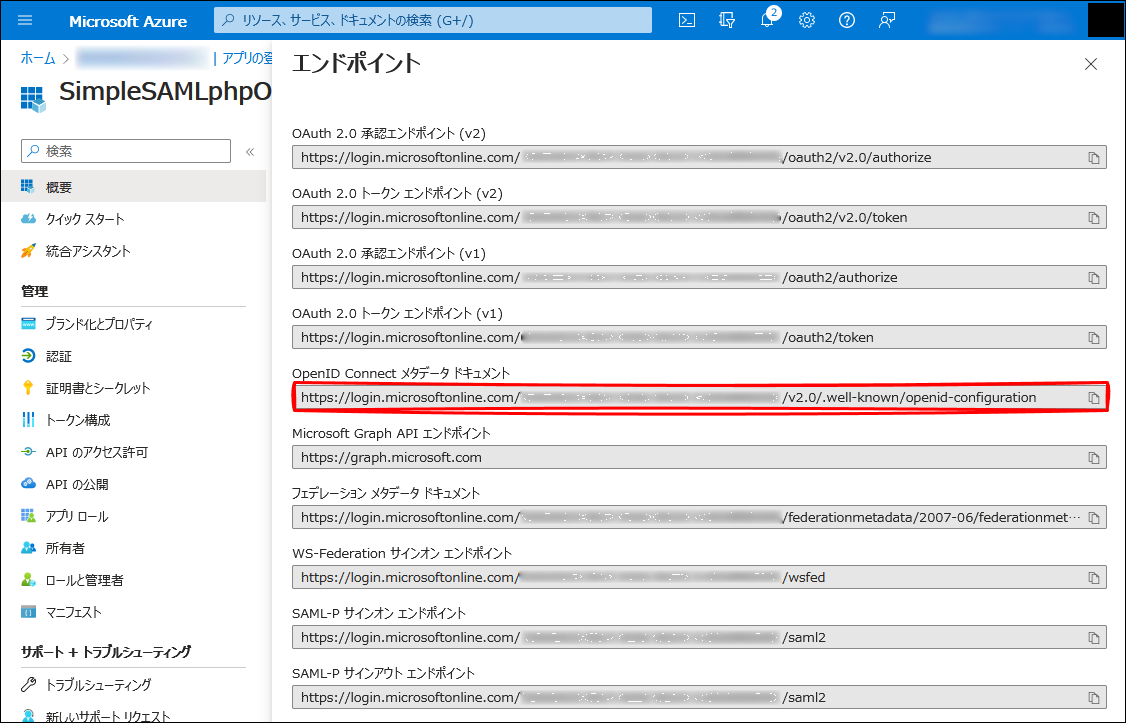
概要 に移動して、エンドポイント をクリックし、
OpenID Connect メタデータ ドキュメント から discoveryUrl(後で行う SimpleSAMLphp 側設定項目) を確認します。
SimpleSAMLphp 設定
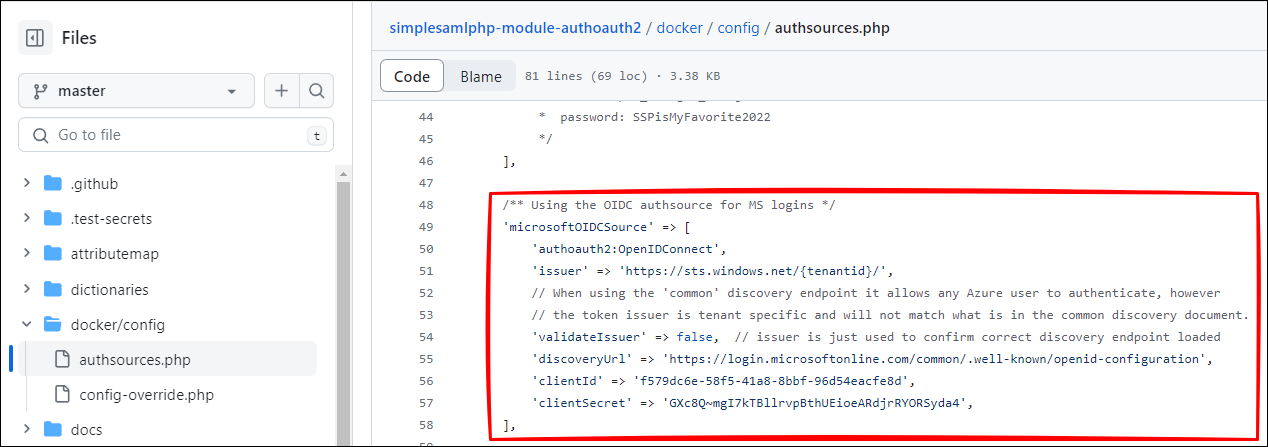
authsources.php に Relying Party(RP) の設定を追加します。
# cd /var/simplesamlphp
# vi config/authsources.php 'microsoftOIDCSource' => [
'authoauth2:OpenIDConnect',
'issuer' => 'https://login.microsoftonline.com/0******2-f**7-4**c-9**4-1**********b/v2.0',
// When using the 'common' discovery endpoint it allows any Azure user to authenticate, however
// the token issuer is tenant specific and will not match what is in the common discovery document.
'validateIssuer' => false, // issuer is just used to confirm correct discovery endpoint loaded
'discoveryUrl' => 'https://login.microsoftonline.com/0******2-f**7-4**c-9**4-1**********b/v2.0/.well-known/openid-configuration',
'clientId' => '3******6-0**9-4**b-85bd-f**********8',
'clientSecret' => 'sv************************************Z_',
],設定キーの
'microsoftOIDCSource'は任意です。
'discoveryUrl'、'clientId'、'clientSecret'は Azure の アプリの登録 で確認した値です。
ソースコードの中に入っていた docker/config/authsources.php の設定を真似しています。
なお、issuer の値は、以下の出力で確認できます。
# apt install curl -y
# apt install jq -y
# curl https://login.microsoftonline.com/0******2-f**7-4**c-9**4-1**********b/v2.0/.well-known/openid-configuration | jq
{
"token_endpoint": "https://login.microsoftonline.com/0******2-f**7-4**c-9**4-1**********b/oauth2/v2.0/token",
"token_endpoint_auth_methods_supported": [
"client_secret_post",
"private_key_jwt",
"client_secret_basic"
],
"jwks_uri": "https://login.microsoftonline.com/0******2-f**7-4**c-9**4-1**********b/discovery/v2.0/keys",
"response_modes_supported": [
"query",
"fragment",
"form_post"
],
"subject_types_supported": [
"pairwise"
],
"id_token_signing_alg_values_supported": [
"RS256"
],
"response_types_supported": [
"code",
"id_token",
"code id_token",
"id_token token"
],
"scopes_supported": [
"openid",
"profile",
"email",
"offline_access"
],
"issuer": "https://login.microsoftonline.com/0******2-f**7-4**c-9**4-1**********b/v2.0",
"request_uri_parameter_supported": false,
...authoauth2 モジュールを有効化します。
authoauth2 モジュールとは、今回、composer でインストールした cirrusidentity/simplesamlphp-module-authoauth2 のモジュール名です。
これを認識させる設定を追加します。
有効にしないと Test のときに以下のエラーになります。
SimpleSAML\Error\Error: UNHANDLEDEXCEPTION
Backtrace:
2 src/SimpleSAML/Error/ExceptionHandler.php:32 (SimpleSAML\Error\ExceptionHandler::customExceptionHandler)
1 vendor/symfony/error-handler/ErrorHandler.php:541 (Symfony\Component\ErrorHandler\ErrorHandler::handleException)
0 [builtin] (N/A)
Caused by: Exception: The module 'authoauth2' is not enabled.
Backtrace:
8 src/SimpleSAML/Module.php:449 (SimpleSAML\Module::resolveClass)
7 src/SimpleSAML/Auth/Source.php:313 (SimpleSAML\Auth\Source::parseAuthSource)
6 src/SimpleSAML/Auth/Source.php:356 (SimpleSAML\Auth\Source::getById)
5 src/SimpleSAML/Auth/Simple.php:62 (SimpleSAML\Auth\Simple::getAuthSource)
4 src/SimpleSAML/Auth/Simple.php:151 (SimpleSAML\Auth\Simple::login)
3 [builtin] (call_user_func_array)
2 src/SimpleSAML/HTTP/RunnableResponse.php:68 (SimpleSAML\HTTP\RunnableResponse::sendContent)
1 vendor/symfony/http-foundation/Response.php:373 (Symfony\Component\HttpFoundation\Response::send)
0 public/module.php:24 (N/A)
# vi config/config.php 'module.enable' => [
'exampleauth' => false,
'core' => true,
'admin' => true,
'saml' => true,//末尾に , 追加必要なのに注意
'authoauth2' => true//追加
],ついでに、ログ出力がデフォルトで syslog になっているため、ファイルに出力するようにします。(実施は任意です。)
また、ログレベルを DEBUG に引き上げておきます。(実施は任意です。)
    //'loggingdir' => '/var/log/',
    'loggingdir' => '/var/log/simplesaml',
...
    //'logging.level' => SimpleSAML\Logger::NOTICE,
    'logging.level' => SimpleSAML\Logger::DEBUG,
    //'logging.handler' => 'syslog',
    'logging.handler' => 'file',
# mkdir /var/log/simplesaml
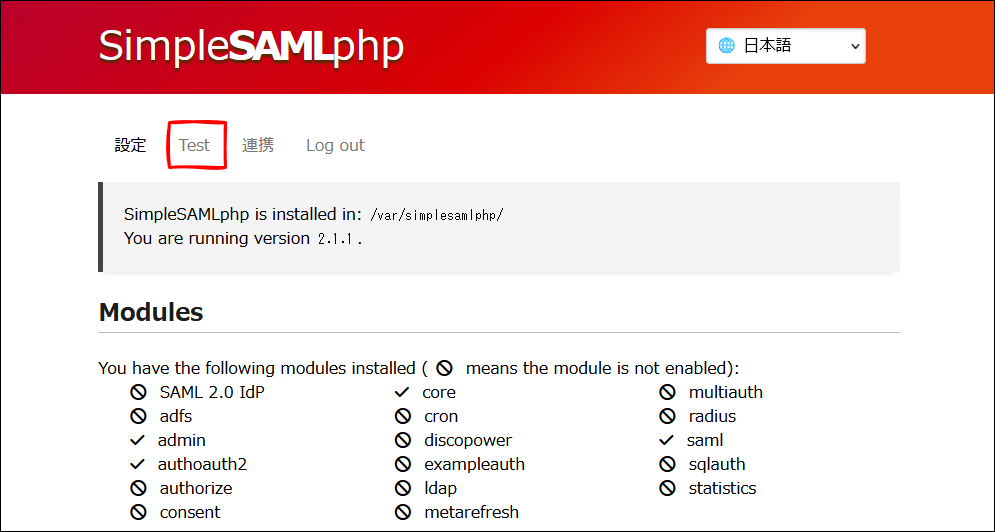
# chown www-data: /var/log/simplesamlTest
Test1
https://ssp2.example.com/simplesaml/admin にて、
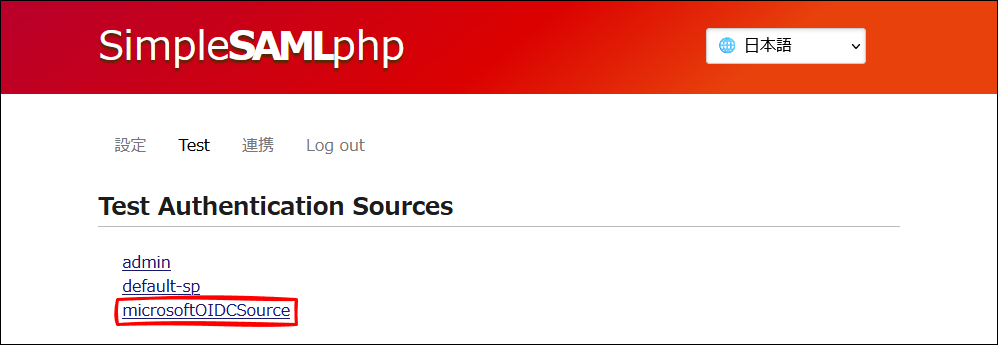
Test タブをクリックして、
microsoftOIDCSource をクリックします。
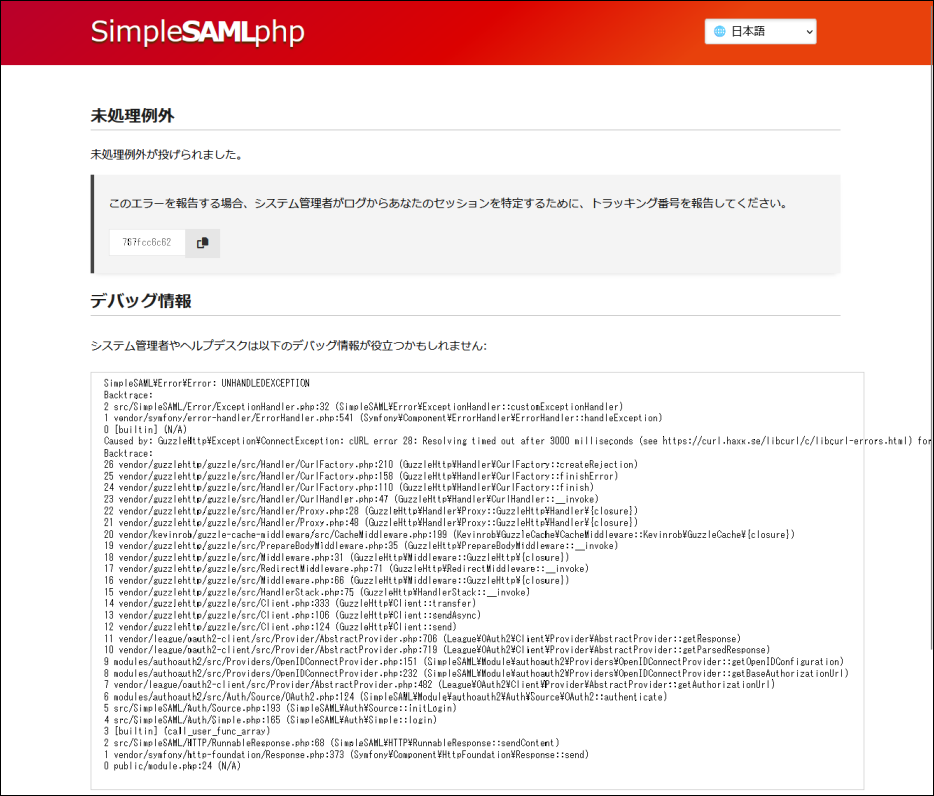
以下のエラーになりました。
SimpleSAML\Error\Error: UNHANDLEDEXCEPTION
Backtrace:
2 src/SimpleSAML/Error/ExceptionHandler.php:32 (SimpleSAML\Error\ExceptionHandler::customExceptionHandler)
1 vendor/symfony/error-handler/ErrorHandler.php:541 (Symfony\Component\ErrorHandler\ErrorHandler::handleException)
0 [builtin] (N/A)
Caused by: GuzzleHttp\Exception\ConnectException: cURL error 28: Resolving timed out after 3000 milliseconds (see https://curl.haxx.se/libcurl/c/libcurl-errors.html) for https://login.microsoftonline.com/0******2-f**7-4**c-9**4-1**********b/v2.0/.well-known/openid-configuration
Backtrace:
26 vendor/guzzlehttp/guzzle/src/Handler/CurlFactory.php:210 (GuzzleHttp\Handler\CurlFactory::createRejection)
(略)
4 src/SimpleSAML/Auth/Simple.php:165 (SimpleSAML\Auth\Simple::login)
3 [builtin] (call_user_func_array)
2 src/SimpleSAML/HTTP/RunnableResponse.php:68 (SimpleSAML\HTTP\RunnableResponse::sendContent)
1 vendor/symfony/http-foundation/Response.php:373 (Symfony\Component\HttpFoundation\Response::send)
0 public/module.php:24 (N/A)
今回の場合、
SimpleSAMLphp からプロキシサーバーを使って、インターネット(https://login.microsoftonline.com/...)に出る必要があるため、エラーになりました。
SimpleSAMLphp にプロキシサーバーの設定が必要です。
NG:
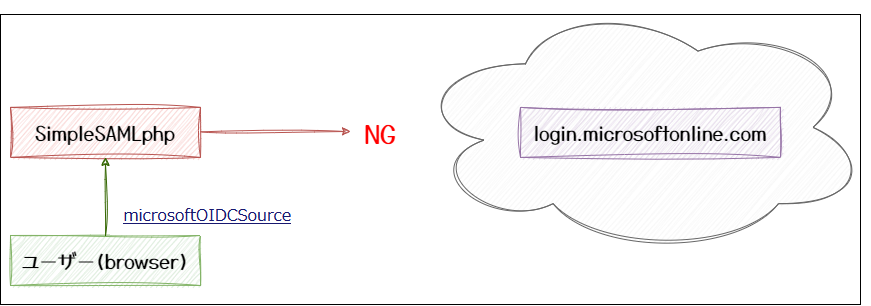
OK:

プロキシサーバー設定
SimpleSAMLphp からプロキシサーバーを使わずに直接インターネットアクセスできる場合は、この設定は必要ありません。
SimpleSAMLphp → プロキシサーバー → インターネット(https://login.microsoftonline.com/...)の通信が可能になるようにプロキシサーバーの設定をします。
今回プロキシサーバーは、http://192.168.0.158:3128 とします。
/etc/environment などサーバー全体の環境変数で指定しても効きません。
# cd /var/simplesamlphp
# vi config/authsources.php 'microsoftOIDCSource' => [
'authoauth2:OpenIDConnect',
'issuer' => 'https://login.microsoftonline.com/0******2-f**7-4**c-9**4-1**********b/v2.0',
// When using the 'common' discovery endpoint it allows any Azure user to authenticate, however
// the token issuer is tenant specific and will not match what is in the common discovery document.
'validateIssuer' => false, // issuer is just used to confirm correct discovery endpoint loaded
'discoveryUrl' => 'https://login.microsoftonline.com/0******2-f**7-4**c-9**4-1**********b/v2.0/.well-known/openid-configuration',
'clientId' => '3******6-0**9-4**b-85bd-f**********8',
'clientSecret' => 'sv************************************Z_',
'proxy' => 'http://192.168.0.158:3128',//←追加
],なお、上記設定以外の方法では、php-fpm の環境変数としてセットすると、プロキシサーバーが有効になります。
この対応の場合、authsources.php の
'proxy'設定は不要です。ソースコードを見ると、$_SERVER["HTTP_PROXY"]の存在をチェックしていました。
# vi /etc/nginx/fastcgi_params
fastcgi_param	HTTP_PROXY	http://192.168.0.158:3128;
fastcgi_param	HTTPS_PROXY	http://192.168.0.158:3128;
fastcgi_param	NO_PROXY	.example.com;
# systemctl restart nginx
Test2
再び
Test タブをクリックして、
microsoftOIDCSource をクリックします。
プロキシサーバー問題はなくなりましたが、まだエラーになりました。(今度のエラーは、成功したり、失敗したりです。)
SimpleSAML\Error\Error: UNHANDLEDEXCEPTION
Backtrace:
2 src/SimpleSAML/Error/ExceptionHandler.php:32 (SimpleSAML\Error\ExceptionHandler::customExceptionHandler)
1 vendor/symfony/error-handler/ErrorHandler.php:541 (Symfony\Component\ErrorHandler\ErrorHandler::handleException)
0 [builtin] (N/A)
Caused by: GuzzleHttp\Exception\ConnectException: cURL error 28: Operation timed out after 3001 milliseconds with 0 bytes received (see https://curl.haxx.se/libcurl/c/libcurl-errors.html) for https://login.microsoftonline.com/0******2-f**7-4**c-9**4-1**********b/v2.0/.well-known/openid-configuration
Backtrace:
26 vendor/guzzlehttp/guzzle/src/Handler/CurlFactory.php:210 (GuzzleHttp\Handler\CurlFactory::createRejection)
(略)
4 src/SimpleSAML/Auth/Simple.php:165 (SimpleSAML\Auth\Simple::login)
3 [builtin] (call_user_func_array)
2 src/SimpleSAML/HTTP/RunnableResponse.php:68 (SimpleSAML\HTTP\RunnableResponse::sendContent)
1 vendor/symfony/http-foundation/Response.php:373 (Symfony\Component\HttpFoundation\Response::send)
0 public/module.php:24 (N/A)
デフォルトの 3 秒を超えて応答が無い場合、エラーになるようでした。 タイムアウトの秒数を 10 秒に変更します。
# cd /var/simplesamlphp
# vi config/authsources.php 'microsoftOIDCSource' => [
'authoauth2:OpenIDConnect',
'issuer' => 'https://login.microsoftonline.com/0******2-f**7-4**c-9**4-1**********b/v2.0',
// When using the 'common' discovery endpoint it allows any Azure user to authenticate, however
// the token issuer is tenant specific and will not match what is in the common discovery document.
'validateIssuer' => false, // issuer is just used to confirm correct discovery endpoint loaded
'discoveryUrl' => 'https://login.microsoftonline.com/0******2-f**7-4**c-9**4-1**********b/v2.0/.well-known/openid-configuration',
'clientId' => '3******6-0**9-4**b-85bd-f**********8',
'clientSecret' => 'sv************************************Z_',
'proxy' => 'http://192.168.0.158:3128',
'timeout' => 10,//←追加
],Test3
Test タブをクリックして、
microsoftOIDCSource をクリックします。
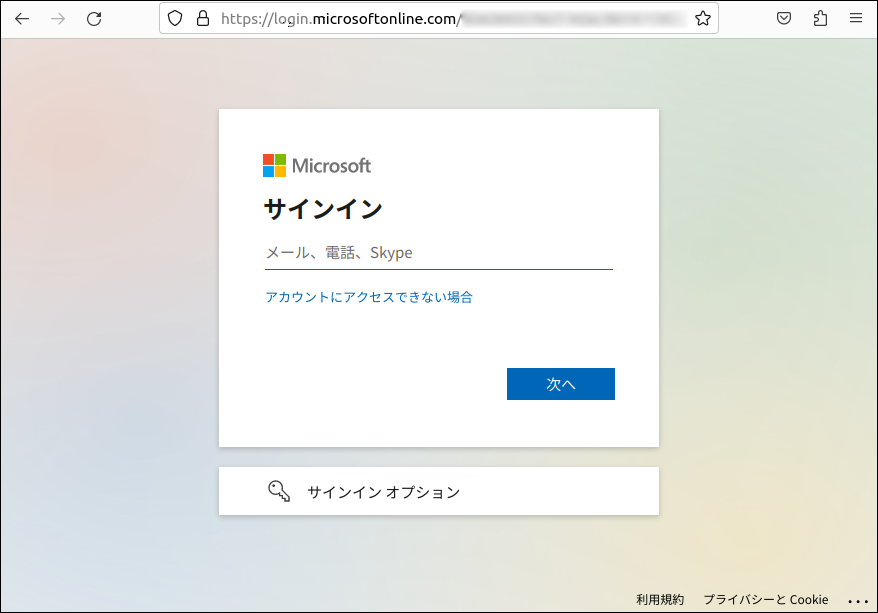
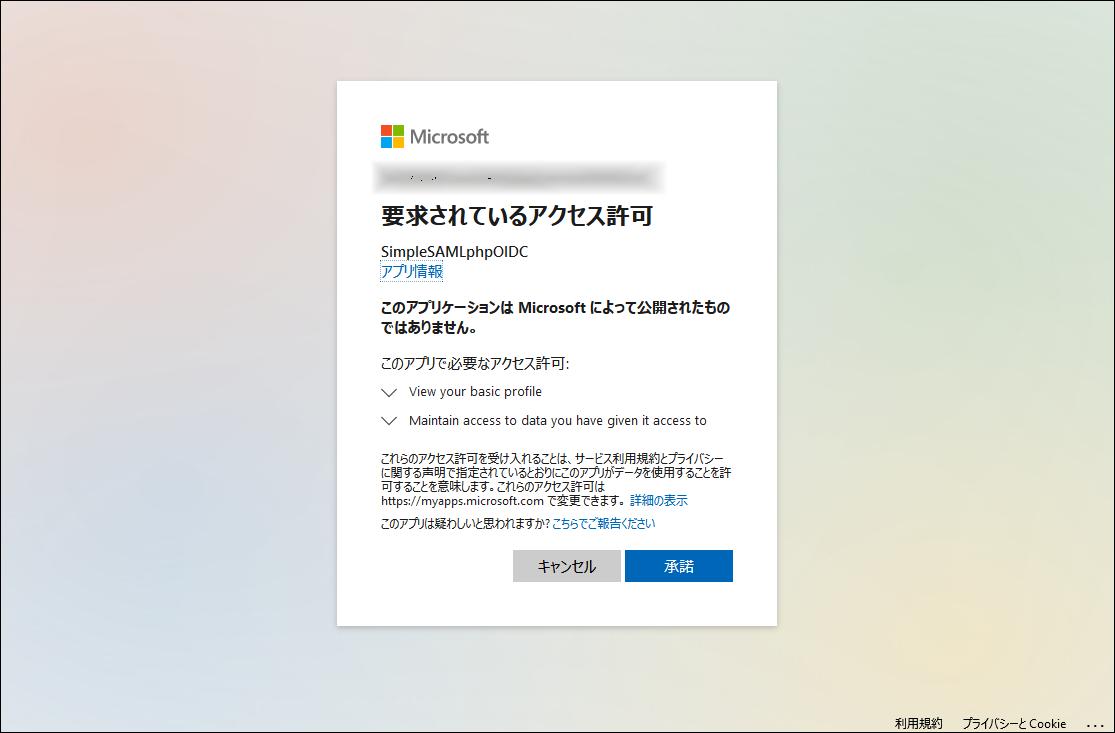
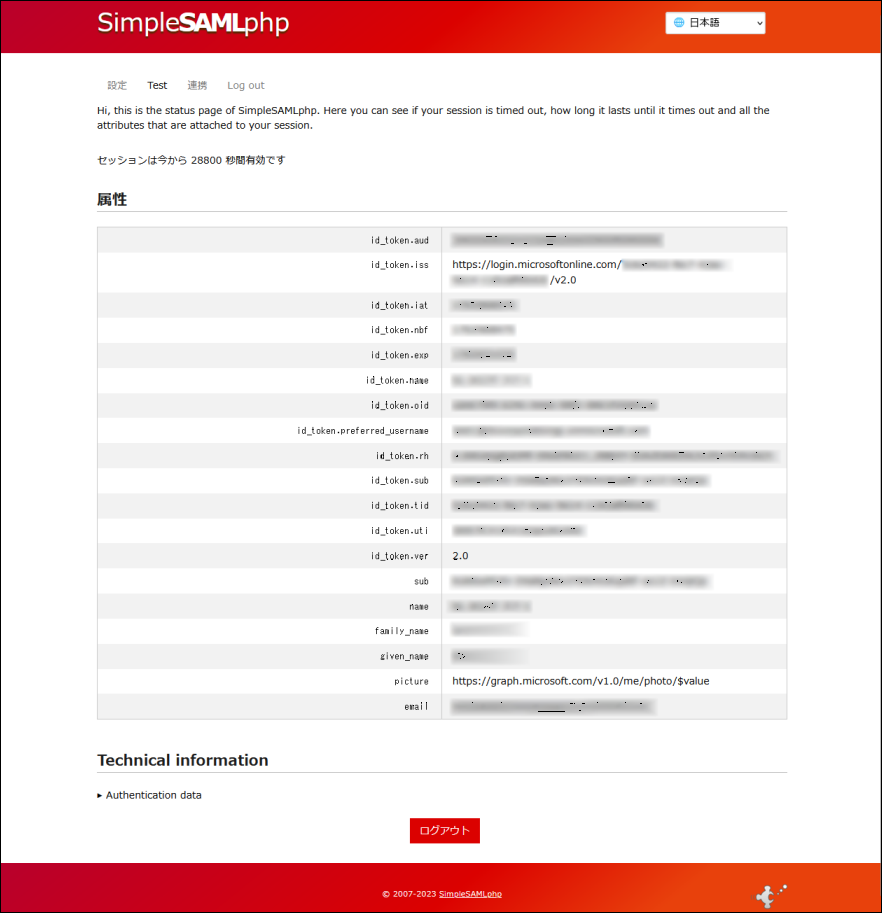
成功しました!ヨシ!
Web アプリ(info.php)SSO 対応
Azure AD - アプリの登録 - SimpleSAMLphpOIDC - 認証
に
リダイレクト URI
https://webapps-php.example.com/simplesaml/module.php/authoauth2/linkback.php
を追加します。

Web アプリを SSO 対応に改修します。
# vi /opt/webapps/php/info.php<?php
require_once('/var/simplesamlphp/lib/_autoload.php');
use SimpleSAML\Auth\Simple;
$as = new Simple('microsoftOIDCSource');
$as->requireAuth();
phpinfo();# vi /etc/nginx/conf.d/webapps-info.conf# location / の上に追記
location ^~ /simplesaml {
index index.php;
alias /var/simplesamlphp/public;
location ~^(?<prefix>/simplesaml)(?<phpfile>.+?\.php)(?<pathinfo>/.*)?$ {
include fastcgi_params;
# fastcgi_pass $fastcgi_pass;
fastcgi_pass unix:/run/php/php8.3-fpm.sock;
fastcgi_param SCRIPT_FILENAME $document_root$phpfile;
# Must be prepended with the baseurlpath
fastcgi_param SCRIPT_NAME /simplesaml$phpfile;
fastcgi_param PATH_INFO $pathinfo if_not_empty;
}
}
location /# systemctl restart nginxhttps://webapps-php.example.com/info.php にアクセスします。
Test でログインしたままブラウザを再起動していない場合、再認証はかかりません。
ヨシっ!
その他、宣伝、誹謗中傷等、当方が不適切と判断した書き込みは、理由の如何を問わず、投稿者に断りなく削除します。
書き込み内容について、一切の責任を負いません。
このコメント機能は、予告無く廃止する可能性があります。ご了承ください。
コメントの削除をご依頼の場合はXのDM等でご連絡ください。


