- 記事一覧 >
- ブログ記事

PythonでSlackのメッセージを一括削除→Cloud Functionsで定期実行 全手順
はじめに
Python で Slack のメッセージを一括削除するプログラムを作成しました。指定チャンネルの1週間経過したメッセージを一括削除します。しばらくすると、また溜まってくるため、一日一回、GCP Cloud Function で定期実行するようにしました。
Slack の API 設定 →Python プログラム作成 →Google Cloud Functions の設定、Cloud Scheduler に登録 まで全手順を書きたいと思います。
なお、Slack、Google Cloud Platform(GCP)はユーザー登録済みとします。(登録の手順は省略します。以降、登録した人が操作しているものとします。)
Cloud Functions の設定は、特に制約が無い場合、Linux や Windows に Python をインストールして、cron or タスクスケジューラでも同じことができると思います。
cron or タスクスケジューラの場合のイメージ:
↑
これでも定期実行可です。※今回、この説明は有りません。
【検証環境(Pythonの開発環境)】
Raspberry Pi Desktop OS
Python 3.7.3
↑
ローカルでテストした環境です。この環境は必須ではありません。
Slack の API 設定
https://api.slack.com/appsにて、Slack の API を作成して、OAuth Token コードを取得します。
「Create New App」をクリックします。
「From scratch」をクリックします。
App Name を適当に入力して、「Pick a workspace to develop your app in:」のところは、削除したいチャンネルが有るワークスペースを選択します。
「OAuth & Permissions」をクリックします。
「User Token Scopes」の「Add an OAuth Scope」のところをクリックして、OAuth Scope を追加していきます。"OAuth Scope"とは、権限のようなものです。
以下を追加します。
●history(メッセージ一覧)を取得するのに必要
channels:history
groups:history
im:history
mpim:history
※channels,groups,im,mpim は、メッセージの種類です。今回、種類に関わらず、「全メッセージ」ですので、全て指定します。
● メッセージを削除するのに必要
chat:write
「Bot Token Scopes」は今回設定しません。Botが参加していないチャンネルの場合、historyが表示されないため、「User Token Scopes」を使います。
「Install to Workspace」をクリックします。
「許可する」をクリックします。
「User OAuth Token」のところに、User OAuth Token コードが現れますので、これをコピーして使います。※以降「Token コード」と書きます。
以上で Slack 側の準備は完了です。
Python プログラム作成
Slack の Python SDK slack_sdk を使って開発します。
公式 SDK を使えば、新しい API や機能への対応が容易になったり、パラメーターが非推奨になったときにいち早くワーニングログが出たり、細かい落とし穴にハマらずに済むかもしれません。(参考)https://リクエストの部分を記述したり、URL を指定する必要もありません。
$ vi delete_old_messages.pyimport os, sys
import time
from slack_sdk import WebClient # Slack APIへリクエストするためのクライアント。SDK使用。
from slack_sdk.errors import SlackApiError # Slack APIエラーオブジェクト。SDK使用。
TERM = 60 * 60 * 24 * 7 # 秒で表した1週間
def delete_old_messages(channel_id):
client = WebClient(
token=os.environ["SLACK_API_TOKEN"]
) # WebClientインスタンス生成。引数は、Tokenコード。
latest = int(time.time() - TERM) # 現在日時 - 1週間 の UNIX時間
cursor = None # シーク位置。最初は None ページを指定して、次からは next_cursor が指し示す位置。
while True:
try:
response = client.conversations_history( # conversations_history = チャット一覧を得る
channel=channel_id,
latest=latest,
cursor=cursor # チャンネルID、latest、シーク位置を指定。
# latestに指定した時間よりも古いメッセージが得られる。latestはUNIX時間で指定する。
)
except SlackApiError as e:
sys.exit(
e.response["error"] # エラーが発生したら即終了
) # str like 'invalid_auth', 'channel_not_found'
if "messages" in response: # response["messages"]が有るか?
for message in response["messages"]: # response["messages"]が有る場合、1件ずつループ
time.sleep(1)
try:
client.chat_delete(
channel=channel_id, ts=message["ts"]
) # chat_delete = 指定したチャットを削除
# 引数にチャンネルID、ts(タイムスタンプ:conversations_historyのレスポンスに含まれる)を指定して、削除
except SlackApiError as e:
sys.exit(e.response["error"]) # エラーが発生したら即終了
if "has_more" not in response or response["has_more"] is not True:
# conversations_historyのレスポンスに["has_more"]が無かったり、has_moreの値がFalseだった場合、終了する。
break
if (
"response_metadata" in response
and "next_cursor" in response["response_metadata"]
): # conversations_historyのレスポンスに["response_metadata"]["next_cursor"]が有る場合、cursorをセット
# (上に戻って、もう一度、conversations_history取得)
cursor = response["response_metadata"]["next_cursor"]
else:
break
time.sleep(1)
if __name__ == "__main__":
args = sys.argv
if len(args) < 2:
print("The first argument is required and must be a channel id.")
else:
delete_old_messages(args[1]) # Slackのチャンネルコードを引数に取る。(注意:チャンネル名ではない。)【注意】
・conversations_historyは、デフォルトでは、1 回のリクエストで 100 件取得できます。100 件を超えた場合、cursorで位置をずらして、また 100 件というようにループで対応しています。100 件は、limit=で変更できます。
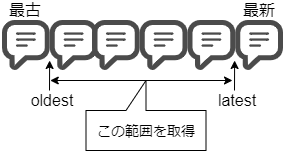
・latestは、UNIX 時間を指定します。latestで指定した時間よりも古いメッセージが取得されます。他にoldestも指定できて、以下の関係になります。
・latestのところがintになっていないと動作しませんでした。(誤って全て取得される。)
・response["response_metadata"]["next_cursor"]は、101 件以上あるときに返ってきます。(100 件超の最初の場合)101 件目の位置を指し示していますが、100とか101とかの数字ではありません。
Python プログラムテスト
Slack 側テストデータ
テスト用チャンネルを作成して、メッセージを入れておきます。
チャンネルを右クリックして、「チャンネル詳細を開く」をクリックし、チャンネル ID を調べます。
この記事では、以降、 C0123456789 とします。
Linux 側
#TERM = 60 * 60 * 24 * 7
TERM = 0
として、動作確認します。
事前に slack_sdk のインストールが必要です。※Python3 で使うため、pip3 です。
# pip3 install slack_sdkSLACK_API_TOKEN環境変数をセットします。これは、Token コードになります。
# export SLACK_API_TOKEN='xoxp-0123456789012-0123456789012-0123456789012-1a2b3c5d6e7f8g9h1a2b3c5d6aaaaaab'チャンネル ID を指定して、実行します。
# python3 delete_old_messages.py C01234567891秒に1メッセージずつ削除されて、全部無くなれば成功です。
エラーメモ
slack_sdk.errors.SlackApiError: The request to the Slack API failed. (url: https://www.slack.com/api/conversations.info)
The server responded with: {'ok': False, 'error': 'channel_not_found'}
⇒ チャネル ID が間違っていました。(チャンネル名ではありません。)
slack_sdk.errors.SlackApiError: The request to the Slack API failed. (url: https://www.slack.com/api/conversations.history)
The server responded with: {'ok': False, 'error': 'missing_scope', 'needed': 'channels:history,groups:history,mpim:history,im:history', 'provided': 'chat:write,channels:read,groups:read,mpim:read,im:read'}
⇒「User Token Scopes」の設定が間違っていました。(権限が足りていない。)
# python3 delete_old_messages.py
/usr/local/lib/python3.7/dist-packages/slack/deprecation.py:16: UserWarning: slack package is deprecated. Please use slack_sdk.web/webhook/rtm package instead. For more info, go to https://slack.dev/python-slack-sdk/v3-migration/
  warnings.warn(message)
Traceback (most recent call last):
  File "delete_old_messages.py", line 4, in <module>
    from slack.errors import SlackApiError
  File "/usr/local/lib/python3.7/dist-packages/slack/__init__.py", line 7, in <module>
    from slack_sdk.rtm import RTMClient  # noqa
  File "/usr/local/lib/python3.7/dist-packages/slack_sdk/rtm/__init__.py", line 16, in <module>
    import aiohttp
ModuleNotFoundError: No module named 'aiohttp'
⇒
# pip3 install aiohttpを行ったら、直りましたが、そもそも
from slack.errors import SlackApiError↓
from slack_sdk.errors import SlackApiErrorと slack.errors の部分は、slack_sdk.errors が正解でした。
slack.errors の場合、古いロジックが呼ばれるようです。pip3 install aiohttpは不要でした。
/usr/local/lib/python3.7/dist-packages/slack/deprecation.py:16: UserWarning: slack package is deprecated. Please use slack_sdk.web/webhook/rtm package instead. For more info, go to https://slack.dev/python-slack-sdk/v3-migration/warnings.warn(message)
が表示されるのも同じ理由でした。
Google Cloud Functions 登録
Google Cloud Platform(GCP)のメニューから、「Cloud Functions」をクリックします。
「関数を作成」をクリックします。
関数名を適当に入力して、リージョンを選択します。※リージョンは、良く分からない場合、そのままで良いと思います。 トリガーのタイプは、「Cloud Pub/Sub」とします。
【 Cloud Pub/Sub 】
Pub/Sub Messagingを行う仕組みです。Pub/Sub Messagingは、サーバーレスおよびマイクロサービスアーキテクチャで使用される非同期サービス間通信の形式です。PubがPublisher(送信側)、SubがSubscriber(受け側)の意味になります。
「Cloud Pub/Sub トピックを選択してください」のところをクリックして、「トピックを作成する」をクリックします。
トピック ID を適当に入力して、「トピックを作成」をクリックします。
「失敗時に再試行する」のチェックボックスは無しとし、「保存」をクリックします。
「ランタイム、ビルド、接続、セキュリティの設定」をクリックして、タイムアウトを最大値の 540 秒にします。
【 タイムアウトについて 】
1秒に1メッセージ削除ですので、1日1回起動の場合、最大約540メッセージ削除可能です。(試していませんが、
sleepを短くして、Slackに負荷がかかりすぎると、打ち切られるかもしれません。)
ランタイム環境変数に
名前:SLACK_API_TOKEN、値:Tokenコード
名前:channel_id、値:チャンネルID
を追加しておきます。
その他の項目はそのままとします。
次へをクリックします。
初めて使うときに、「Cloud Build APIでは、選択されているランタイムを使用する必要があります。」となります。「APIを有効にする」をクリックします。

「ランタイム」のところを「Python 3.7」とします。
「エントリポイント」のところを「delete_old_messages」とします。これは、関数の名前になります。
その下に、以下の内容のソースコードを貼り付けます。(最初サンプルが表示されていますが、全て消して構いません。)
注意:Linux でテストした時と内容は異なります。
import os, sys
import time
from slack_sdk import WebClient
from slack_sdk.errors import SlackApiError


TERM = 60 * 60 * 24 * 7


def delete_old_messages(event, context):
    client = WebClient(token=os.environ["SLACK_API_TOKEN"])
    channel_id = os.environ["channel_id"]
    latest = int(time.time() - TERM)
    cursor = None
    while True:
        try:
            response = client.conversations_history(
                channel=channel_id, latest=latest, cursor=cursor
            )
        except SlackApiError as e:
            sys.exit(
                e.response["error"]
            )  # str like 'invalid_auth', 'channel_not_found'

        if "messages" in response:
            for message in response["messages"]:
                time.sleep(1)
                try:
                    client.chat_delete(channel=channel_id, ts=message["ts"])
                except SlackApiError as e:
                    sys.exit(e.response["error"])

        if "has_more" not in response or response["has_more"] is not True:
            break

        if (
            "response_metadata" in response
            and "next_cursor" in response["response_metadata"]
        ):
            cursor = response["response_metadata"]["next_cursor"]
        else:
            break
        time.sleep(1)
print("OK")requirements.txtをクリックして、slack_sdk
を追記します。
これにより、pip install slack_sdkのように slack_sdk が組み込まれます。
デプロイをクリックします。
しばらくすると、緑色のチェックマークが付きます。ここまでで、とりあえずは関数作成成功です。
Google Cloud Functions テスト
Cloud でテスト
作成した関数をテストします。
関数名をクリックします。
「テスト中」をクリックします。
「関数をテストする」をクリックします。
「OK」の表示が下の方に表示されれば成功です。※この時、本当に1週間より古いメッセージを削除しに行きます。
ローカルでテスト
Cloud でボタンを押して確認していると、エラーが発生した場合、仕切り直すのに時間がかかります。
以下のようにローカルでも動作確認できます。(今回の場合、確認済みのソースコードのため、意味無いですが。)
functions-frameworkをインストールします。
# pip3 install functions-framework先ほど Cloud に登録したソースコードとまったく同じ内容のプログラム main.py を作成します。
# vi main.pyimport os, sys
import time
from slack_sdk import WebClient
from slack_sdk.errors import SlackApiError
TERM = 60 * 60 * 24 * 7
def delete_old_messages(event, context):
client = WebClient(token=os.environ["SLACK_API_TOKEN"])
channel_id = os.environ["channel_id"]
latest = int(time.time() - TERM)
cursor = None
while True:
try:
response = client.conversations_history(
channel=channel_id, latest=latest, cursor=cursor
)
except SlackApiError as e:
sys.exit(
e.response["error"]
) # str like 'invalid_auth', 'channel_not_found'
if "messages" in response:
for message in response["messages"]:
time.sleep(1)
try:
client.chat_delete(channel=channel_id, ts=message["ts"])
except SlackApiError as e:
sys.exit(e.response["error"])
if "has_more" not in response or response["has_more"] is not True:
break
if (
"response_metadata" in response
and "next_cursor" in response["response_metadata"]
):
cursor = response["response_metadata"]["next_cursor"]
else:
break
time.sleep(1)
print("OK")SLACK_API_TOKEN=Token コードchannel_id=チャンネル ID
を環境変数にセットして、--targetに関数名を指定して、--signature-type=eventとし、functions-frameworkを起動します。
# export channel_id='C0123456789'
# export SLACK_API_TOKEN='xoxp-0123456789012-0123456789012-0123456789012-1a2b3c5d6e7f8g9h1a2b3c5d6aaaaaab'
# functions-framework --target delete_old_messages --signature-type=eventhttp://localhost:8080のサーバーが起動するため、別の端末から、
$ curl -d '{"data": {}}' -X POST -H "Content-Type: application/json" http://localhost:8080とリクエストを送ると、main.pyのdelete_old_messages関数が起動します。
今回、
delete_old_messagesの引数event,contextともに使いませんので、-d '{"data": {}}'と無意味なデータをPOSTして起動しています。引数
event,contextは必須です。(名前は何でも良いです。)無い場合、以下のエラーになります。delete_old_messages() takes 0 positional arguments but 2 were given
Error: function terminated. Recommended action: inspect logs for termination reason. Additional troubleshooting documentation can be found at https://cloud.google.com/functions/docs/troubleshooting#logging Details:
Cloud Scheduler に登録
Cloud Scheduler に登録して、定期的に実行するようにします。
今回、毎日0時に実行とします。
Google Cloud Platform のメニューから「Cloud Scheduler」をクリックします。
「ジョブを作成」をクリックします。
初めて使うときに、リージョンの選択があります。

名前、説明を適当に入力して、頻度を「0 0 * * *」とします。(crontab の書き方で、毎日 0 時という意味になります。)
タイムゾーンを日本標準時にし、「続行」をクリックします。
ターゲットタイプを「Pub/Sub」とし、トピックは、先ほど、Cloud Functions で作成したトピックを選択します。
メッセージ本文は、今回使いませんので、適当に「message」と入力します。(必須のため、何か入力しないといけません。)
続行をクリックします。
再試行の構成は、再試行無しで良いため、そのままにし、「作成」をクリックします。
「今すぐ実行」をクリックします。
「成功」となっていたら、あとは0時まで待つだけになります。
できました!

その他、宣伝、誹謗中傷等、当方が不適切と判断した書き込みは、理由の如何を問わず、投稿者に断りなく削除します。
書き込み内容について、一切の責任を負いません。
このコメント機能は、予告無く廃止する可能性があります。ご了承ください。
コメントの削除をご依頼の場合はTwitterのDM等でご連絡ください。


