- 記事一覧 >
- ブログ記事

GitLab as OpenID Connect identity providerをやってみた
はじめに
「AD FS 構成から mod_auth_openidc による OpenID Connect 認証成功まで全手順」
「Keycloak PostgreSQL OpenLDAP mod_auth_openidc で SSO 全手順」
と AD FS、Keycloak を OpenID Provider として SSO(シングルサインオン)環境を構築してみましたが、今回、GitLab を OpenID Provider として SSO 環境を構築します。
GitLab 自体は、「Ubuntu 20.04.2.0 に GitLab をインストール」の手順でインストール済みとします。
Relying Party(RP)側は、Apache のモジュールのmod_auth_openidc、Flaskの拡張機能Flask-OIDCと2種類構築して、試してみました。
【 mod_auth_openidc 】
Apache 2.x HTTP ServerをOpenID ConnectのRelying Partyとして動作させる事を可能にする認証モジュールです。
【 Flask 】
Flask(フラスコ/フラスク)はPythonのWebアプリケーションフレームワークです。標準で提供する機能を最小限に保っているため、小規模なアプリに向いています。
【 Flask-OIDC 】
Flask-OIDCはFlaskの拡張機能であり、OpenID Connectベースの認証機能を数分でWebサイトに追加できます。
・GitLab の構造(OpenID Provider 関連部分のみ)
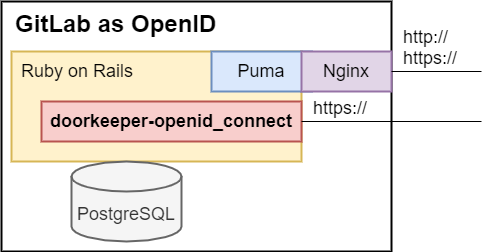
※ものすごく簡略化しています。詳細は、こちらにあります。
GitLab Application Architecture component diagram
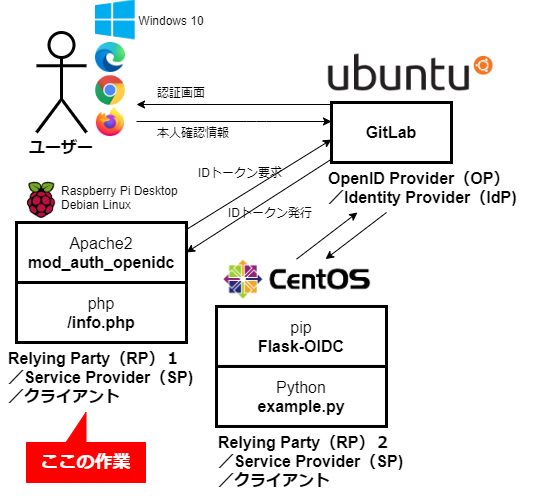
構成
構成は、以下です。
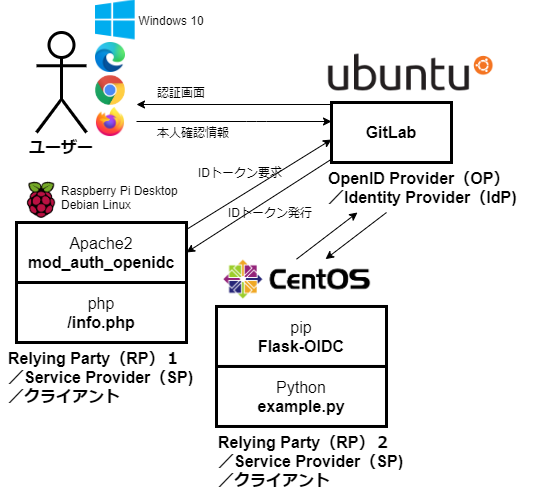
ユーザー
OS: Windows 10 PRO x64
Chrome: バージョン: 96.0.4664.45(Official Build) (64 ビット)
OpenID Provider
以下の呼び方の場合もあります。
OpenID プロバイダー
OP
Identity Provider
IdP
OS: Ubuntu 20.04.2 LTS
GitLab as OpenID Connect identity provider を構築するサーバーです。
ホスト名は、gitlab-test.itccorporation.jp とします。
・GitLab v13.11.2
・Python 3.6.8
Relying Party1
以下の呼び方の場合もあります。
RP
Service Provider
SP
Client
クライアント
OS: Raspberry Pi Desktop
Debian ベースの Linux です。
/etc/debian_version:10.7
・Apache/2.4.38 (Debian)
・mod_auth_openidc-2.3.10.2
・PHP 7.3.31-1~deb10u1 (cli)
※php は、php である必要は無く、今回、認証が必要な Web アプリに見立てています。
・OpenLDAP 2.4.47(必須ではない)
Relying Party2
OS: CentOS Linux release 8.5.2111
Flask-OIDC をインストールするサーバーです。
アプリは、Python で、公式実装サンプルのexample.pyを使用します。
GitLab https:// 化
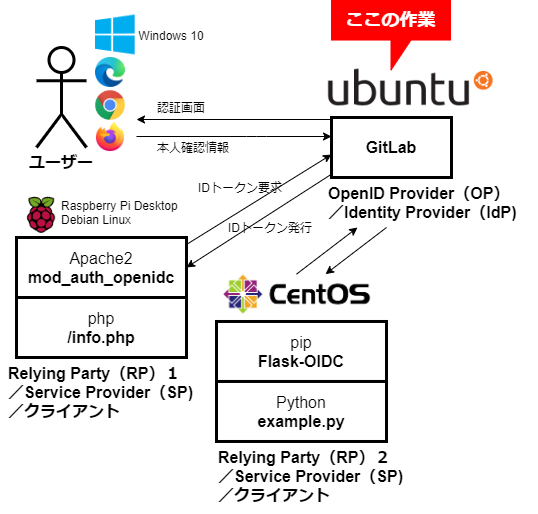
OpenID Provider(GitLab) での作業になります。
自己署名の SSL 証明書を作成します。
※「CentOS8 & Apache の自己署名証明書作成と証明書エラー回避」に詳しい説明があります。
# openssl genrsa -out ca.key 2048
# openssl req -new -key ca.key -out ca.csr
Country Name (2 letter code) [AU]:JP
State or Province Name (full name) [Some-State]:Aichi
Locality Name (eg, city) []:Toyota
Organization Name (eg, company) [Internet Widgits Pty Ltd]:
Organizational Unit Name (eg, section) []:
Common Name (e.g. server FQDN or YOUR name) []:gitlab-test.itccorporation.jp
Email Address []:

Please enter the following 'extra' attributes
to be sent with your certificate request
A challenge password []:
An optional company name []:
# echo "subjectAltName=DNS:*.itccorporation.jp,IP:192.168.12.111" > san.txt
# openssl x509 -req -days 365 -in ca.csr -signkey ca.key -out ca.crt -extfile san.txt
Signature ok
subject=C = JP, ST = Aichi, L = Toyota, O = Default Company Ltd, CN = test.itccorporation.jp
Getting Private key
# mkdir -p /etc/pki/tls/certs
# mkdir /etc/pki/tls/private
# cp ca.crt /etc/pki/tls/certs/ca.crt
# cp ca.key /etc/pki/tls/private/ca.key
# cp ca.csr /etc/pki/tls/private/ca.csrgitlab.rbを変更します。
# vi /etc/gitlab/gitlab.rbexternal_url 'http://gitlab-test.itccorporation.jp'
↓
external_url 'https://gitlab-test.itccorporation.jp'
nginx['ssl_certificate'] = "/etc/pki/tls/certs/ca.crt"
nginx['ssl_certificate_key'] = "/etc/pki/tls/private/ca.key"変更を反映して、再起動します。
# gitlab-ctl reconfigure
# gitlab-ctl restart
https://gitlab-test.itccorporation.jp/ にアクセス出来ればOKです。
注意:アクセスするのが早すぎると、502 Whoops, GitLab is taking too much time to respond.とエラーになるかもしれません。その場合、もう少し待つ必要があります。
GitLab https:// 化についての余談
よく考えたら当たり前ですが、OpenID Provider(GitLab)のhttps://化は必須ですが、最初http://のままなんとかしようとして、ソースコードを書き換えて対応していました。
# vi /opt/gitlab/embedded/lib/ruby/gems/2.7.0/gems/doorkeeper-openid_connect-1.7.5/lib/doorkeeper/openid_connect/config.rb option :protocol, default: lambda { |*_|
::Rails.env.production? ? :https : :http
}
↓
option :protocol, default: lambda { |*_|
::Rails.env.production? ? :http : :http
}と書き換えて、
# gitlab-ctl restartGitLabリスタート後、
# curl http://gitlab-test.itccorporation.jp/.well-known/openid-configurationとすると、
"authorization_endpoint": "http://gitlab-test・・・
のように各エンドポイントの情報がhttp://で返ってくるようになりましたが、mod_auth_openidc が頑なにhttps://でリダイレクトして、うまくいきませんでした。
mod_auth_openidc の設定を
OIDCProviderAuthorizationEndpoint http://gitlab-test.itccorporation.jp/oauth/authorizeとすると、以下のように怒られました。
AH00526: Syntax error on line 838 of /etc/apache2/mods-enabled/auth_openidc.conf:
'http://gitlab-test.itccorporation.jp/oauth/authorize' cannot be parsed as a "https" URL (scheme == http)!
そういった作業中に気付いたのですが、issuer の情報等は、設定で書き換えられます。(doorkeeper-openid_connect)
# vi /opt/gitlab/embedded/service/gitlab-rails/config/initializers/doorkeeper_openid_connect.rb# frozen_string_literal: true
Doorkeeper::OpenidConnect.configure do
#issuer Gitlab.config.gitlab.url
issuer 'dummy'# gitlab-ctl restartprotocolは設定では書き換えられませんでした。(GitLab がエラーになって起動しない。)
# frozen_string_literal: true

Doorkeeper::OpenidConnect.configure do
  #protocol 'http'
  protocol Gitlab.config.gitlab.protocol
  issuer Gitlab.config.gitlab.url
GitLab アプリケーション設定
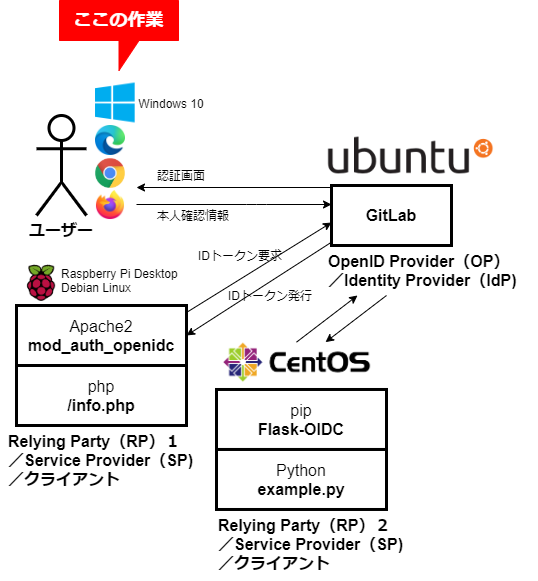
PC端末での作業になります。
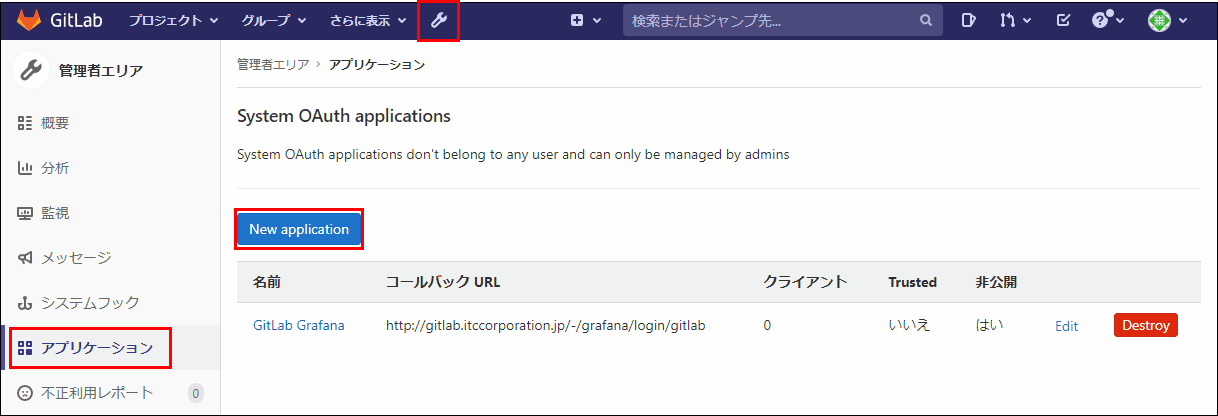
管理者エリアから「アプリケーション」を選択し、「New application」ボタンをクリックします。
Relying Party1登録
mod_auth_openidc のアプリケーションを登録します。
登録内容は以下とします。
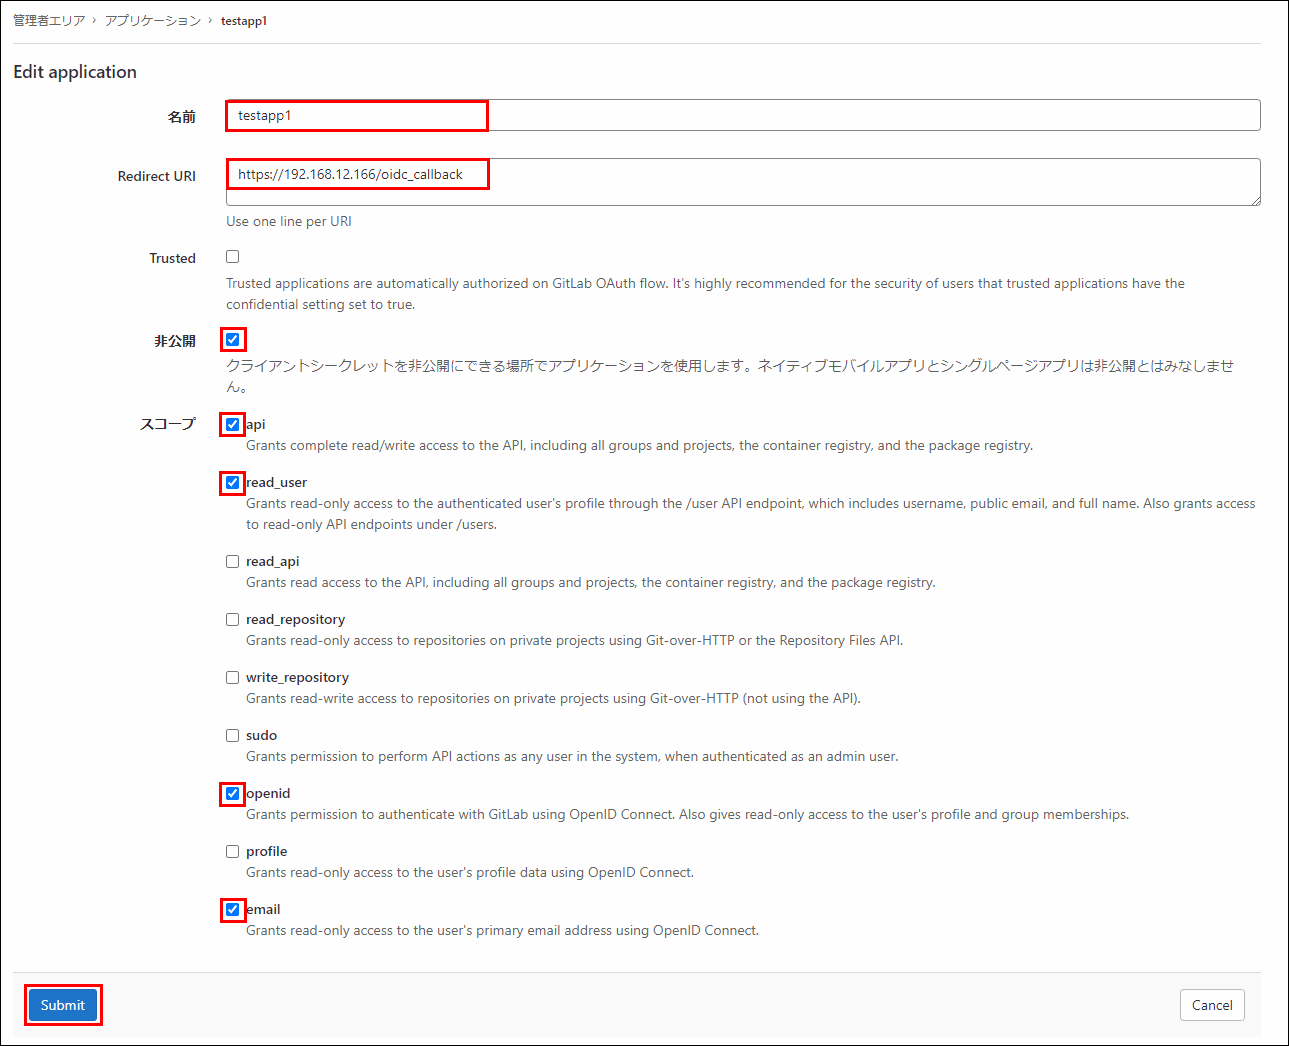
名前: testapp1
Redirect URI: https://192.168.12.166/oidc_callback
Trusted: チェック無し
非公開: チェック
スコープ: api,read_user,openid,emailにチェックとします。(openidは必須です。emailはこの手順では必須です。)
名前は自由入力です。
Redirect URI は、アプリ(ここで言うhttps://192.168.12.166/側で使わないところを指定しないといけません。)
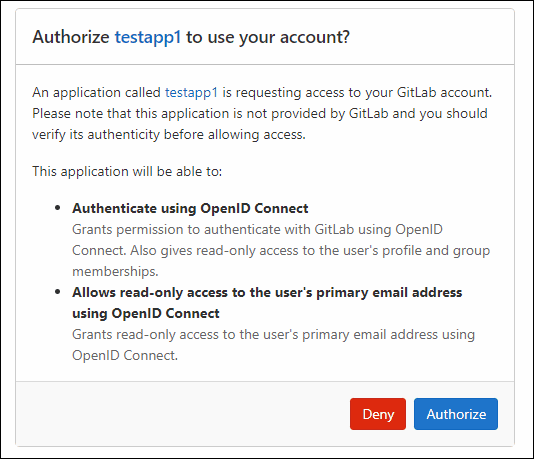
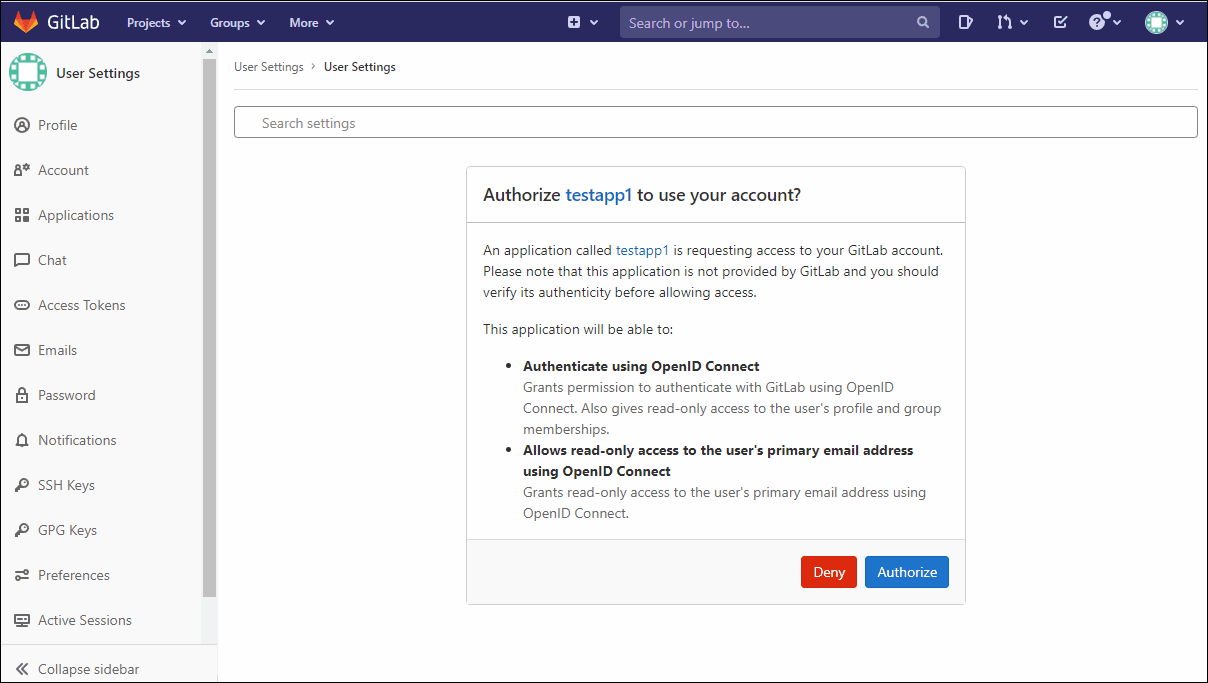
Trusted は、チェックを入れないと、ユーザー名、パスワード入力直後に以下の確認画面を表示します。
非公開は、おそらく、Keycloak で言う"confidential"に相当します。(詳細は割愛します。)今回チェックは必須です。
スコープは、アプリに渡して良い情報です。今回openidは必須です。(apiにチェックを入れるとどうなるか等については割愛します。)
「Submit」をクリックします。
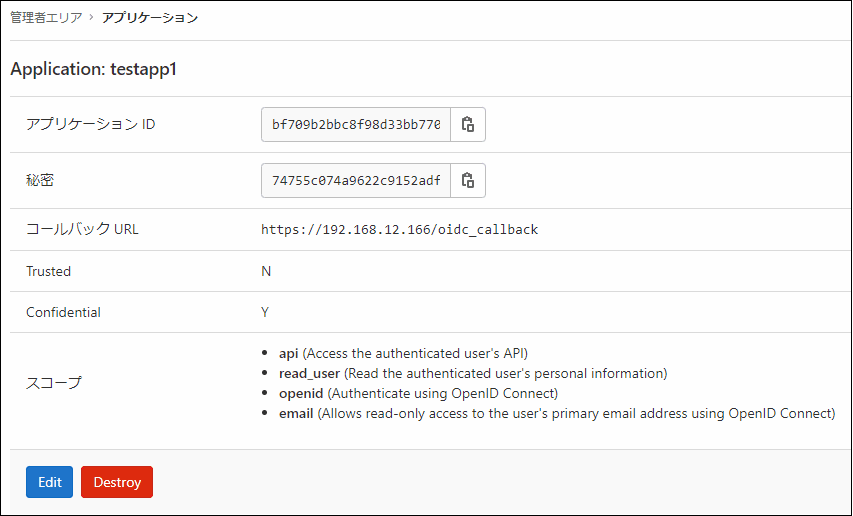
アプリケーション ID、秘密、コールバック URL は後で必要ですので、メモしておきます。
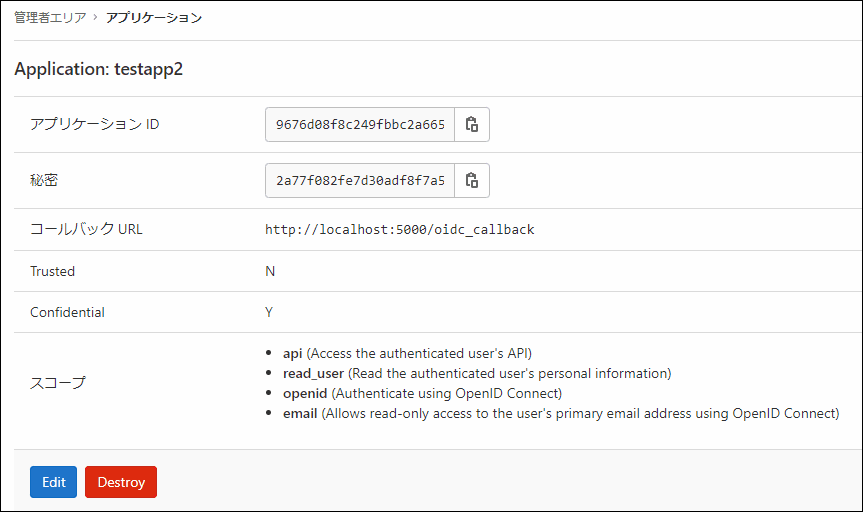
Relying Party2登録
続けて、「New application」ボタンをクリックで、
Flask-OIDC のアプリケーションを登録します。
登録内容は以下とします。
名前: testapp2
Redirect URI: http://localhost:5000/oidc_callback
Trusted: チェック無し
非公開: チェック
スコープ: api,read_user,openid,emailにチェックとします。(openidは必須です。emailはこの手順では必須です。)
「Submit」をクリックします。
アプリケーション ID、秘密、コールバック URL は後で必要ですので、メモしておきます。
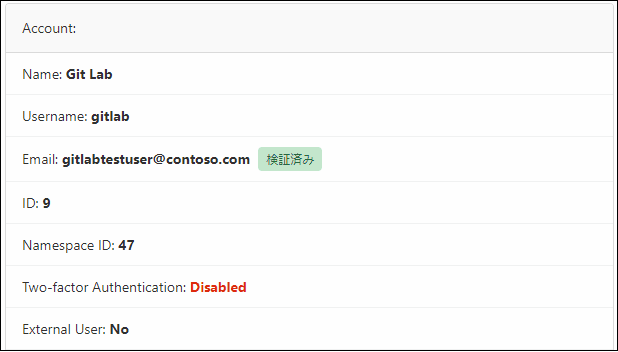
他、アカウントを作成しておきます。
この例では、
Name: Git Lab
Username: gitlab
Email: gitlabtestuser@contoso.com
とします。
mod_auth_openidc 設定
Relying Party(RP)1 での作業になります。
Web アプリ側(https://192.168.12.166/)Relying Party(RP)の設定を行います。
Apache2 のインストールから mod_auth_openidc の設定になりますが、内容が「AD FS 構成から mod_auth_openidc による OpenID Connect 認証成功まで全手順」の記事と重複するため、そちらをご確認ください。
Apache2 インストール
mod_auth_openidc の設定
↑
設定の説明はこちらにあります。
いきなり設定作業から入ります。
※GitLab サーバーgitlab-test.itccorporation.jpの名前解決ができない場合、hosts の登録が必要です。
# vi /etc/apache2/mods-available/auth_openidc.confOIDCRedirectURI https://192.168.12.166/oidc_callback
OIDCCryptoPassphrase password
OIDCProviderMetadataURL https://gitlab-test.itccorporation.jp/.well-known/openid-configuration
OIDCScope "openid email"
OIDCSSLValidateServer Off
OIDCResponseType code
OIDCClientID bf709b2bbc8f98d33bb770cb8533711ba67d6b1d3e675b0437e3fe837f26e13f
OIDCClientSecret 74755c074a9622c9152adf80307e67d4e0f882e426f2169c759cf20af25e22c4
OIDCPKCEMethod S256
OIDCSessionInactivityTimeout 300
OIDCHTMLErrorTemplate /etc/apache2/auth_openidc_error.html
OIDCDefaultLoggedOutURL https://192.168.12.166/loggedout.html
OIDCClaimPrefix OIDC_CLAIM_
OIDCRemoteUserClaim nickname
OIDCPassClaimsAs both
OIDCAuthNHeader X-Remote-UserOIDCRedirectURI は、GitLab 設定中に設定した "コールバック URL" です。
OIDCProviderMetadataURL のgitlab-test.itccorporation.jpは、GitLab サーバー名です。
OIDCClientID は、GitLab 設定中に出てきた "アプリケーション ID" です。
OIDCClientSecret は、GitLab 設定中に出てきた "秘密" です。
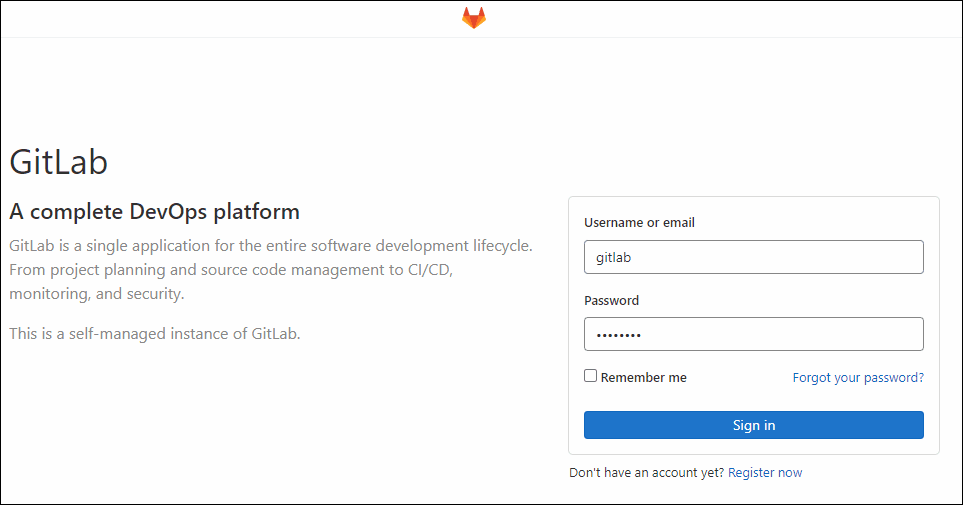
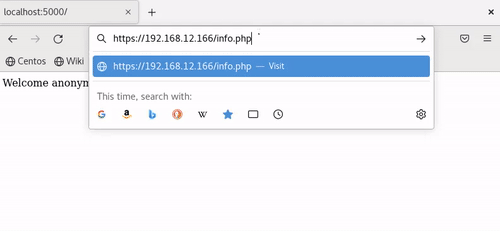
# systemctl restart apache2User:gitlab でhttps://192.168.12.166/info.phpにアクセスして、ログインします。
ヨシ!
【エラーについて】
/var/log/apache2/error.log:
oidc_util_json_string_print: oidc_util_check_json_error: response contained an "error" entry with value: ""invalid_client"", referer: https://gitlab-test.itccorporation.jp/
oidc_util_json_string_print: oidc_util_check_json_error: response contained an "error_description" entry with value: ""Client authentication failed due to unknown client, no client authentication included, or unsupported authentication method."", referer: https://gitlab-test.itccorporation.jp/
oidc_proto_resolve_code_and_validate_response: failed to resolve the code, referer: https://gitlab-test.itccorporation.jp/
OIDCClientSecret のクライアントIDが間違っています。
/var/log/apache2/error.log:
oidc_proto_validate_exp: "exp" validation failure (1638407097): JWT expired 31 seconds ago, referer: https://gitlab-test.itccorporation.jp/
oidc_proto_parse_idtoken: id_token payload could not be validated, aborting, referer: https://gitlab-test.itccorporation.jp/
oidc_proto_validate_exp: "exp" validation failure (1638407098): JWT expired 30 seconds ago, referer: https://192.168.12.166/
oidc_proto_parse_idtoken: id_token payload could not be validated, aborting, referer: https://192.168.12.166/
mod_auth_openidc のサーバーと GitLab のサーバーとで時刻がズレすぎています。
/var/log/apache2/error.log:
oidc_get_remote_user: JSON object did not contain a "preferred_username" string
oidc_set_request_user: OIDCRemoteUserClaimis set to "preferred_username", but could not set the remote user based on the requested claim "preferred_username" and the available claims for the user
oidc_handle_authorization_response: remote user could not be set
OIDCRemoteUserClaim の値が間違っています。(OIDCRemoteUserClaim preferred_usernameと GitLab から得られない claim を指定していた。)
Flask-OIDC

Relying Party(RP)2 での作業になります。
python3 を使います。
インストールされていない場合、インストールします。
# dnf install python3flaskとFlask-OIDCをインストールします。
# pip3 install flask
# pip3 install Flask-OIDC
https://github.com/puiterwijk/flask-oidc
のexample.pyをコピーして設置します。
# mkdir /opt/flask-oidc
# cd /opt/flask-oidc
# vi example.py今回、簡略化のため、このexample.pyは極力変えない縛りでいきます。そのため、localhost:5000 で起動し、外部からアクセスできません。
Flask-OIDCの設定ファイルclient_secrets.jsonを作成します。
# vi client_secrets.json{
"web": {
"issuer": "https://gitlab-test.itccorporation.jp/",
"client_id": "9676d08f8c249fbbc2a665a2cbf697c04416851667d058015931abd70da7c861",
"client_secret": "2a77f082fe7d30adf8f7a59c2f9eeb0d8db9af2bd98f361b0508c9d41deb9239",
"auth_uri": "https://gitlab-test.itccorporation.jp/oauth/authorize",
"redirect_urls": ["http://localhost:5000/oidc_callback"],
"token_uri": "https://gitlab-test.itccorporation.jp/oauth/token",
"userinfo_uri": "https://gitlab-test.itccorporation.jp/oauth/userinfo"
}
}gitlab-test.itccorporation.jp部分は全て GitLab サーバー名です。
client_id は、GitLab 設定中に出てきた "アプリケーション ID" です。
client_secret は、GitLab 設定中に出てきた "秘密" です。
redirect_urls は、GitLab 設定中に設定した "コールバック URL" です。
このまま起動すると、
ssl.SSLError: [SSL: CERTIFICATE_VERIFY_FAILED] certificate verify failed (_ssl.c:897)
となり、https://gitlab-test.itccorporation.jpへの接続に失敗します。
Flask-OIDCが使っているhttplib2のエラーで、disable_ssl_certificate_validation=Trueオプションを指定すれば良いのですが、ソースコードを書き換える必要があります。証明書を読み込ませるしか回避方法は無いようです。(実稼働を想定すると当たり前ですが。)
証明書管理システムのcertifiを導入します。
# pip3 install certifiGitLab の証明書を取得します。
# openssl s_client -connect gitlab-test.itccorporation.jp:443 -showcertsいろいろ表示されますが、
-----BEGIN CERTIFICATE-----から-----END CERTIFICATE-----までを追記します。
# vi /usr/local/lib/python3.6/site-packages/certifi/cacert.pem-----BEGIN CERTIFICATE-----
MIIDqDCCApCgAwIBAgIUGj8bA2ucR7TBvc59skeIZsuhTykwDQYJKoZIhvcNAQEL
・・・(略)・・・
6MhtLBxsJVsQZQAkn9UDNaNjK15Ui2CxfTroHQ==
-----END CERTIFICATE-----まだハマりどころがあり、このまま起動すると、ログインした直後、
return e_int.args[0].errno if isinstance(e_int.args[0], socket.error) else e_int.errno
IndexError: tuple index out of range
エラーになります。
全く書き換えないでいきたかったですが、example.pyを書き換えます。
# vi example.pyimport loggingの下にimport sslを追記します。
import logging
import ssl
起動します。
# python3 example.py
 * Environment: production
   WARNING: This is a development server. Do not use it in a production deployment.
   Use a production WSGI server instead.
 * Debug mode: on
INFO:werkzeug: * Running on http://127.0.0.1:5000/ (Press CTRL+C to quit)
INFO:werkzeug: * Restarting with stat
WARNING:werkzeug: * Debugger is active!
INFO:werkzeug: * Debugger PIN: 135-432-255http://127.0.0.1:5000/でバインドされていて、自分自身からしかアクセスできないため、CentOS8 GUI の Firefox でアクセスします。
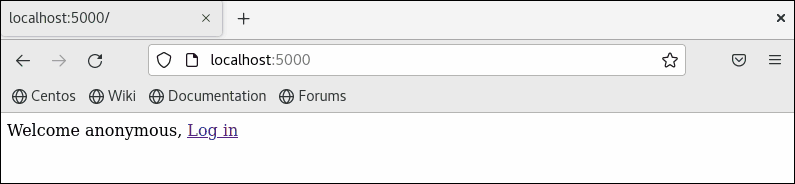

ヨシ!
(「None」と表示されているのは、example.pyがopenid_idを表示しようとしているためで、GitLab からopenid_idclaim は渡されないため、問題無しとします。)
シングルサインオンもヨシ!
※ログイン画面無しで遷移
【エラーについて】
端末:
ERROR:flask_oidc:Token has expired
DEBUG:flask_oidc:Invalid ID token
画面(Not Aurhorized):
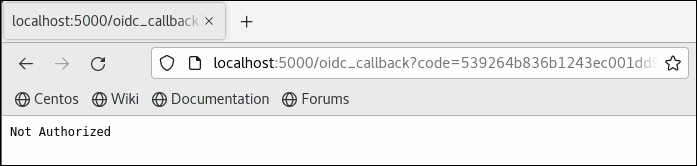
となった場合、
mod_auth_openidc の時と同様、時計を合わせる必要があります。
端末:
DEBUG:flask_oidc:Expired ID token, credentials missing
Traceback (most recent call last):
  File "/usr/local/lib/python3.6/site-packages/flask_oidc/__init__.py", line 437, in authenticate_or_redirect
    self.credentials_store[id_token['sub']])
KeyError: '9'
画面(The requested scope is invalid, unknown, or malformed.):
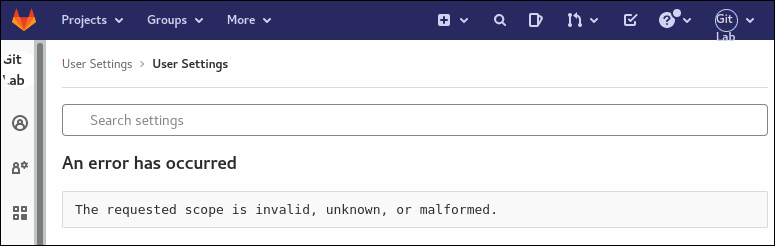
となった場合、
example.pyがemailを要求するのに対して、GitLab のアプリケーション設定のスコープで email のチェックが入っていない可能性があります。

その他、宣伝、誹謗中傷等、当方が不適切と判断した書き込みは、理由の如何を問わず、投稿者に断りなく削除します。
書き込み内容について、一切の責任を負いません。
このコメント機能は、予告無く廃止する可能性があります。ご了承ください。
コメントの削除をご依頼の場合はXのDM等でご連絡ください。


