- 記事一覧 >
- ブログ記事

Next.JSのブログにSSRの検索機能を実装してNetlifyにデプロイ
はじめに
Next.jsで作られているこのブログ(ソースコード:GitHub)に検索機能を実装しました。 今回は、どのように実装したか、何がひっかかったか、から、果てはNetlifyへのデプロイまで書いていきます。(作り変え前も書きますので、長いです。)ソースコードの全体は、GitHubにありますので、断片を掲載しての説明になります。
●最初の実装
Commits on Sep 13, 2021
Fix image component warning
https://github.com/itc-lab/itc-blog/commit/603d035baa8e0be2c794554dd57b9ea7c337d08c
●少し作り変えた実装
Commits on Sep 17, 2021
Update add loading spinner
https://github.com/itc-lab/itc-blog/commit/24a167caf720c96d931fee4de9d50342e92fbb95
検索機能実装にあたり、何から手を付ければ良いか分からず、下記記事とソースコードを参考にさせていただきました。敬意と感謝を申し上げます。
【検証環境】
CentOS 7.6.1810
node 14.16.1
npm 6.14.13
react 17.0.2
next 11.1.2
Netlify(2021年9月)
検索機能全体像
バックエンドは実装していません。
microCMSのAPIを利用して、全文検索しています。
URLにq パラメータを付けて、結果を得ているだけになります。
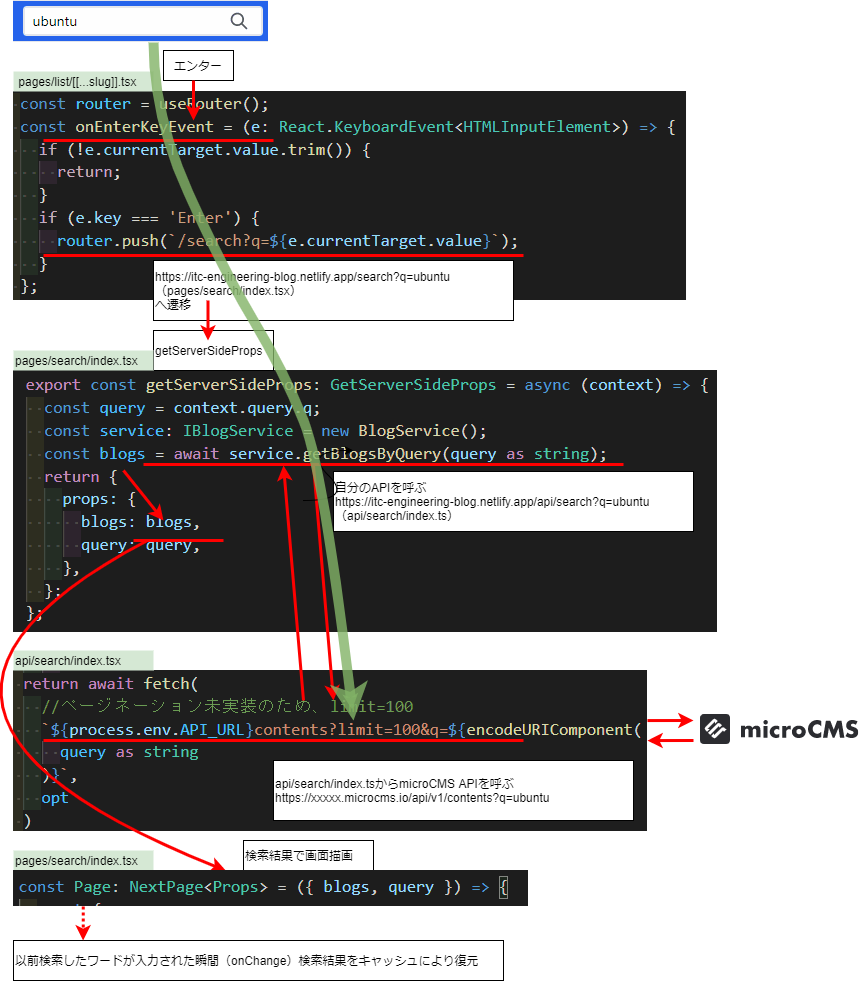
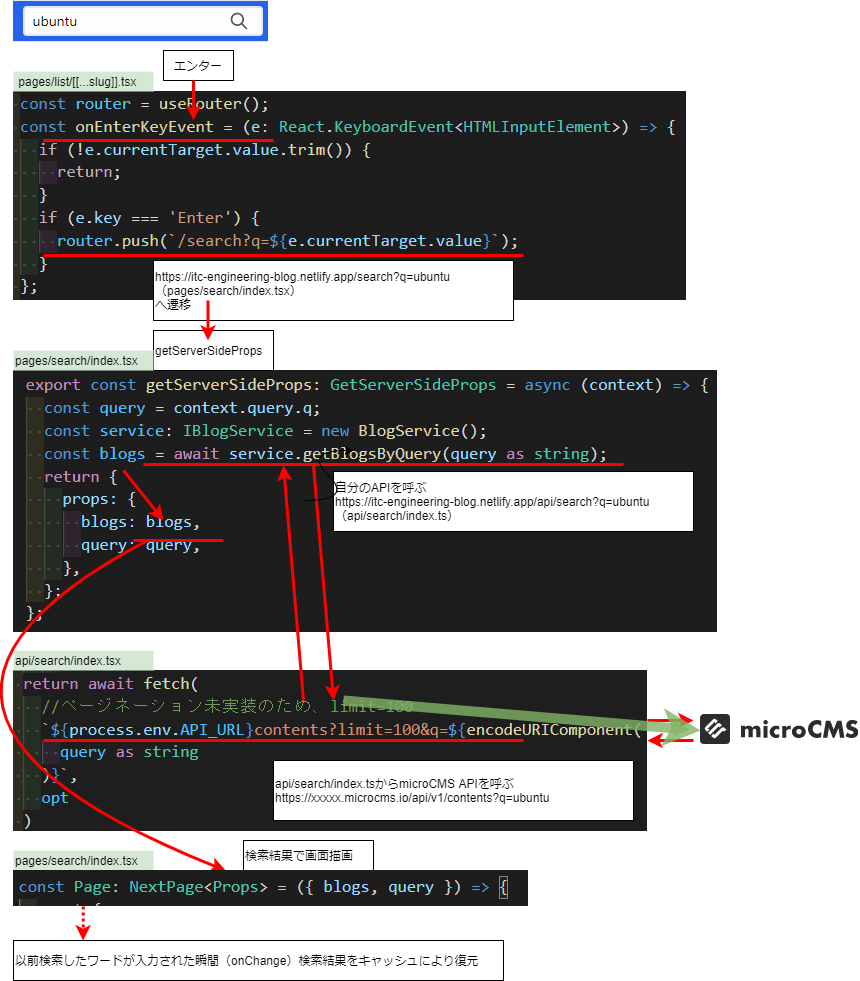
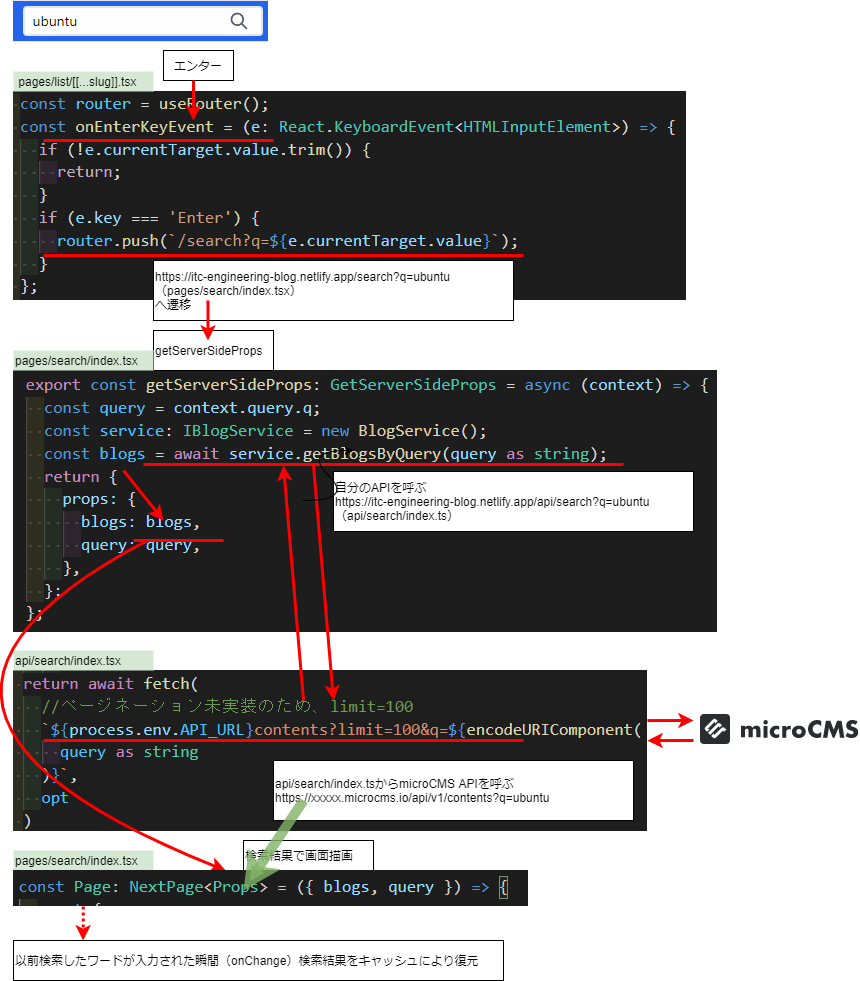
●最初の実装

検索
↓
https://itc-engineering-blog.netlify.app/search?q=ubuntu
(pages/search/index.tsx)
へ遷移
↓
getServerSideProps
↓
自分のAPIを呼ぶ
https://itc-engineering-blog.netlify.app/api/search?q=ubuntu
(api/search/index.ts)
↓
api/search/index.tsからmicroCMS APIを呼ぶ
https://xxxxx.microcms.io/api/v1/contents?q=ubuntu
↓
検索結果で画面描画
↓
以前検索したワードが入力された瞬間(onChange)検索結果をキャッシュにより復元
●少し作り変えた実装

検索
↓
https://itc-engineering-blog.netlify.app/search?q=ubuntu
(pages/search/index.tsx)
へ遷移
↓
静的ページ(ビルド済みのHTML/JS)読み込み
↓
(画面から)自分のAPIを呼ぶ
https://itc-engineering-blog.netlify.app/api/search?q=ubuntu
(api/search/index.ts)
↓
api/search/index.tsからmicroCMS APIを呼ぶ
https://xxxxx.microcms.io/api/v1/contents?q=ubuntu
↓
isLoading = true のときは、スピナー表示
↓
検索結果で画面描画
↓
以前検索したワードが入力されて再検索(エンター or 検索ボタンクリック)されたとき、検索結果をキャッシュにより復元
検索欄
右上検索欄

<div className="hidden lg:flex border-2 rounded focus-within:ring focus-within:border-blue-300 text-gray-600 focus-within:text-black h-3/4">
  <input
    type="text"
    className="px-2 py-2 w-48 text-black text-sm border-0 rounded-none focus:outline-none"
    placeholder="サイト内検索"
    onKeyPress={(e: React.KeyboardEvent<HTMLInputElement>) =>
      onEnterKeyEvent(e)
    }
  />
  <button
    className="flex items-center justify-center px-3 border-0 bg-white"
    onClick={(e) => onClickSearchButton(e)}>
    <svg
      className="w-5 h-5"
      fill="currentColor"
      xmlns="http://www.w3.org/2000/svg"
      viewBox="0 0 24 24">
      <path d="M16.32 14.9l5.39 5.4a1 1 0 0 1-1.42 1.4l-5.38-5.38a8 8 0 1 1 1.41-1.41zM10 16a6 6 0 1 0 0-12 6 6 0 0 0 0 12z" />
    </svg>
  </button>
</div>CSSは、Tailwindのクラスで調整しています。
【 Tailwind 】
CSSを別のどこかに書かなくても、classNameのところに直接デザインが指定できます。例えば、m-1なら、margin: 0.25rem;を指定した意味になります。(例えば、もうちょっとマージンが欲しいとかの場合、m-2とかm-3とか書き換えるだけになります。)
hidden lg:flexとなっているところは、lg=横幅1024px未満の時は、display: none;で非表示、1024px以上のときは、display: flex;で表示という意味です。※lg=1024pxは設定で変更できます。
focus-within:によって、クリックしてフォーカスが当たったときに、inputとbuttonを内包したdivの枠が変化するギミックになっています。
iPhoneの場合、デフォルトでラウンド(縁の丸まり)がかかり、ボタンとの継ぎ目が見えてしまうため、rounded-none = border-radius: 0px; で明示的にラウンドを否定しないといけませんでした。
右上検索ボタン

<div
  className="flex lg:hidden items-center mr-2 md:mr-10"
  onClick={() => setSearchModal(true)}>
  <svg
    className="w-6 h-6 text-white cursor-pointer"
    fill="currentColor"
    xmlns="http://www.w3.org/2000/svg"
    viewBox="0 0 24 24">
    <path d="M16.32 14.9l5.39 5.4a1 1 0 0 1-1.42 1.4l-5.38-5.38a8 8 0 1 1 1.41-1.41zM10 16a6 6 0 1 0 0-12 6 6 0 0 0 0 12z" />
  </svg>
</div>
flex lg:hiddenで、先ほどの右上検索欄とは逆に、1024px未満で表示されるようにしています。
useStateのsetSearchModalで、isSearchModalをtrueに変更して、再描画がかかり、以下の中央検索欄を表示しています。
中央検索欄

{isSearchModal && (
  <div
    className={`menuWrapper ${
      isSearchModal ? 'menuWrapper__active' : ''
    }`}
    onClick={(e) => {
      closeWithClickOutSideMethod(e, setSearchModal);
    }}>
    <form
      className="block absolute top-12 right-0 left-0 z-50 w-11/12 my-0 mx-auto"
      action="/search"
      method="get">
      <input
        type="text"
        className="w-full h-11 border border-solid border-gray-200 bg-white shadow text-base pl-2"
        autoComplete="off"
        placeholder="サイト内検索"
        defaultValue=""
        name="q"
      />
    </form>
  </div>
)}isSearchModalで表示非表示を切り替えていて、falseのときは、DOMが生成されていない状態です。
z-index: 999; のdivで画面全体を覆って、その中に検索欄を表示しています。このdivは、クリックされると、closeWithClickOutSideMethodでform以外がクリックされたことを判定して、消えるようにしています。
検索結果画面検索欄

<div className="flex justify-center px-5 pb-5">
  <div className="flex w-full max-w-screen-sm border-2 rounded focus-within:ring focus-within:border-blue-300 text-gray-600 focus-within:text-black">
    <input
      type="text"
      value={searchValue}
      className="w-full px-2 py-2 text-black border-0 rounded-none focus:outline-none"
      placeholder="サイト内検索"
      onChange={(e) => setSearchValue(e.target.value)}
      onKeyPress={(e) => onEnterKeyEvent(e)}
    />
    <button
      className="flex items-center justify-center px-3 border-0 bg-white"
      onClick={(e) => onClickSearchButton(e)}>
      <svg
        className="w-5 h-5"
        fill="currentColor"
        xmlns="http://www.w3.org/2000/svg"
        viewBox="0 0 24 24">
        <path d="M16.32 14.9l5.39 5.4a1 1 0 0 1-1.42 1.4l-5.38-5.38a8 8 0 1 1 1.41-1.41zM10 16a6 6 0 1 0 0-12 6 6 0 0 0 0 12z" />
      </svg>
    </button>
  </div>
</div>右上検索欄の長くなったバージョンです。value={searchValue}のところで、検索したワードをあらかじめセットしています。
最初の実装
検索→自分のAPIへ
※ここでは、記事一覧画面、右上検索欄エンターキーで検索したものとします。
検索
↓
https://itc-engineering-blog.netlify.app/search?q=ubuntu
(pages/search/index.tsx)
へ遷移
↓
getServerSideProps
↓
自分のAPIを呼ぶ
https://itc-engineering-blog.netlify.app/api/search?q=ubuntu
(api/search/index.ts)
pages/list/[[...slug]].tsx
  const router = useRouter();
  const onEnterKeyEvent = (e: React.KeyboardEvent<HTMLInputElement>) => {
    if (!e.currentTarget.value.trim()) {
      return;
    }
    if (e.key === 'Enter') {
      router.push(`/search?q=${e.currentTarget.value}`);
    }
};useRouterのrouter.push(`/search?q=${e.currentTarget.value}`);により、検索結果画面/search?q=xxxに遷移します。
これにより、まず、pages/search/index.tsx の getServerSideProps が動きます。
getServerSidePropsは、SSR(Server Side Rendering)のため、アクセスするたびに処理されます。※getStaticPaths, getStaticPropsの場合は、SSG(Static Site Generation)で、ビルドするときのみ処理されます。
ここから、
service.getBlogsByQueryにより、/api/search?q=xxxにGETが行きます。
このとき、クエリ文字列(?q=xxxのxxxの部分)はURLエンコードされています。
直接microCMSのAPIをGETしても良いのですが、画面にAPIキーが露出しないように
一旦サーバー側の/api/searchを経由しています。
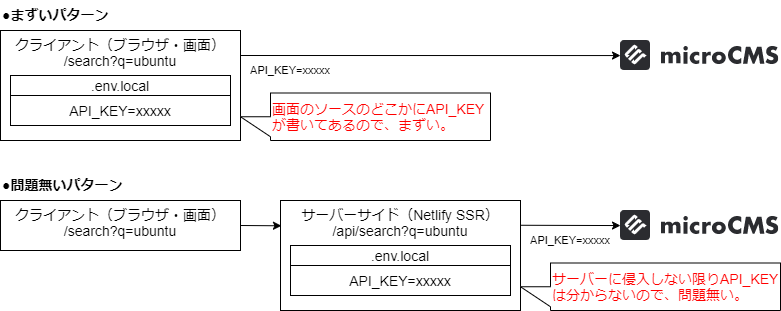
Next.jsの"API Routes"によって、
pages/api配下のコードは、/api/*としてマッピングされて、APIのエンドポイントとして利用できます。サーバーサイドでのみ動作します。
自分のAPI→microCMSのAPIへ
自分のAPIを呼ぶ
https://itc-engineering-blog.netlify.app/api/search?q=ubuntu
(api/search/index.ts)
↓
api/search/index.tsからmicroCMS APIを呼ぶ
https://xxxxx.microcms.io/api/v1/contents?q=ubuntu
pages/api/search/index.ts
import { NextApiRequest, NextApiResponse } from 'next';
import { HttpsProxyAgent } from 'https-proxy-agent';

export default async (
  req: NextApiRequest,
  res: NextApiResponse
): Promise<void> => {
  const query: string | string[] = req.query.q;
  if (!query) {
    res.status(400).json({ error: `missing queryparamaeter` });
  }
  const header: HeadersInit = new Headers();
  header.set('X-API-KEY', process.env.API_KEY || '');
  const proxy = process.env.https_proxy;
  const opt = proxy
    ? {
        headers: header,
        agent: new HttpsProxyAgent(proxy),
      }
    : {
        headers: header,
      };
  return await fetch(
    //ページネーション未実装のため、limit=100
    `${process.env.API_URL}contents?limit=100&q=${encodeURIComponent(
      query as string
    )}`,
    opt
  )
    .then(async (data) => {
      res.status(200).json(await data.json());
    })
    .catch(async (error) => {
      res.status(500).json(await error.json());
    });
};
pages/api/search/index.tsからmicroCMS APIを呼んで、結果を返しているだけになります。
検索結果で画面描画
api/search/index.tsからmicroCMS APIを呼ぶ
https://xxxxx.microcms.io/api/v1/contents?q=ubuntu
↓
検索結果で画面描画
getServerSidePropsでAPIの結果を受け取って、画面の描画に入ります。
type Props = {
  blogs: MicroCmsResponse<IBlog>;
  query: string;
};

const Page: NextPage<Props> = ({ blogs, query }) => {
  const {
    searchValue,
    setSearchValue,
    onEnterKeyEvent,
    onClickSearchButton,
    data,
  } = useSearchByQuery(query, blogs);

  const [isTooltipVisible, setTooltipVisibility] = useState(false);
  useEffect(() => {
    setTooltipVisibility(true);
  }, []);
(略)ここで、blogsがuseSearchByQueryに入れられて、それ以降使われません。
戻ってきたdataを画面の描画に使います。
blogsとdataは以下の形式のデータです。
{
    "contents": [
        {
            "id": "fgm-dkbu10",
            "createdAt": "2021-05-09T08:41:26.685Z",
            "updatedAt": "2021-07-16T10:13:36.149Z",
            "publishedAt": "2021-05-09T08:41:26.685Z",
            "revisedAt": "2021-07-16T10:13:36.149Z",
            "title": "Ubuntu 20.04.2.0にGitLabをインストール",
            "category": {
                "id": "xexrrtp93gce",
                "createdAt": "2021-05-09T08:36:14.468Z",
                "updatedAt": "2021-08-31T12:05:21.841Z",
                "publishedAt": "2021-05-09T08:36:14.468Z",
                "revisedAt": "2021-08-31T12:05:21.841Z",
                "topics": "GitLab",
                "logo": "/logos/GitLab.png",
                "needs_title": false
            },
            "topics": [
                {
                    "id": "xexrrtp93gce",
                    "createdAt": "2021-05-09T08:36:14.468Z",
                    "updatedAt": "2021-08-31T12:05:21.841Z",
                    "publishedAt": "2021-05-09T08:36:14.468Z",
                    "revisedAt": "2021-08-31T12:05:21.841Z",
                    "topics": "GitLab",
                    "logo": "/logos/GitLab.png",
                    "needs_title": false
                },
                {
                    "id": "bcluojl_o",
                    "createdAt": "2021-02-18T07:36:53.394Z",
                    "updatedAt": "2021-08-31T12:08:52.380Z",
                    "publishedAt": "2021-02-18T07:36:53.394Z",
                    "revisedAt": "2021-08-31T12:08:52.380Z",
                    "topics": "ubuntu",
                    "logo": "/logos/ubuntu.png",
                    "needs_title": false
                }
            ],
            "content": "(略 ブログの内容)",
            "description": "(略 ブログの説明文)",
            "reflect_updatedAt": false,
            "reflect_revisedAt": false,
            "seo_images": [
                {
                    "id": "x5ad6bml5",
                    "createdAt": "2021-07-16T10:02:27.966Z",
                    "updatedAt": "2021-07-16T10:02:27.966Z",
                    "publishedAt": "2021-07-16T10:02:27.966Z",
                    "revisedAt": "2021-07-16T10:02:27.966Z",
                    "url": "https://res.cloudinary.com/dt8zu6zzd/image/upload/blog/gitlab_install/ITC_Engineering_Blog.png",
                    "alt": "Ubuntu 20.04.2.0にGitLabをインストール",
                    "width": 1200,
                    "height": 630
                }
            ],
            "seo_authors": []
        },
        {
            "id": "i-hna4_wx",
            ・・・略 同じ形式のデータの繰り返し・・・
        }
    ],
    "totalCount": 10,
    "offset": 0,
    "limit": 10
}useSearchByQueryにqueryとblogsを渡して、hooks/useSearchByQuery.tsxにてuseQueryに渡っています。queryは、useStateの初期値に渡されて、searchValueに名を変え、blogsはinitialDataになっています。
hooks/useSearchByQuery.tsx
export function useSearchByQuery(
  query: string,
  initialData: MicroCmsResponse<IBlog>
): Props {
  const [searchValue, setSearchValue] = useState<string>(query);
  const { isLoading, data, refetch } = useQuery(
    ['blogs', searchValue],
    async (context) => {
      return await new BlogService().getBlogsByQuery(
        context.queryKey[1] as string
      );
    },
    {
      initialData: initialData,
      enabled: false,
    }
  );

  const onEnterKeyEvent = async (e: React.KeyboardEvent<HTMLInputElement>) => {
    console.log('onEnterKeyEvent', e);
    if (!e.currentTarget.value.trim()) return;
    if (e.key === 'Enter') {
      refetch();
    }
  };

  const onClickSearchButton = (
    e: React.MouseEvent<HTMLButtonElement, MouseEvent>
  ) => {
    const { value } = (e.currentTarget as HTMLButtonElement)
      .previousElementSibling as HTMLInputElement;
    if (!value.trim()) {
      return;
    }
    refetch();
  };

  return {
    setSearchValue,
    onEnterKeyEvent,
    onClickSearchButton,
    data,
    searchValue,
    isLoading,
};useQueryの詳細は、https://react-query.tanstack.com/reference/useQueryになるのですが、"queryKey"毎に検索結果をキャッシュします。以下のように一度キャッシュした結果は瞬時に表示されます。今回の場合、query(検索文字列)毎にキャッシュになります。入力された瞬間に表示されるのは、onChangeでキャッシュを引き出しているからです。
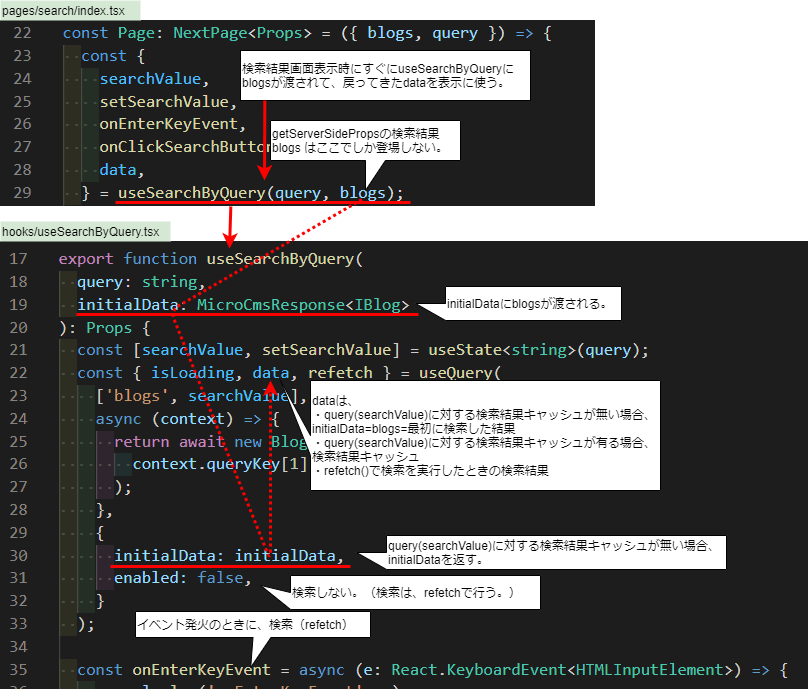
initialData: initialData,の部分は、初回表示時getServerSidePropsでの検索結果をキャッシュに入れています。
enabled: false,の部分は、検索を実行しないことを意味しています。(既に分かっている検索結果をキャッシュに入れて、{ isLoading, data, refetch }を返す)
クエリに対する検索キャッシュが無い場合、とりあえず、initialDataに入れられたデータを返して、バックグラウンドでfetchする仕様ですが、enabled: false,のため、バックグラウンドでfetchは動かないようになっています。つまり、クエリに対する検索キャッシュが無い場合、initialDataに入れられた既に分かっている検索結果を返す動きだけします。
※isLoadingは使われていません。
dataは、検索結果です。初回表示の時は、blogsと同じ値が入っています。
blogsは、getServerSidePropsでの検索結果です。
refetchは、クエリを手動で再フェッチする関数です。
以下のようにエンターキー押下、検索ボタンクリック時に呼ばれるようになっていて、この時、APIにGETが行きます。
検索欄の内容を変更時(onChange)、useQueryが呼ばれますが、refetchは呼ばれないため、キャッシュのdataによって、再描画されます。(キャッシュが有れば。)
  const onEnterKeyEvent = async (e: React.KeyboardEvent<HTMLInputElement>) => {
    console.log('onEnterKeyEvent', e);
    if (!e.currentTarget.value.trim()) return;
    if (e.key === 'Enter') {
      refetch();
    }
  };

  const onClickSearchButton = (
    e: React.MouseEvent<HTMLButtonElement, MouseEvent>
  ) => {
    const { value } = (e.currentTarget as HTMLButtonElement)
      .previousElementSibling as HTMLInputElement;
    if (!value.trim()) {
      return;
    }
    refetch();
  };

  return {
    setSearchValue,
    onEnterKeyEvent,
    onClickSearchButton,
    data,
    searchValue,
    isLoading,
};なお、useQueryを使うときは、_app.tsxに以下の記述が必要です。無い場合、Error: No QueryClient set, use QueryClientProvider to set oneとエラーになります。
pages/_app.tsx の記述例:
import { QueryClient, QueryClientProvider } from 'react-query';

const queryClient = new QueryClient();

const MyApp: FC<AppProps> = ({ Component, pageProps }) => {
  usePageView();
  return (
    <>
      <QueryClientProvider client={queryClient}>
        <Component {...pageProps} />
      </QueryClientProvider>
    </>
  );
};

export default MyApp;
ビルドのエラー
proxy環境でもfetchできるようにしていたのですが、今回、クライアント側でもfetchが動くようになり、以下のエラーになりました。
error - ./node_modules/https-proxy-agent/dist/agent.js:15:0
Module not found: Can't resolve 'net'原因は、getBlogsByQueryが定義してあるutils/BlogService.tsの
import { HttpsProxyAgent } from 'https-proxy-agent';により、クライアント側処理で必要な net と tls が無いという理由でエラーになっていました。
クライアント側処理に関係するgetBlogsByQueryは、proxyを使っていなくて、別の場所に移したりして何とかなかったかもしれませんが、特に影響無さそうなので、npm installしておきました。
$ npm install net
$ npm install tls
少し作り変えた実装
最初の実装から違うところだけ書きます。
検索画面へ切り替わり
※ここでは、記事一覧画面、右上検索欄エンターキーで検索したものとします。
検索
↓
https://itc-engineering-blog.netlify.app/search?q=ubuntu
(pages/search/index.tsx)
へ遷移
↓
静的ページ(ビルド済みのHTML/JS)読み込み
useRouterのrouter.push(`/search?q=${e.currentTarget.value}`);により、検索結果画面/search?q=xxxに遷移するのですが、pages/search/index.tsxが静的ページになっていて、サーバーサイドでは何もしなくなりました。
画面が読み込まれたときに、画面から/api/search?q=xxxにGETが行きます。
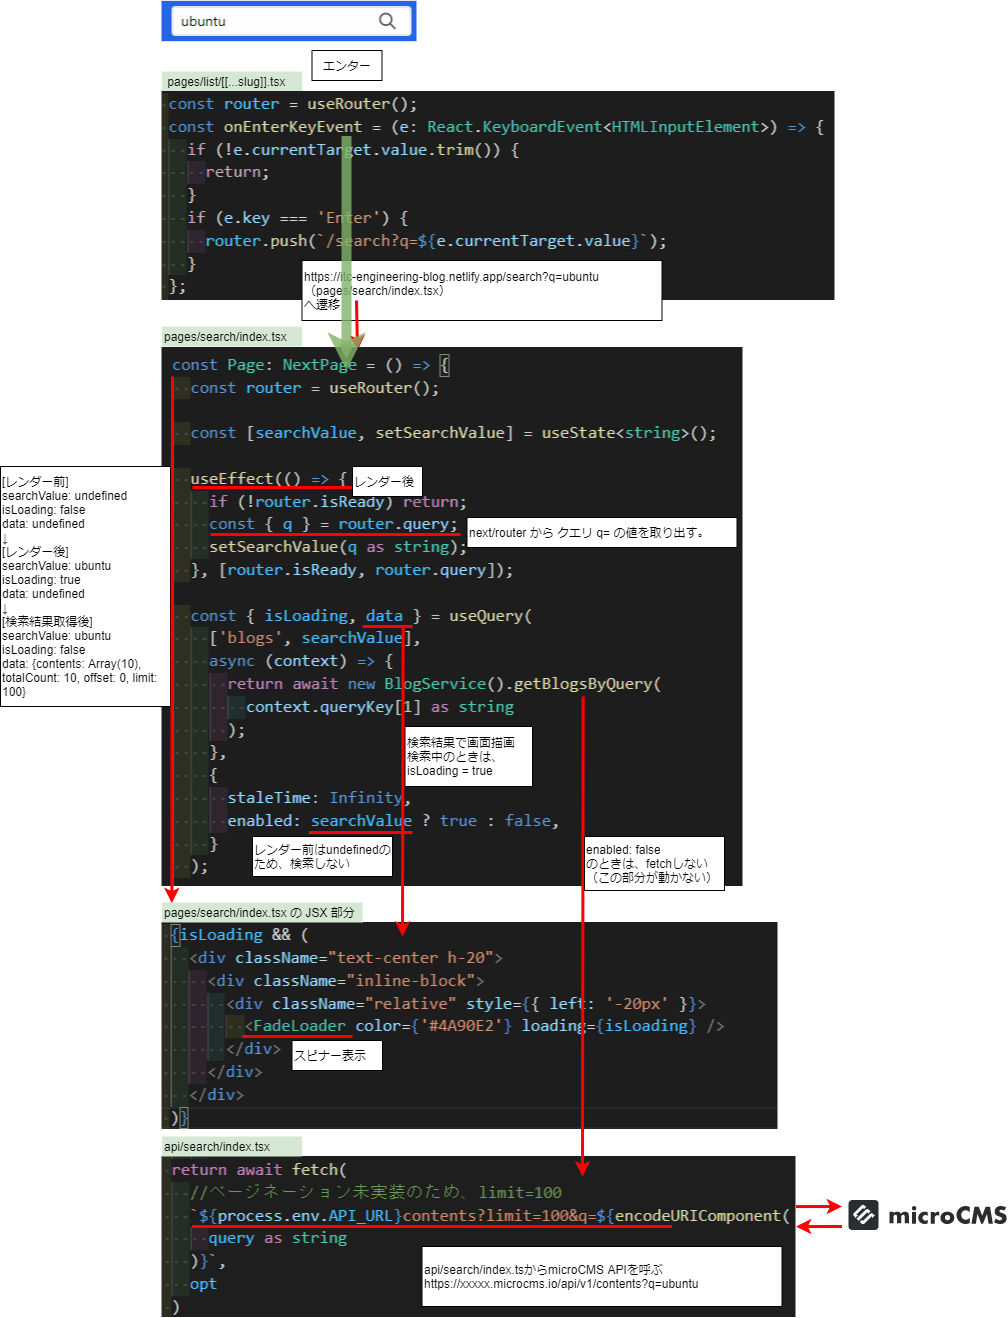
検索結果で画面描画
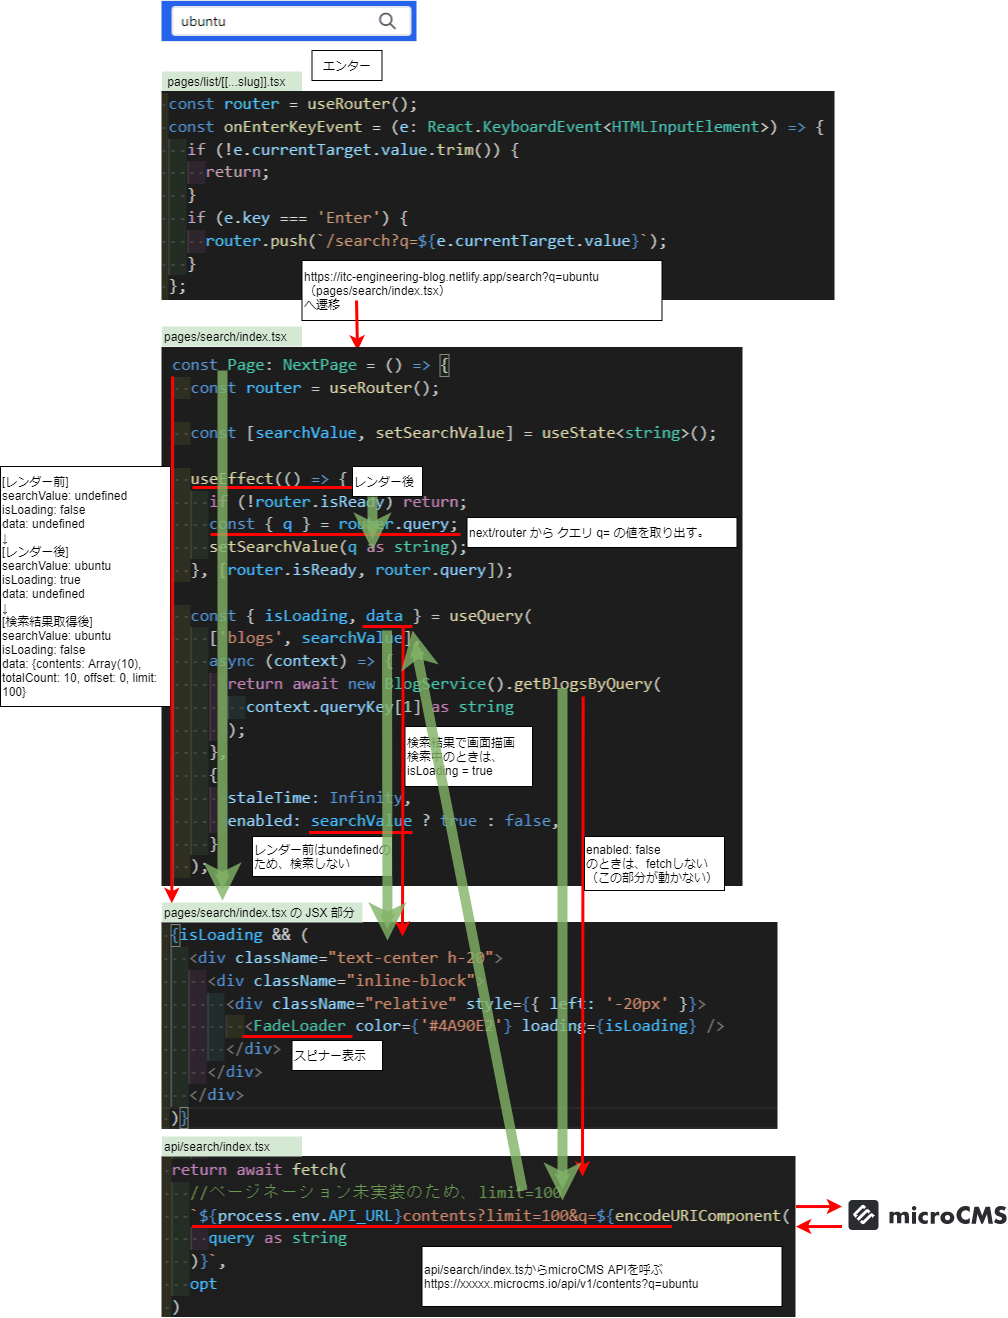
useEffect(() => {(レンダー後に処理)
↓
useQuery発動
↓
useRouterでq=の値を取得
↓
(画面から)自分のAPIを呼ぶ
https://itc-engineering-blog.netlify.app/api/search?q=ubuntu
(api/search/index.ts)
↓
api/search/index.tsからmicroCMS APIを呼ぶ
https://xxxxx.microcms.io/api/v1/contents?q=ubuntu
↓
isLoading = true の間は、スピナー表示
↓
検索結果を受け取って、再描画(isLoading = false)
となっています。
レンダー後にconst { q } = router.query;で?q=の値を取り出しています。(レンダー後じゃないと取り出せない。)
なお、useEffectでqueryの値が得られる前にfetchするとまずいため、searchValueがundefinedのときは、 enabled: false を設定して、fetchに行かないようにしています。
URLが/search?q=に切り替わった瞬間は、以下のように値が遷移します。(「ubuntu」で検索した場合)
[レンダー前]
searchValue: undefined
isLoading: false
data: undefined
↓
[レンダー後]
searchValue: ubuntu
isLoading: true
data: undefined
↓
[検索結果取得後]
searchValue: ubuntu
isLoading: false
data: {contents: Array(10), totalCount: 10, offset: 0, limit: 100}
const Page: NextPage = () => {
  const router = useRouter();

  const [searchValue, setSearchValue] = useState<string>();

  useEffect(() => {
    if (!router.isReady) return;
    const { q } = router.query;
    setSearchValue(q as string);
  }, [router.isReady, router.query]);

  const { isLoading, data } = useQuery(
    ['blogs', searchValue],
    async (context) => {
      return await new BlogService().getBlogsByQuery(
        context.queryKey[1] as string
      );
    },
    {
      staleTime: Infinity,
      enabled: searchValue ? true : false,
    }
);dataの形式は作り変え前と同じです。
staleTime: Infinity,により、一度検索した結果は、再確認することなくキャッシュされます。以下のように一度検索した文字で再検索をすると瞬時に表示されます。この時、fetchには行きません。
staleTimeはキャッシュを再確認し始めるまでの時間です。staleTimeの時間が過ぎると、とりあえず手持ちのキャッシュをすぐに返して、バックグラウンドでfetchに行って、内容が更新されていたら、それを新たにキャッシュします。デフォルトは、0です。
つまり、デフォルトでは、常にバックグラウンドでfetchに行きます。Infinityにより、逆に常に再確認に行かないようにしています。
キャッシュ関係の設定で、cacheTimeが有るのですが、こちらは、単純にキャッシュの有効期間です。デフォルトは5分です。
スピナーの表示
スピナーの表示は、
import FadeLoader from 'react-spinners/FadeLoader';にて、FadeLoaderコンポーネントを表示しています。
スピナーの形は、react-spinners demoから選べます。
{isLoading && (
  <div className="text-center h-20">
    <div className="inline-block">
      <div className="relative" style={{ left: '-20px' }}>
        <FadeLoader color={'#4A90E2'} loading={isLoading} />
      </div>
    </div>
  </div>
)}color={'#4A90E2'}のように、コンポーネントの色を指定しています。他にスピード、サイズを変更できます。loading=のところは表示有無です。(それ以前にisLoading &&のところで決まっていますが。)今回は色と表示有無しか指定していません。
style={{ left: '-20px' }}のところは、悩ましかったのですが、FadeLoaderはデフォルトでleft: 20pxが指定されていて、真ん中に表示しようとしても少しずれるため、親要素を-20pxずらして元に戻しています。
css=パラメータでCSSが指定できるのですが、CSS-in-JSライブラリのemotionを使わないといけないらしく、これだけのために導入はしたくなかったので、css=無しで解決しました。
getServerSideProps
当初そのつもり無かったのですが、画面読み込み時に検索しているので、SSR(Server Side Rendering)にする必要が無いことに気付き、getServerSidePropsをまるごと削除して、静的ページにしました。結果、検索結果画面に一瞬で遷移します。
以下のコードがまるごと削除したコードです。
export const getServerSideProps: GetServerSideProps = async (context) => {
  const query = context.query.q;
  const service: IBlogService = new BlogService();
  const blogs = await service.getBlogsByQuery(query as string);
  return {
    props: {
      blogs: blogs,
      query: query,
    },
  };
};
Netlifyへのデプロイ
基本的なデプロイの手順は、過去記事「Next.js microCMS GitHub NetlifyでJamstackなブログを公開」の通りです。今回対応した事だけ書きます。
SSG → SSG & SSR について
SSG(Static Site Generation)だけでやっていたため、package.jsonに"export": "next build && next export",を設定して、
$ npm run exportにより、ビルドしていました。
が、今回、検索機能がSSR(Server Side Rendering)のため、npm run exportではエラーになります。(next exportが不要。)
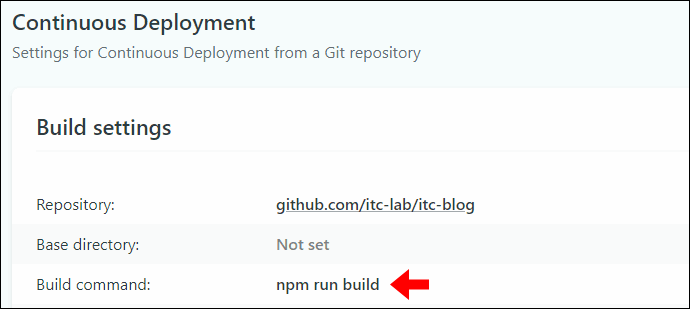
package.jsonに"build": "next build",を設定して、
$ npm run buildでビルドする必要がありました。
そのため、Netlifyのビルドコマンドの設定 Build & deploy → Build settings → Build command: も
npm run build
に変更しました。
Netlifyビルドコマンド変更前コンソールのエラー抜粋:
warn - Statically exporting a Next.js application via `next export` disables API routes.
This command is meant for static-only hosts, and is not necessary to make your application static.
Pages in your application without server-side data dependencies will be automatically statically exported by `next build`, including pages powered by `getStaticProps`.
Learn more: https://nextjs.org/docs/messages/api-routes-static-export
info - Exporting (0/3)
info - Copying "public" directory
Error occurred prerendering page "/search". Read more: https://nextjs.org/docs/messages/prerender-error
Error: Error for page /search: pages with `getServerSideProps` can not be exported. See more info here: https://nextjs.org/docs/messages/gssp-export
at /opt/build/repo/node_modules/next/dist/export/worker.js:227:27
at async Span.traceAsyncFn (/opt/build/repo/node_modules/next/dist/telemetry/trace/trace.js:60:20)
info - Exporting (3/3)
Error: Export encountered errors on following paths:
/search
at /opt/build/repo/node_modules/next/dist/export/index.js:487:19
at async Span.traceAsyncFn (/opt/build/repo/node_modules/next/dist/telemetry/trace/trace.js:60:20)
────────────────────────────────────────────────────────────────
"build.command" failed
────────────────────────────────────────────────────────────────
Error message
Command failed with exit code 1: npm run export
Error location
In Build command from Netlify app:
npm run export
Resolved config
build:
command: npm run export
commandOrigin: ui
environment:Netlifyのプラグインのインストールが必要かと思いましたが、必要無かったです。SSG → SSG & SSR で行ったことは、ビルドコマンドの変更だけです。※netlify.tomlは使っていません。
Next.js側の対応
Netlifyにデプロイするにあたり、Next.js側の対応は何もありませんでした。
next.config.js
module.exports = {
  ・・・
  target: 'serverless',
  ・・・
};
が必要なような記述を見つけて、追加してビルドしてみましたが、エラーになり、結果、必要無かったです。
npm installのエラー
react-static-tweetsがnext10系に依存しているのに対して、next11系をインストールしたため、エラーになりました。
Installing NPM modules using NPM version 7.21.1
npm ERR! code ERESOLVE
npm ERR! ERESOLVE unable to resolve dependency tree
npm ERR!
npm ERR! While resolving: itc-blog@0.1.0
npm ERR! Found: next@11.1.2
npm ERR! node_modules/next
npm ERR!   next@"^11.0.0" from the root project
npm ERR!
npm ERR! Could not resolve dependency:
npm ERR! peer next@"^10.0.6" from react-static-tweets@0.5.4
npm ERR! node_modules/react-static-tweets
npm ERR!   react-static-tweets@"0.5.4" from the root project
npm ERR!
npm ERR! Fix the upstream dependency conflict, or retry
npm ERR! this command with --force, or --legacy-peer-deps
npm ERR! to accept an incorrect (and potentially broken) dependency resolution.
npm ERR!
npm ERR! See /opt/buildhome/.npm/eresolve-report.txt for a full report.
npm ERR! A complete log of this run can be found in:
npm ERR!     /opt/buildhome/.npm/_logs/2021-09-12T08_05_49_299Z-debug.log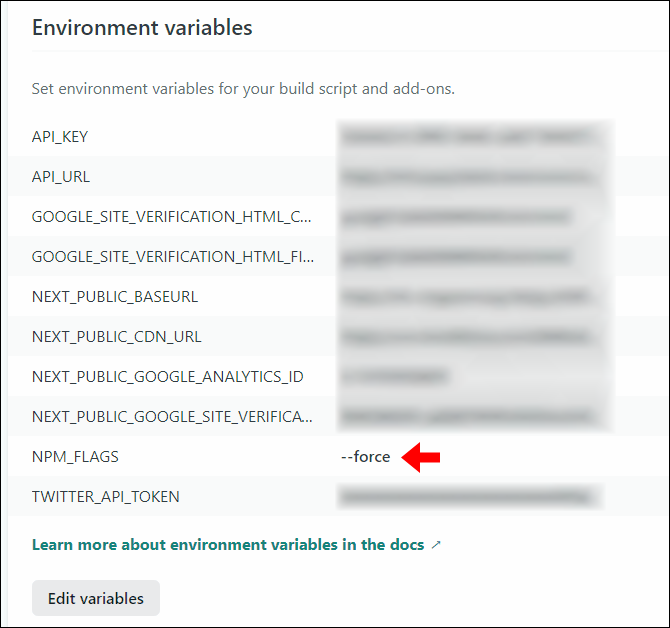
Error during NPM installreact-static-tweetsのpackage.jsonにパッチを当てたかったですが、package.jsonの内容が可変なのと、package.jsonがpatch-packageの対象に加わらず、断念しました。結局、Environment variablesにNPM_FLAGS = --forceを設定して、無視するようにしました。
Request must beエラー
ビルドが通ったと思って、喜んでいたら、最後の最後でエラーになりました。
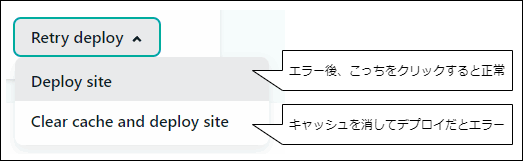
「Request must be smaller than 69905067 bytes for the CreateFunction operation」
は、Netlifyがバックエンドに使っているAWS Lambdaのエラーのようです。
キャッシュをクリアしないで、もう一度ビルド(Deploy site)したら、エラーは無くなりました。
初めてSSRをデプロイするときに出るのかもしれません。
────────────────────────────────────────────────────────────────
5. onPostBuild command from @netlify/plugin-nextjs
────────────────────────────────────────────────────────────────
Next.js cache saved.
For faster deploy times, build IDs should be set to a static value.
To do this, set generateBuildId: () => 'build' in your next.config.js
(@netlify/plugin-nextjs onPostBuild completed in 292ms)
────────────────────────────────────────────────────────────────
6. Deploy site
────────────────────────────────────────────────────────────────
Starting to deploy site from 'out'
Creating deploy tree
Creating deploy upload records
92 new files to upload
6 new functions to upload
Request must be smaller than 69905067 bytes for the CreateFunction operation
Request must be smaller than 69905067 bytes for the CreateFunction operation
Request must be smaller than 69905067 bytes for the CreateFunction operation
Request must be smaller than 69905067 bytes for the CreateFunction operation
Request must be smaller than 69905067 bytes for the CreateFunction operation
Request must be smaller than 69905067 bytes for the CreateFunction operation
Request must be smaller than 69905067 bytes for the CreateFunction operation
Request must be smaller than 69905067 bytes for the CreateFunction operation
Request must be smaller than 69905067 bytes for the CreateFunction operation
・・・コンソール出力
以下、デプロイがうまくいったときのコンソール画面です。search関連だけλ(Lambda)になっています。※最初の実装のときの出力です。その後の実装変更で、/searchは、○ (Static)になりました。
Page Size First Load JS
┌ ● / (9815 ms) 263 B 122 kB
├ /_app 0 B 79.9 kB
├ ○ /404 195 B 80.1 kB
├ λ /api/search 0 B 79.9 kB
├ ● /blogs/[id] (137237 ms) 292 kB 410 kB
├ ├ /blogs/download-iframe (10615 ms)
├ ├ /blogs/nextjs-fetch-proxy (9927 ms)
├ ├ /blogs/nextjs-patch (9807 ms)
├ ├ /blogs/sslcert (9558 ms)
├ ├ /blogs/next-sitemap2 (9481 ms)
├ ├ /blogs/proxies (8400 ms)
├ ├ /blogs/next-sitemap (3571 ms)
├ └ [+31 more paths] (avg 2448 ms)
├ ● /list/[[...slug]] (115105 ms) 216 B 122 kB
├ ├ /list/1/8hcq78trdqsy (4334 ms)
├ ├ /list/1/068udcpeazn (4258 ms)
├ ├ /list/1/umqsrvfrv7 (4177 ms)
├ ├ /list/1/6ra37_nhnpqm (4068 ms)
├ ├ /list/1/o8o4z1zp7 (4019 ms)
├ ├ /list/1/91zw54wj7d (3841 ms)
├ ├ /list/1/n767cc7fin (3765 ms)
├ └ [+26 more paths] (avg 3332 ms)
└ λ /search 41 kB 144 kB
+ First Load JS shared by all 79.9 kB
├ chunks/framework.c179ed.js 42.4 kB
├ chunks/main.2ca113.js 23.2 kB
├ chunks/pages/_app.d6e24f.js 13.5 kB
├ chunks/webpack.0cb069.js 825 B
└ css/ae63bce8d69d04f7cb7c.css 7.91 kB
λ (Lambda) server-side renders at runtime (uses getInitialProps or getServerSideProps)
○ (Static) automatically rendered as static HTML (uses no initial props)
● (SSG) automatically generated as static HTML + JSON (uses getStaticProps)
(ISR) incremental static regeneration (uses revalidate in getStaticProps)
> itc-blog@0.1.0 postbuild /opt/build/repo
> next-sitemap --config sitemap.config.js
(build.command completed in 1m 44.3s)
────────────────────────────────────────────────────────────────
3. onBuild command from @netlify/plugin-nextjs
────────────────────────────────────────────────────────────────
Detected Next.js site. Copying files...
** Running Next on Netlify package **
🚀 Next on Netlify 🚀
🌍️ Copying public folder to /opt/build/repo/out
💼 Copying static NextJS assets to /opt/build/repo/out
💫 Setting up API endpoints as Netlify Functions in /opt/build/repo/.netlify/functions-internal
💫 Setting up pages with getInitialProps as Netlify Functions in /opt/build/repo/.netlify/functions-internal
💫 Setting up pages with getServerSideProps as Netlify Functions in /opt/build/repo/.netlify/functions-internal
🔥 Copying pre-rendered pages with getStaticProps and JSON data to /opt/build/repo/out
💫 Setting up pages with getStaticProps and fallback: true as Netlify Functions in /opt/build/repo/.netlify/functions-internal
💫 Setting up pages with getStaticProps and revalidation interval as Netlify Functions in /opt/build/repo/.netlify/functions-internal
🔥 Copying pre-rendered pages without props to /opt/build/repo/out
Building 150 pages
🔀 Setting up redirects
🔀 Setting up headers
✅ Success! All done!
(@netlify/plugin-nextjs onBuild completed in 375ms)
────────────────────────────────────────────────────────────────
4. Functions bundling
────────────────────────────────────────────────────────────────
Packaging Functions from .netlify/functions-internal directory:
- next_api_search/next_api_search.js
- next_blogs_id/next_blogs_id.js
- next_image/next_image.js
- next_index/next_index.js
- next_list_slug/next_list_slug.js
- next_search/next_search.js
(Functions bundling completed in 35.4s)
────────────────────────────────────────────────────────────────
5. onPostBuild command from @netlify/plugin-nextjs
────────────────────────────────────────────────────────────────
Next.js cache saved.
For faster deploy times, build IDs should be set to a static value.
To do this, set generateBuildId: () => 'build' in your next.config.js
(@netlify/plugin-nextjs onPostBuild completed in 357ms)
────────────────────────────────────────────────────────────────
6. Deploy site
────────────────────────────────────────────────────────────────
Starting to deploy site from 'out'
Creating deploy tree
Creating deploy upload records
87 new files to upload
5 new functions to upload
Site deploy was successfully initiated
(Deploy site completed in 5.9s)
────────────────────────────────────────────────────────────────
Netlify Build Complete
────────────────────────────────────────────────────────────────
(Netlify Build completed in 2m 29s)
Starting post processing
Post processing - HTML
Caching artifacts
Started saving node modules
Finished saving node modules
Started saving build plugins
Finished saving build plugins
Started saving pip cache
Finished saving pip cache
Started saving emacs cask dependencies
Finished saving emacs cask dependencies
Started saving maven dependencies
Finished saving maven dependencies
Started saving boot dependencies
Finished saving boot dependencies
Started saving rust rustup cache
Finished saving rust rustup cache
Started saving go dependencies
Finished saving go dependencies
Build script success
Post processing - header rules
Post processing - redirect rules
Post processing done
Site is live ✨
Finished processing build request in 3m19.77232733s
その他、宣伝、誹謗中傷等、当方が不適切と判断した書き込みは、理由の如何を問わず、投稿者に断りなく削除します。
書き込み内容について、一切の責任を負いません。
このコメント機能は、予告無く廃止する可能性があります。ご了承ください。
コメントの削除をご依頼の場合はXのDM等でご連絡ください。


