- 記事一覧 >
- ブログ記事

LocalStackをAWS SQSにしてRuby on Rails Shoryukenを使ってみた
はじめに
タイトルの SQS とは、Amazon Simple Queue Service (Amazon SQS) のことになります。
SQS を使うには、AWS に契約して、設定して、インターネットに接続して使わないといけないですが、
LocalStack を使うと、ネット接続できなくても、オフラインで SQS を使ったプログラムの動作確認ができます。
今回、AWS CLI を使って、本物の SQS の代わりに LocalStack へ指示を出して、キューの出し入れの動作確認と、Ruby on Rails + Shoryuken を使って、プログラムによるキューの出し入れを動作確認します。
LocalStack、Ruby on Rails + Shoryuken は、インストールからやっていきます。
動作確認はオフラインでもできますが、インストール作業時は、ネット接続しています。
【 SQS 】
"分散型メッセージキューイングサービス"です。
AWSが提供するサービスの一部で、サーバーレスでキューイングを実現できるサービスです。
【 LocalStack 】
オンプレ上のAWSのようなものです。疑似的なAWSを構築して、本物のAWSへ接続しなくてもAWSサービスを利用したプログラムの動作確認ができます。AWSサービスの一部、例えば、Cognitoなどは、有料になります。
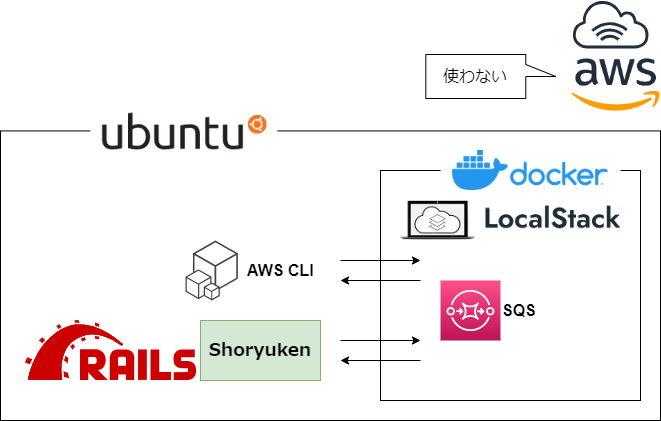
図中の矢印を本物のAWSに向けると、本物のAWSでも動作すると思いますが、本物では、デプロイ、動作確認していません。
今回、全て1台の Ubuntu 20.04 LTS で作業しています。
【検証環境】
VMware Workstation Pro 16
Ubuntu 20.04.2 LTS
Docker 20.10.16
LocalStack 0.14.1
aws-cli/1.18.69
ruby 3.0.4p208
Rails 7.0.3
Shoryuken 6.0.0
LocalStack インストール
Docker インストール
docker-compose を使いますので、まず、Docker をインストールします。
LocalStack インストール方法として、
pipを使う方法もありますが、その他のインストール方法は、割愛します。その他の方法は、公式ドキュメント(https://docs.localstack.cloud/get-started/)で分かると思います。
# apt update
# apt install -y apt-transport-https ca-certificates curl software-properties-common
# curl -fsSL https://download.docker.com/linux/ubuntu/gpg | sudo apt-key add -
# add-apt-repository "deb [arch=amd64] https://download.docker.com/linux/ubuntu focal stable"
# apt update
# apt install -y docker-ce
# docker -v
Docker version 20.10.16, build aa7e414
docker-compose インストール
今回、LocakStack を docker-compose で立ち上げようと思います。
公式ドキュメント(https://docs.localstack.cloud/get-started/)には、currently requires docker-compose version 1.9.0+ と書かれています(2022 年 5 月時点)ので、docker-compose 1.29.2 をインストールします。
# curl -L "https://github.com/docker/compose/releases/download/1.29.2/docker-compose-$(uname -s)-$(uname -m)" -o /usr/local/bin/docker-compose
# chmod +x /usr/local/bin/docker-compose
# docker-compose --version
docker-compose version 1.29.2, build 5becea4c
docker-compose.yml 修正
localstack.git をクローンして、docker-compose.yml を編集します。
# git clone https://github.com/localstack/localstack.git
# cd localstack
# vi docker-compose.yml
Pro 版の記述を削除して、restart: always を追加して、OS(Ubuntu)を再起動しても LocalStack が自動起動するようにします。
削除
      - "127.0.0.1:53:53"                # only required for Pro (DNS)
      - "127.0.0.1:53:53/udp"            # only required for Pro (DNS)
      - "127.0.0.1:443:443"              # only required for Pro (LocalStack HTTPS Edge Proxy)

      - LOCALSTACK_API_KEY=${LOCALSTACK_API_KEY-}  # only required for Pro

追加
    restart: always
docker-compose.yml の全体は、以下です。
version: "3.8"

services:
  localstack:
    container_name: "${LOCALSTACK_DOCKER_NAME-localstack_main}"
    image: localstack/localstack
    network_mode: bridge
    ports:
      - "127.0.0.1:4510-4559:4510-4559"  # external service port range
      - "127.0.0.1:4566:4566"            # LocalStack Edge Proxy
    environment:
      - DEBUG=${DEBUG-}
      - DATA_DIR=${DATA_DIR-}
      - LAMBDA_EXECUTOR=${LAMBDA_EXECUTOR-}
      - HOST_TMP_FOLDER=${TMPDIR:-/tmp/}localstack
      - DOCKER_HOST=unix:///var/run/docker.sock
    volumes:
      - "${TMPDIR:-/tmp}/localstack:/tmp/localstack"
      - "/var/run/docker.sock:/var/run/docker.sock"
    restart: always
【
${DEBUG-}等の末尾のマイナス記号の意味 】
${DEBUG}かつ、環境変数DEBUGがセットされていない場合、docker-compose upで
WARNING: The DATA_DIR variable is not set. Defaulting to a blank string.と警告メッセージが出力されます。一方、
${DEBUG-}かつ、環境変数DEBUGがセットされていない場合、警告メッセージは表示されません。
${TMPDIR:-/tmp/}のように:-の場合は、デフォルト値の設定です。環境変数TMPDIRがセットされていなかった場合、/tmp/になります。
LocalStack 起動
docker-compose.yml が存在するディレクトリで、docker-compose up により、LocalStack 環境の構築と、起動が行われます。
# docker-compose up -d
Starting localstack_main ... done
# docker ps
CONTAINER ID   IMAGE                   COMMAND                  CREATED              STATUS         PORTS                                                                    NAMES
13b95c739f99   localstack/localstack   "docker-entrypoint.sh"   About a minute ago   Up 4 seconds   127.0.0.1:4510-4559->4510-4559/tcp, 127.0.0.1:4566->4566/tcp, 5678/tcp   localstack_main
【 :8080 Web UI(dashboard) について 】
この手順のLocalStackは8080ポートのdashboard機能は使えません。
https://stackoverflow.com/questions/57554575/localstack-cant-access-dashboard
によると、
localstack/localstack-full(Pro版)を使う必要があるようです。
AWS CLI インストール
SQS(LocalStack のモック)の動作確認をするため、AWS CLI をインストールします。
# apt install -y awscli
# aws --version
aws-cli/1.18.69 Python/3.8.5 Linux/5.8.0-49-generic botocore/1.16.19
【 AWS CLI 】
AWS Command Line Interface (AWS CLI) は、コマンドラインシェルでコマンドを使用して AWS サービスとやり取りするためのオープンソースツールです。AWS CLI を使用すると、最小限の設定で、任意のターミナルプログラムのコマンドプロンプトから、ブラウザベースの AWS Management Console で提供される機能と同等の機能を実装するコマンドを実行できます。
SQS 動作確認
LocalStack の SQS を AWS CLI を使って、動作確認します。
profile 作成
キューのリストを表示するコマンドは、
# aws sqs list-queuesですが、いきなり実行すると、以下のエラーになります。
You must specify a region. You can also configure your region by running "aws configure".
profile の作成が必要です。profile とは、アクセスキーやリージョンの設定のことです。
localstack という名前の profile を作成します。(値は適当でOKです。)
# aws configure --profile localstack
AWS Access Key ID [None]: dummy
AWS Secret Access Key [None]: dummy
Default region name [None]: us-east-1
Default output format [None]: json
さらに、profile を作成してもエンドポイントを LocalStack に向けていないと、以下のようにエラーになります。(エラー内容は一見 profile の設定の問題に見える。)
# aws sqs list-queues --profile localstackAn error occurred (InvalidClientTokenId) when calling the ListQueues operation: The security token included in the request is invalid.
本物の AWS に対しての実行と認識されていますので、--endpoint-url=http://localhost:4566 オプションが必要です。
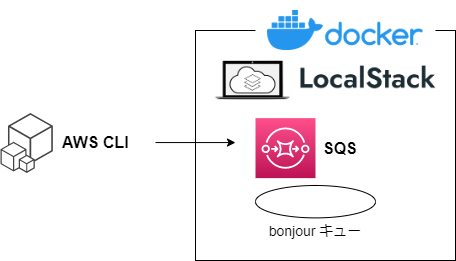
キュー作成
bonjour というキューを作成します。
# aws sqs create-queue --queue-name bonjour \
  --endpoint-url http://localhost:4566 \
  --profile localstack
{
    "QueueUrl": "http://localhost:4566/000000000000/bonjour"
}
キューが作成されたか確認します。
# aws sqs list-queues \
  --endpoint-url http://localhost:4566 \
  --profile localstack
{
    "QueueUrls": [
        "http://localhost:4566/000000000000/bonjour"
    ]
}
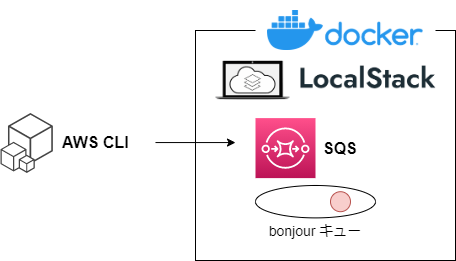
メッセージ送信
メッセージをキューに送信します。(プロデューサー側の操作)
このとき、--queue-url は、キューを作成したときに表示される QueueUrl です。
# aws sqs send-message --queue-url http://localhost:4566/000000000000/bonjour --message-body "Bonjour le monde" \
  --profile localstack \
  --endpoint-url http://localhost:4566
{
    "MD5OfMessageBody": "5eb63bbbe01eeed093cb22bb8f5acdc3",
    "MessageId": "fb290b94-2f3a-1cb2-e2fa-97da4a464551"
}
キューの詳細を確認します。
キューの詳細を表示するコマンドは、aws sqs get-queue-attributes で、--attribute-names All オプションで表示する属性を絞り込まないようにしています。
絞り込む場合は、--attribute-names ApproximateNumberOfMessages のように属性名を指定します。
# aws sqs get-queue-attributes --queue-url http://localhost:4566/000000000000/bonjour \
  --attribute-names All \
  --profile=localstack \
  --endpoint-url=http://localhost:4566
{
    "Attributes": {
        "ApproximateNumberOfMessages": "1",
        "ApproximateNumberOfMessagesDelayed": "0",
        "ApproximateNumberOfMessagesNotVisible": "0",
        "CreatedTimestamp": "1651914722.301067",
        "DelaySeconds": "0",
        "LastModifiedTimestamp": "1651914722.301067",
        "MaximumMessageSize": "262144",
        "MessageRetentionPeriod": "345600",
        "QueueArn": "arn:aws:sqs:us-east-1:000000000000:bonjour",
        "ReceiveMessageWaitTimeSeconds": "0",
        "VisibilityTimeout": "30"
    }
}
"ApproximateNumberOfMessages": "1", により、メッセージが1件登録されているのが分かります。
キュー消費
メッセージをキューから消費します。(コンシューマー側の操作)
# aws sqs receive-message --queue-url http://localhost:4566/000000000000/bonjour \
  --profile localstack \
  --endpoint-url http://localhost:4566
{
    "Messages": [
        {
            "MessageId": "fb290b94-2f3a-1cb2-e2fa-97da4a464551",
            "ReceiptHandle": "brndnprrbglkzgrtjerytdikwcenrppcvedvpbaevftpudbwenjqzqdvihxgmrmxtsgfdmjijvsllmtkttjtvjmunnupfblnoxqxlhacasjjkdbelbdkiqvikaqponmvqdvgzcrwgkodcgzbgkiyaiwtxzmymndcguktjgkrwqcplvqtzpjftgwyw",
            "MD5OfBody": "5eb63bbbe01eeed093cb22bb8f5acdc3",
            "Body": "Bonjour le monde"
        }
    ]
}
キューの詳細を確認します。
# aws sqs get-queue-attributes --queue-url http://localhost:4566/000000000000/bonjour \
  --attribute-names All \
  --profile=localstack \
  --endpoint-url=http://localhost:4566
{
    "Attributes": {
        "ApproximateNumberOfMessages": "0",
        "ApproximateNumberOfMessagesDelayed": "0",
        "ApproximateNumberOfMessagesNotVisible": "1",
        "CreatedTimestamp": "1651914722.301067",
        "DelaySeconds": "0",
        "LastModifiedTimestamp": "1651914722.301067",
        "MaximumMessageSize": "262144",
        "MessageRetentionPeriod": "345600",
        "QueueArn": "arn:aws:sqs:us-east-1:000000000000:bonjour",
        "ReceiveMessageWaitTimeSeconds": "0",
        "VisibilityTimeout": "30"
    }
}
"ApproximateNumberOfMessages": "0",
"ApproximateNumberOfMessagesNotVisible": "1",
により、1件処理されたことが分かります。
【 ApproximateNumberOfMessagesNotVisible 】
処理中のメッセージの数。メッセージがクライアントに送信されたが、まだ削除されていない場合、または表示期限に達していない場合、メッセージは処理中とみなされます。

メッセージ削除
処理中になったメッセージを削除します。
このとき、--receipt-handle は、メッセージをキューから消費したときに表示される ReceiptHandle です。
# aws sqs delete-message --queue-url http://localhost:4566/000000000000/bonjour \
  --receipt-handle WCtj1aBsktWdQlFYhXWIJDBNgJGcNvwS5YvY02BdCKLbPjDI9NsXofxp19klOX9auaRr0GSVsco0CyJQ5gzGlT7ZTNbZFxyfvoEIsmdc09XWnrSZuOsQALzWfTE04KCEix9Sjpirbne3XaocPG9IEjHUpavnAw6IE59jTirCvpLJ \
  --profile localstack \
  --endpoint-url http://localhost:4566
キューの詳細を確認します。
# aws sqs get-queue-attributes --queue-url http://localhost:4566/000000000000/bonjour \
  --attribute-names All \
  --profile=localstack \
  --endpoint-url=http://localhost:4566
{
    "Attributes": {
        "ApproximateNumberOfMessages": "0",
        "ApproximateNumberOfMessagesDelayed": "0",
        "ApproximateNumberOfMessagesNotVisible": "0",
        "CreatedTimestamp": "1651914722.301067",
        "DelaySeconds": "0",
        "LastModifiedTimestamp": "1651914722.301067",
        "MaximumMessageSize": "262144",
        "MessageRetentionPeriod": "345600",
        "QueueArn": "arn:aws:sqs:us-east-1:000000000000:bonjour",
        "ReceiveMessageWaitTimeSeconds": "0",
        "VisibilityTimeout": "30"
    }
}
ApproximateNumberOfMessages* が全て "0" になりました。

Ruby インストール
コマンドラインツール rbenv を使用して Ruby と Rails をインストールします。
【 Rbenv 】
Rbenvは、Rubyの異なるバージョンを切り替えるために使用できるツールです。
まず、依存関係を解消しておきます。
# apt update
# apt install -y git curl libssl-dev libreadline-dev zlib1g-dev autoconf bison build-essential libyaml-dev libreadline-dev libncurses5-dev libffi-dev libgdbm-dev
ここから一般ユーザー(今回は、"admin"とします。)で作業します。
rbenv-installer を起動します。
$ curl -fsSL https://github.com/rbenv/rbenv-installer/raw/HEAD/bin/rbenv-installer | bash/home/admin/.rbenv/bin/rbenv にインストールされるため、 パスを通し、rbenv コマンドラインユーティリティを使用できるようにします。
$ echo 'export PATH="$HOME/.rbenv/bin:$PATH"' >> ~/.bashrceval "$(rbenv init - bash)" により、rbenv が自動的にロードされるようにします。
$ echo 'eval "$(rbenv init - bash)"' >> ~/.bashrc
$ source ~/.bashrc
$ rbenv --version
rbenv 1.2.0-14-gc6cc0a1
インストールできる ruby を確認します。
$ rbenv install -l
2.6.10
2.7.6
3.0.4
3.1.2
jruby-9.3.4.0
mruby-3.0.0
rbx-5.0
truffleruby-22.1.0
truffleruby+graalvm-22.1.0

Only latest stable releases for each Ruby implementation are shown.
Use 'rbenv install --list-all / -L' to show all local versions.
今回、3.0.4 をインストールすることにします。
$ rbenv install 3.0.4rbenv global で Ruby のデフォルトバージョンとして設定します。
$ rbenv global 3.0.4
$ ruby -v
ruby 3.0.4p208 (2022-04-12 revision 3fa771dded) [x86_64-linux]
Rails インストール
$ gem install rails -v 6.1.5.1
$ rbenv rehash
$ rails -v
Rails 6.1.5.1で終わりですが、この場合、グローバルに rails がインストールされますので、今回このインストール方法ではやっていません。ローカル(プロジェクト毎)にインストールする方法にします。
プロジェクト名を sqs-app とします。
$ mkdir sqs-app
$ cd sqs-app
$ bundle init
Writing new Gemfile to /home/admin/sqs-app/Gemfile
$ vi Gemfile
# frozen_string_literal: true
source "https://rubygems.org"
git_source(:github) { |repo_name| "https://github.com/#{repo_name}" }
# gem "rails"を
# frozen_string_literal: true

source "https://rubygems.org"

git_source(:github) { |repo_name| "https://github.com/#{repo_name}" }

gem "rails"とします。(gem "rails" を有効にする。)
プロジェクトのディレクトリ配下にある、vendor/bundle 配下に gem をインストールするように指定します。
$ bundle config set path 'vendor/bundle'Rails プロジェクト作成
Rails プロジェクト初期化は、$ bundle exec rails new . ですが、そのまま実行すると、sqlite3 の gem をチェックするときに、エラーになりました。(DBを何も指定しないと、SQLite とみなされます。)
先に libsqlite3-dev をインストールしておきます。
$ sudo apt install -y libsqlite3-devgem を更新します。(gem "rails" が有効になって、rails がインストールされます。)
$ bundle install【 bundle install 】
bundler を使って Gemfile から gem をインストールするコマンドです。
installは、デフォルトのオプションのため、bundleだけでも同じ意味です。
プロジェクト sqs-app を Rails プロジェクトとして初期化します。今回、"動けば良い" でいきますので、全てデフォルトのオプション無しとします。
$ bundle exec rails new .
       exist
      create  README.md
      create  Rakefile
      create  .ruby-version
      create  config.ru
      create  .gitignore
      create  .gitattributes
    conflict  Gemfile
Overwrite /home/admin/sqs-app/Gemfile? (enter "h" for help) [Ynaqdhm] Y
オプションを付けるとしたら、以下のような例になります。
$ bundle exec rails new . -B -d mysql --skip-test --skip-coffee-B : Rails プロジェクト作成時に bundle install を行わない。
-d mysql : DB を mysql に変更。
–skip-test : rails のデフォルトの minitest を使わない。
–skip-coffee : coffee スクリプトを使わない。
Shoryuken インストール
shoryuken gem をインストールします。
$ vi Gemfile以下を追加します。
gem 'shoryuken'
gem 'aws-sdk-sqs'
$ bundle installShoryuken 実行
ここまで来たら、
https://github.com/ruby-shoryuken/shoryuken/wiki/Getting-Started#rails
に従って、
Create a job
Create a queue
Set the queue backend
Start Shoryuken
Enqueue a message
をやっていきたいところですが、本物の AWS 前提のため、LocalStack に振り向けるように、config/initializers/shoryuken.rb を設定します。
region、access_key_id、secret_access_key は、環境変数、endpoint は http://localhost:4566 固定とします。
$ vi config/initializers/shoryuken.rbShoryuken.configure_client do |config|
config.sqs_client = Aws::SQS::Client.new(
region: ENV["AWS_REGION"],
access_key_id: ENV["AWS_ACCESS_KEY_ID"],
secret_access_key: ENV["AWS_SECRET_ACCESS_KEY"],
endpoint: 'http://localhost:4566',
verify_checksums: false
)
end
Shoryuken.configure_server do |config|
config.sqs_client = Aws::SQS::Client.new(
region: ENV["AWS_REGION"],
access_key_id: ENV["AWS_ACCESS_KEY_ID"],
secret_access_key: ENV["AWS_SECRET_ACCESS_KEY"],
endpoint: 'http://localhost:4566',
verify_checksums: false
)
endadmin ユーザーで profile を登録します。(profile 名=localstack で値は適当です。)
$ aws configure --profile localstack
AWS Access Key ID [None]: dummy
AWS Secret Access Key [None]: dummy
Default region name [None]: us-east-1
Default output format [None]: json
あとは、Getting-Started の通りに、ジョブ実行のクラスを定義します。
$ vi app/jobs/hello_job.rbclass HelloJob < ActiveJob::Base
queue_as 'hello'
def perform(name)
puts "Hello, #{name}"
end
endキューを作成します。
$ export AWS_ACCESS_KEY_ID=dummy
$ export AWS_SECRET_ACCESS_KEY=dummy
$ export AWS_REGION=us-east-1
$ bundle exec shoryuken sqs create hello --endpoint=http://localhost:4566
Queue hello was successfully created. Queue URL http://localhost:4566/000000000000/hello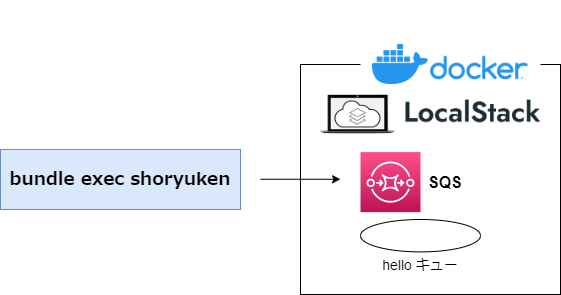
bundle exec shoryuken は、shoryuken コマンドをスタンドアローンで起動しています。ただ、このままの場合、本物の AWS が対象になるため、--endpoint=http://localhost:4566 オプションを指定して、LocalStack に向ける必要があります。
bundle exec shoryukenは、config/initializers/shoryuken.rbの設定は反映されません。環境変数+--endpointオプションで切り替えが必要です。
【 bundle exec 】
今いるプロジェクトの gem でコマンドを起動します。
キューイングバックエンドとして、shoryuken を設定します。
$ vi config/application.rbrequire_relative "boot"
require "rails/all"
# Require the gems listed in Gemfile, including any gems
# you've limited to :test, :development, or :production.
Bundler.require(*Rails.groups)
module SqsApp
class Application < Rails::Application
# Initialize configuration defaults for originally generated Rails version.
config.load_defaults 7.0
config.active_job.queue_adapter = :shoryuken
# Configuration for the application, engines, and railties goes here.
#
# These settings can be overridden in specific environments using the files
# in config/environments, which are processed later.
#
# config.time_zone = "Central Time (US & Canada)"
# config.eager_load_paths << Rails.root.join("extras")
end
endconfig.active_job.queue_adapter = :shoryuken の1行を追加します。
shoryuken を起動して、キューをポーリングします。
このとき、config/initializers/shoryuken.rb のサーバー側設定 Shoryuken.configure_server do |config| が有効になります。
$ bundle exec shoryuken -q hello -R-q : キューを指定します。
-R : Rails で動作することを伝えます。
(別コンソール起動)
HelloJob ジョブをキューに入れます。
HelloJob.perform_later('Ken')を入力します。
このとき、config/initializers/shoryuken.rb のクライアント側設定 Shoryuken.configure_client do |config| が有効になります。
$ export AWS_ACCESS_KEY_ID=dummy
$ export AWS_SECRET_ACCESS_KEY=dummy
$ export AWS_REGION=us-east-1
$ bundle exec rails c
Loading development environment (Rails 7.0.3)
irb(main):001:0> HelloJob.perform_later('Ken')
Enqueued HelloJob (Job ID: 1fb25dae-1a43-4e55-9a51-a1df1cfb8db3) to Shoryuken(hello) with arguments: "Ken"
=>
#<HelloJob:0x000055bb44d9dbe0
 @arguments=["Ken"],
 @exception_executions={},
 @executions=0,
 @job_id="1fb25dae-1a43-4e55-9a51-a1df1cfb8db3",
 @priority=nil,
 @queue_name="hello",
 @sqs_send_message_parameters=
  {:message_body=>
    "{\"job_class\":\"HelloJob\",\"job_id\":\"1fb25dae-1a43-4e55-9a51-a1df1cfb8db3\",\"provider_job_id\":null,\"queue_name\":\"hello\",\"priority\":null,\"arguments\":[\"Ken\"],\"executions\":0,\"exception_executions\":{},\"locale\":\"en\",\"timezone\":\"UTC\",\"enqueued_at\":\"2022-05-06T11:59:07Z\"}",
   :message_attributes=>{"shoryuken_class"=>{:string_value=>"ActiveJob::QueueAdapters::ShoryukenAdapter::JobWrapper", :data_type=>"String"}}},
 @successfully_enqueued=true,
 @timezone="UTC">
【 bundle exec rails c 】
Railsコンソールを起動します。
bundle exec rails consoleの略です。
【 perform_later 】
ジョブをキューに入れ、キューが空き次第ジョブを実行します。
shoryuken を起動した端末に以下のような出力が有れば、成功です。(すぐに取り出されます。)
2022-05-06T12:49:34Z 3759 TID-c80 ActiveJob/HelloJob/hello/e064278e-b8c6-1e54-d9f8-7857361213ab INFO: started at 2022-05-06 21:49:34 +0900
Hello, Ken
2022-05-06T12:49:34Z 3759 TID-c80 ActiveJob/HelloJob/hello/e064278e-b8c6-1e54-d9f8-7857361213ab INFO: completed in: 62.727776999999996 ms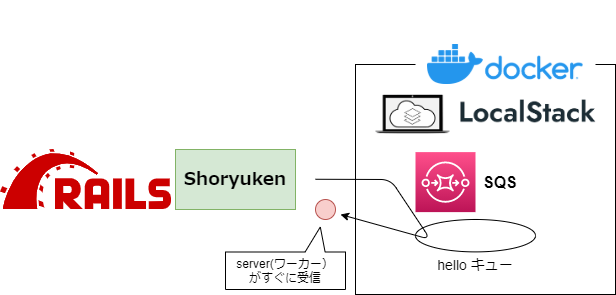
ヨシ!
エラーケースまとめ
注意:全て今回の LocalStack 環境の話です。
エラー内容:
# aws sqs list-queuesYou must specify a region. You can also configure your region by running "aws configure".
原因:
profile(~/.aws/config, ~/.aws/credentials)が作成されていないか、作成した profile を指定していない。
対処内容:
profile を作成して、--profileオプションで指定する。
# aws configure --profile localstack
AWS Access Key ID [None]: dummy
AWS Secret Access Key [None]: dummy
Default region name [None]: us-east-1
Default output format [None]: json
# aws sqs list-queues --profile localstack
エラー内容:
# aws sqs list-queues --profile localstackAn error occurred (InvalidClientTokenId) when calling the ListQueues operation: The security token included in the request is invalid.
原因:
--endpoint オプションで、LocalStack のエンドポイント URL を指定していない。
対処内容:
--endpoint オプションで、LocalStack のエンドポイント URL を指定する。
# aws sqs list-queues \
  --endpoint-url http://localhost:4566 \
  --profile localstack
エラー内容:
$ ruby -vrbenv: ruby: command not found
The `ruby' command exists in these Ruby versions:
3.0.4
$ bundle installCommand 'bundle' not found, but can be installed with:
原因1:
パスを通していない。
対処内容1:
パスを通す。
$ echo 'export PATH="$HOME/.rbenv/bin:$PATH"' >> ~/.bashrc
$ echo 'eval "$(rbenv init - bash)"' >> ~/.bashrc
$ source ~/.bashrc
原因2:
ruby のバージョンを指定していない。
対処内容2:
ruby のバージョンを指定する。
$ rbenv global 3.0.4エラー内容:
$ sudo apt install -y libsqlite3-devGem::Ext::BuildError: ERROR: Failed to build gem native extension.
current directory: /home/admin/.rbenv/versions/3.0.4/lib/ruby/gems/3.0.0/gems/sqlite3-1.4.2/ext/sqlite3
An error occurred while installing sqlite3 (1.4.2), and Bundler cannot continue.
Could not find gem 'sqlite3 (~> 1.4)' in locally installed gems.
原因:
libsqlite3-dev がインストールされていない。
対処内容:
libsqlite3-dev をインストール。
$ sudo apt install -y libsqlite3-devエラー内容:
$ bundle exec shoryuken sqs create hellobundler: failed to load command: shoryuken (/home/admin/sqs-app/vendor/bundle/ruby/3.0.0/bin/shoryuken)
/home/admin/sqs-app/vendor/bundle/ruby/3.0.0/gems/aws-sdk-core-3.130.2/lib/aws-sdk-core/plugins/regional_endpoint.rb:87:in `after_initialize': No region was provided. Configure the `:region` option or export the region name to ENV['AWS_REGION'] (Aws::Errors::MissingRegionError)
原因:
環境変数でリージョン等指定していない。
対処内容:
環境変数でリージョン等を指定。
$ export AWS_ACCESS_KEY_ID=dummy
$ export AWS_SECRET_ACCESS_KEY=dummy
$ export AWS_REGION=us-east-1
$ bundle exec shoryuken sqs create hello --endpoint=http://localhost:4566
エラー内容:
$ export AWS_ACCESS_KEY_ID=dummy
$ export AWS_SECRET_ACCESS_KEY=dummy
$ export AWS_REGION=us-east-1
$ bundle exec shoryuken sqs create hello
bundler: failed to load command: shoryuken (/home/admin/sqs-app/vendor/bundle/ruby/3.0.0/bin/shoryuken)
/home/admin/sqs-app/vendor/bundle/ruby/3.0.0/gems/aws-sdk-core-3.130.2/lib/aws-sdk-core/plugins/regional_endpoint.rb:87:in `after_initialize': No region was provided. Configure the `:region` option or export the region name to ENV['AWS_REGION'] (Aws::Errors::MissingRegionError)
原因:
--endpoint オプションで、LocalStack のエンドポイント URL を指定していない。
対処内容:
--endpoint オプションで、LocalStack のエンドポイント URL を指定する。
$ export AWS_ACCESS_KEY_ID=dummy
$ export AWS_SECRET_ACCESS_KEY=dummy
$ export AWS_REGION=us-east-1
$ bundle exec shoryuken sqs create hello --endpoint=http://localhost:4566
エラー内容:
$ bundle exec shoryuken -q hello -Rbundler: failed to load command: shoryuken (/home/admin/sqs-app/vendor/bundle/ruby/3.0.0/bin/shoryuken)
/home/admin/sqs-app/vendor/bundle/ruby/3.0.0/gems/aws-sdk-core-3.130.2/lib/seahorse/client/plugins/raise_response_errors.rb:17:in `call': The security token included in the request is invalid. (Aws::SQS::Errors::InvalidClientTokenId)
原因:
LocalStack のエンドポイント URL を config/initializers/shoryuken.rb で指定していない。
対処内容:
LocalStack のエンドポイント URL を config/initializers/shoryuken.rb で指定する。
$ vi config/initializers/shoryuken.rbShoryuken.configure_server do |config|
config.sqs_client = Aws::SQS::Client.new(
region: ENV["AWS_REGION"],
access_key_id: ENV["AWS_ACCESS_KEY_ID"],
secret_access_key: ENV["AWS_SECRET_ACCESS_KEY"],
endpoint: 'http://localhost:4566',
verify_checksums: false
)
end※Shoryuken.configure_server なのに注意。
エラー内容:
$ bundle exec rails c
> HelloJob.perform_later('Ken')
Failed enqueuing HelloJob to Shoryuken(hello): Aws::SQS::Errors::InvalidClientTokenId (The security token included in the request is invalid.)
/home/admin/sqs-app/vendor/bundle/ruby/3.0.0/gems/aws-sdk-core-3.130.2/lib/seahorse/client/plugins/raise_response_errors.rb:17:in `call': The security token included in the request is invalid. (Aws::SQS::Errors::InvalidClientTokenId)
原因:
LocalStack のエンドポイント URL を config/initializers/shoryuken.rb で指定していない。
対処内容:
LocalStack のエンドポイント URL を config/initializers/shoryuken.rb で指定する。
$ vi config/initializers/shoryuken.rbShoryuken.configure_client do |config|
config.sqs_client = Aws::SQS::Client.new(
region: ENV["AWS_REGION"],
access_key_id: ENV["AWS_ACCESS_KEY_ID"],
secret_access_key: ENV["AWS_SECRET_ACCESS_KEY"],
endpoint: 'http://localhost:4566',
verify_checksums: false
)
end※Shoryuken.configure_client なのに注意。
その他、宣伝、誹謗中傷等、当方が不適切と判断した書き込みは、理由の如何を問わず、投稿者に断りなく削除します。
書き込み内容について、一切の責任を負いません。
このコメント機能は、予告無く廃止する可能性があります。ご了承ください。
コメントの削除をご依頼の場合はXのDM等でご連絡ください。


