- 記事一覧 >
- ブログ記事

GitLabバンドルnginx廃止→OpenResty - GitLab - Webアプリ同居手順
はじめに
GitLab をインストールすると、nginx がインストールされています。GitLab のインストール方法は、別記事「Ubuntu 20.04.2.0 に GitLab をインストール」にあります。nginx の実体は、/opt/gitlab/embedded/sbin/nginxにインストールされます。
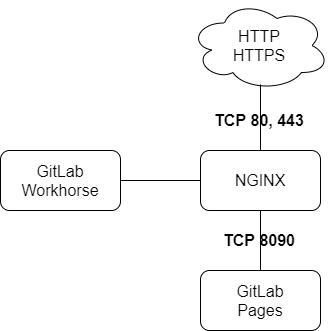
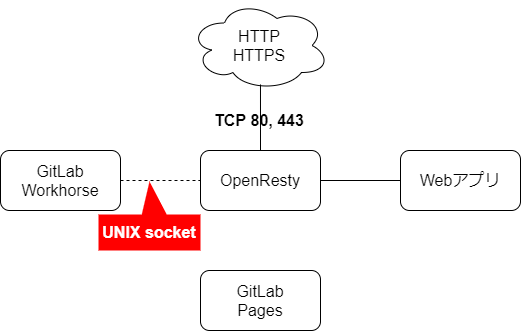
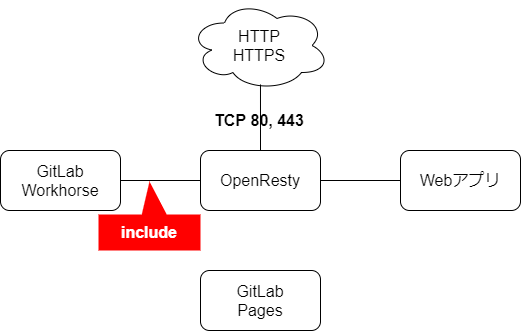
GitLab バンドルの nginx は、以下の GitLab 構造図を見ると、80,443 ポートの窓口の役割になっています。今回、これを OpenResty に変更します。

【変更前】
↓
【変更後】
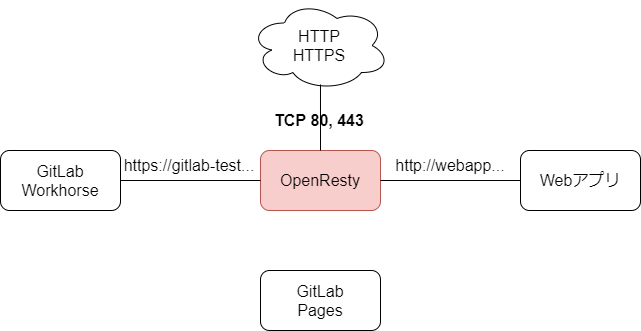
「GitLab バンドル nginx を利用して php の独自 Web アプリを同居させる手順」では、GitLab バンドル nginx をそのまま利用して、Web アプリを同居させましたが、今回は、GitLab バンドル nginx を OpenResty に変更して、GitLab と Web アプリを同居させます。(今回の記事中のゴールは、Web アプリ起動= phpinfo 表示です。)
【GitLab環境前提】
「Ubuntu 20.04.2.0にGitLabをインストール」でインストールされた環境が前提です。
【OpenResty, php環境前提】
【GitLab環境前提】に加えて、GitLabインストール済み環境へ「OpenResty lua-resty-openidc phpでSSO Webアプリ環境作成」でOpenRestyとphpがインストールされた環境からスタートが前提です。(
http://webapp.example.com/info.phpを確認するところまでやったものとします。)また、"そもそもOpenRestyとは何か?"の部分も上記記事に記載がありますので、ここでは解説しません。Nginxのことと読み替えても支障は無いと思います。
【検証環境】
Ubuntu 20.04.2 LTS
GitLab v13.11.2
nginx 1.18.0(GitLabバンドル版の方→廃止)
nginx openresty/1.19.9.1
PHP 8.0.14
バンドル nginx 廃止
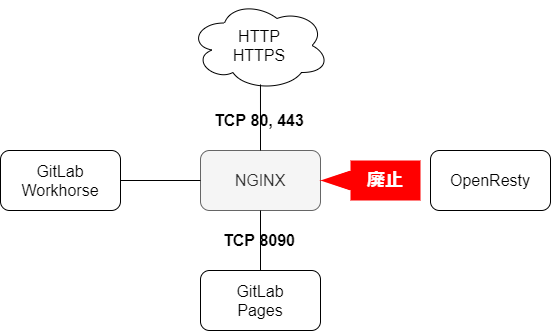
GitLab 公式マニュアル「Using a non-bundled web-server」を参考に、GitLab からバンドルされた nginx を切り離して、OpenResty を使う設定にします。
# vi /etc/gitlab/gitlab.rb# nginx['enable'] = true
↓
nginx['enable'] = false・・・これだけになります。
つまり、GitLab 公式マニュアルの「1. Disable bundled NGINX」しか必要なかったです。
反映させるために、以下を実行します。これにより、GitLab - GitLab バンドル nginx は切り離されます。
# gitlab-ctl stop nginx
# gitlab-ctl reconfigure
以下、必要なかった他の手順について、書きます。
2. Set the username of the non-bundled web-server user
# web_server['external_users'] = []
↓
web_server['external_users'] = ['www-data']
差し替える Web サーバーのユーザーに合わせる必要がありますが、今回の手順では、Web サーバー= OpenResty のユーザーの方を逆に GitLab のユーザーに合わせて gitlab-www にするため、何も設定しません。
3. Add the non-bundled web-server to the list of trusted proxies
# gitlab_rails['trusted_proxies'] = []
↓
gitlab_rails['trusted_proxies'] = [ '192.168.1.0/24', '192.168.2.1', '2001:0db8::/32' ]
差し替える Web サーバーの IP アドレスが GitLab と異なる場合、設定しないといけないようですが、今回、OpenResty が GitLab と同居するパターンのため、何も設定しません。
差し替えるWebサーバーがDockerなどの時に、必要なようですが、そういったパターンでは、試していません。
4.(Optional) Set the right GitLab Workhorse settings if using Apache
# gitlab_workhorse['listen_network'] = "unix"
# gitlab_workhorse['listen_addr'] = "/var/opt/gitlab/gitlab-workhorse/sockets/socket"
↓
gitlab_workhorse['listen_network'] = "tcp"
gitlab_workhorse['listen_addr'] = "127.0.0.1:8181"
UNIX ソケットをサポートされていない Apache の場合、TCP 通信に切り替えるために必要なようですが、今回は、OpenResty(nginx)のため、UNIX ソケットをそのまま利用し、何も設定しません。
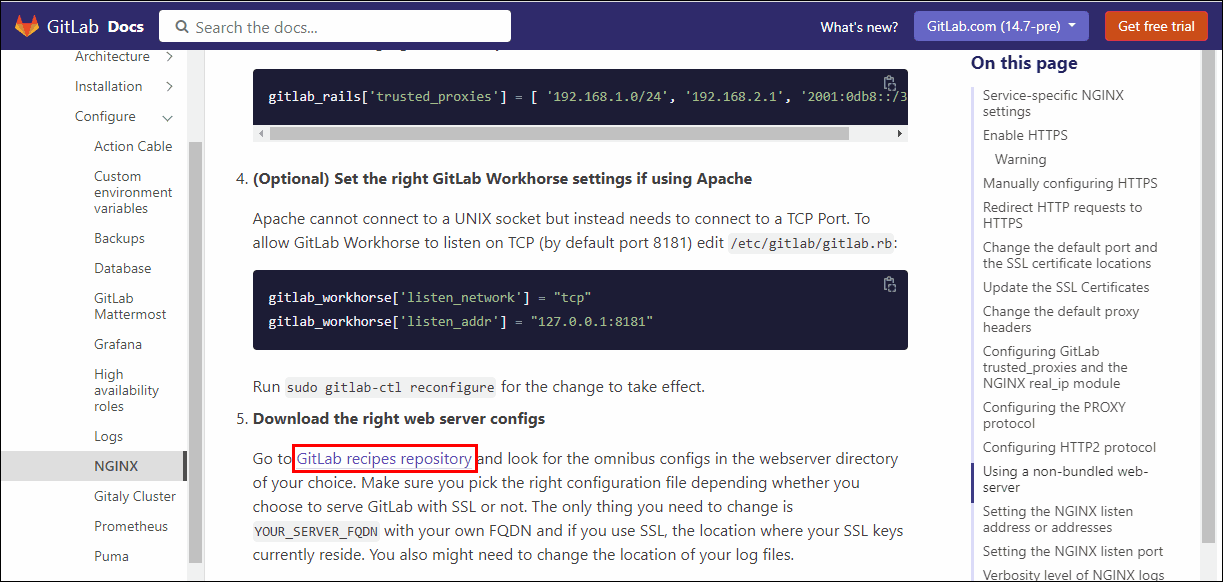
5.Download the right web server configs
この手順は必要ですが、gitlab.rbの書き換えではないため、後ほどの説明になります。
パーミッション調整
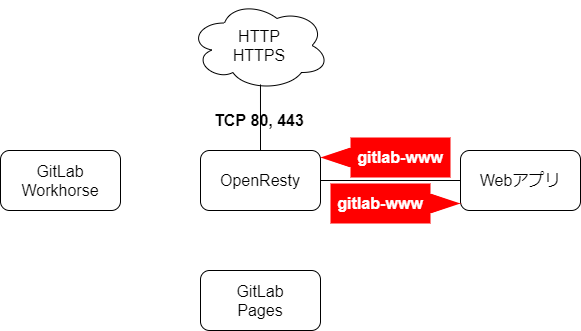
OpenResty、php-fpm のパーミッション設定を GitLab ユーザー gitlab-www に変更します。
# vi /usr/local/openresty/nginx/conf/nginx.confuser gitlab-www;# vi /etc/php/8.0/fpm/pool.d/www.confuser = gitlab-www
group = gitlab-www
と
listen.owner = gitlab-www
listen.group = gitlab-www前回記事「OpenResty lua-resty-openidc phpでSSO Webアプリ環境作成」に沿って、Webアプリは、
/opt/webapp/www/html/info.phpにあるものとします。
# chown -R gitlab-www: /opt/webappOpenResty 設定
マニュアルの「GitLab recipes repository」部分がリンクになっていて、こちらから GitLab 用コンフィグファイルをダウンロードします。
https://gitlab.com/gitlab-org/gitlab-recipes/tree/master/web-server
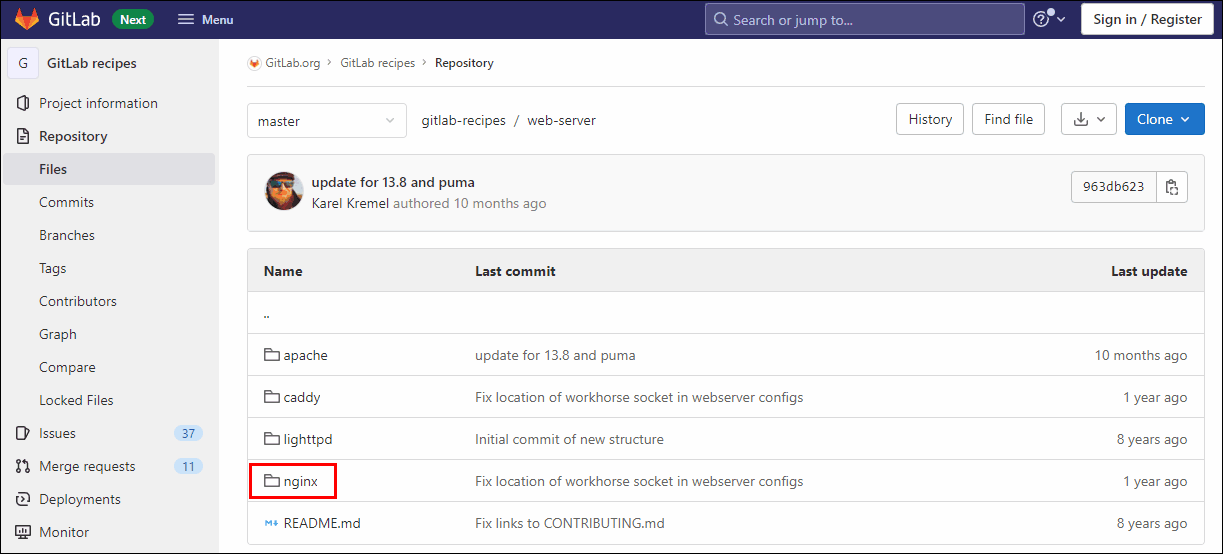
nginx をクリックします。
https://gitlab.com/gitlab-org/gitlab-recipes/-/tree/master/web-server/nginx
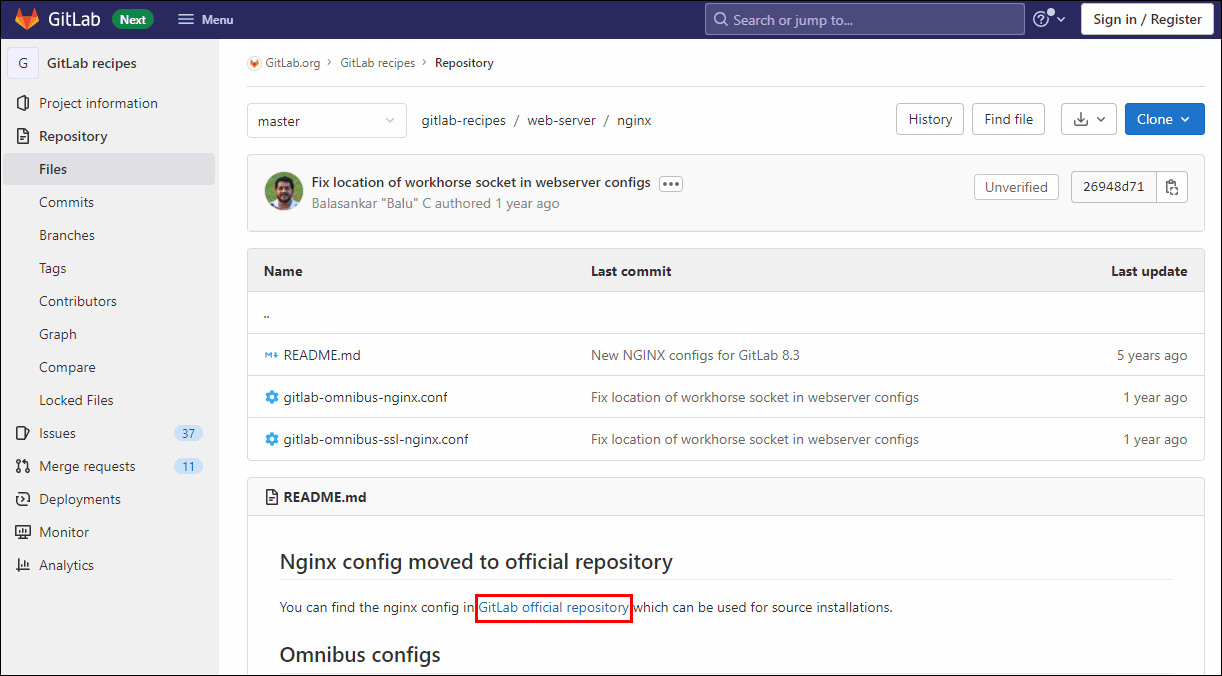
「Nginx config moved to official repository」となっていて、「移動した」と言っています。
移動先リンクをクリックします。
https://gitlab.com/gitlab-org/gitlab-foss/-/tree/master/lib/support/nginx
gitlab-ssl をダウンロードします。
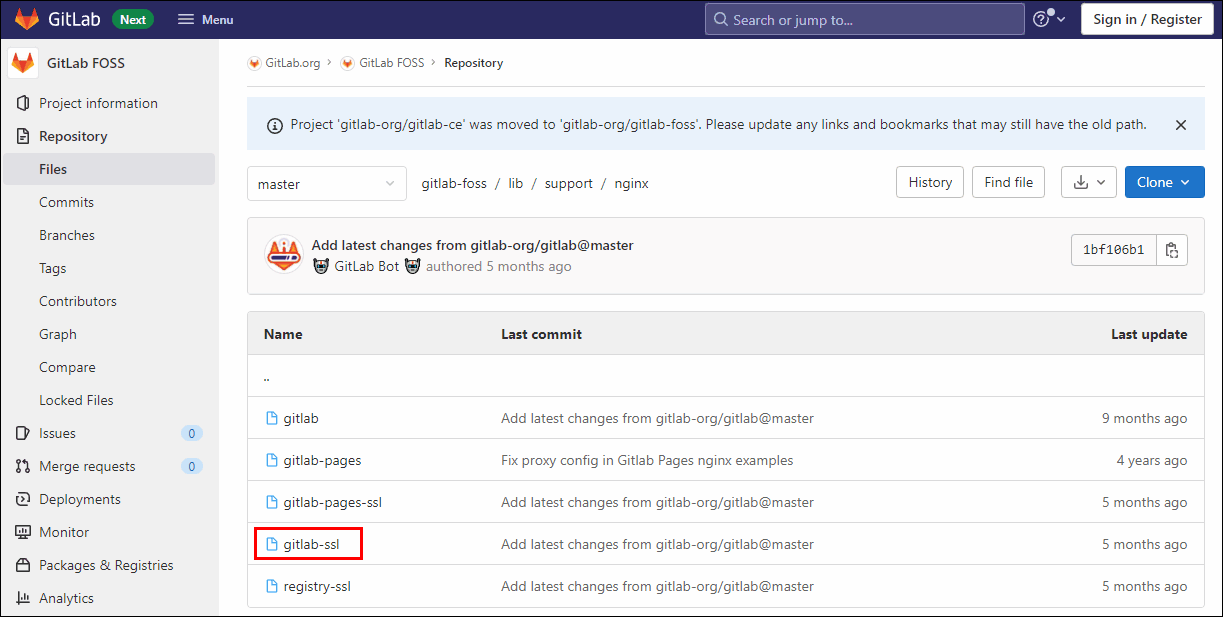
今回、
https://でGitLabのソースコード管理機能に接続するため、このファイルのみになります。http://接続や、GitLab Pages、GitLab Registry機能の利用は想定していません。
ダウンロードしたファイルを/usr/local/openresty/nginx/conf/gitlab-ssl.confとして配置し、編集します。
# vi /usr/local/openresty/nginx/conf/gitlab-ssl.confここで、変えるべきところは、以下のような部分になると思います。
・UNIX ドメインソケット
upstream gitlab-workhorse {
  # GitLab socket file,
  # for Omnibus this would be: unix:/var/opt/gitlab/gitlab-workhorse/sockets/socket
  server unix:/home/git/gitlab/tmp/sockets/gitlab-workhorse.socket fail_timeout=0;
}
↓
upstream gitlab-workhorse {
  # GitLab socket file,
  # for Omnibus this would be: unix:/var/opt/gitlab/gitlab-workhorse/sockets/socket
  #server unix:/home/git/gitlab/tmp/sockets/gitlab-workhorse.socket fail_timeout=0;
  server unix:/var/opt/gitlab/gitlab-workhorse/sockets/socket fail_timeout=0;
}これは、/etc/gitlab/gitlab.rbに
# gitlab_workhorse['listen_addr'] = "/var/opt/gitlab/gitlab-workhorse/sockets/socket"が書かれているからです。(デフォルトの UNIX ソケット位置)
・GitLab サーバー名
  server_name YOUR_SERVER_FQDN; ## Replace this with something like gitlab.example.com
↓
  server_name gitlab-test.itccorporation.jp; ## Replace this with something like gitlab.example.com
GitLab のサーバー名に書き換えます。(2箇所あります。)
・GitLab ログパス
  access_log  /var/log/nginx/gitlab_access.log gitlab_ssl_access;
  error_log   /var/log/nginx/gitlab_error.log;
↓
  access_log  /var/log/gitlab/nginx/gitlab_access.log gitlab_ssl_access;
  error_log   /var/log/gitlab/nginx/gitlab_error.log;
どこでも良いのですが、バンドル版 nginx が上記パスだったため、合わせます。(2箇所あります。)
・SSL 証明書パス
  ssl_certificate /etc/nginx/ssl/gitlab.crt;
  ssl_certificate_key /etc/nginx/ssl/gitlab.key;
↓
  ssl_certificate /etc/pki/tls/certs/ca.crt;
  ssl_certificate_key /etc/pki/tls/private/ca.key;
設置した SSL 証明書とキーのパスに合わせます。
動作確認
/usr/local/openresty/nginx/conf/gitlab-ssl.confを OpenResty 本体側の設定からインクルードします。
# vi /usr/local/openresty/nginx/conf/nginx.conf #}
include gitlab-ssl.conf;
include webapp.conf;
}末尾辺りにinclude gitlab-ssl.conf;を記入します。なお、include webapp.conf;は既にインストール済みの Web アプリの設定とします。
OpenResty を再起動します。
# systemctl restart openrestyGitLab と Web アプリは、同じ IP アドレスに名前解決できるものとします。
それぞれにアクセスしてみます。
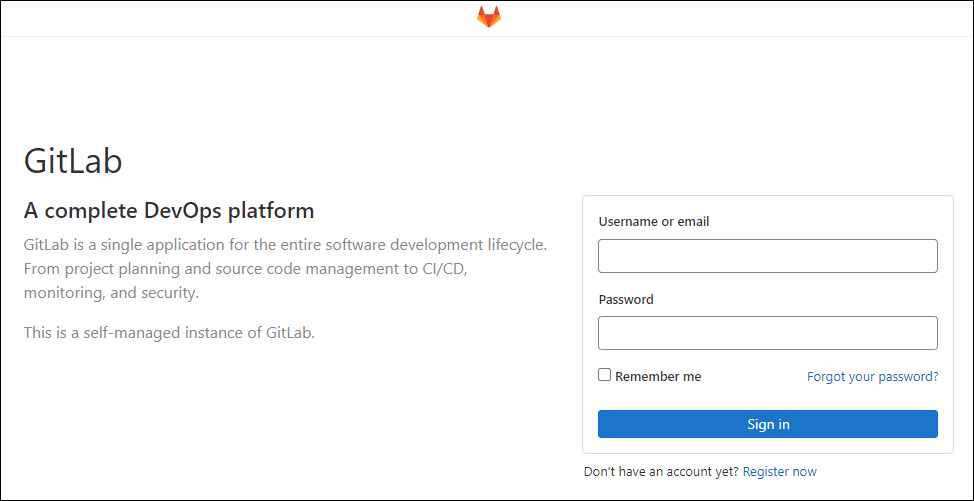
・https://gitlab-test.itccorporation.jp/(GitLab)
・http://webapp.example.com/(Web アプリ)
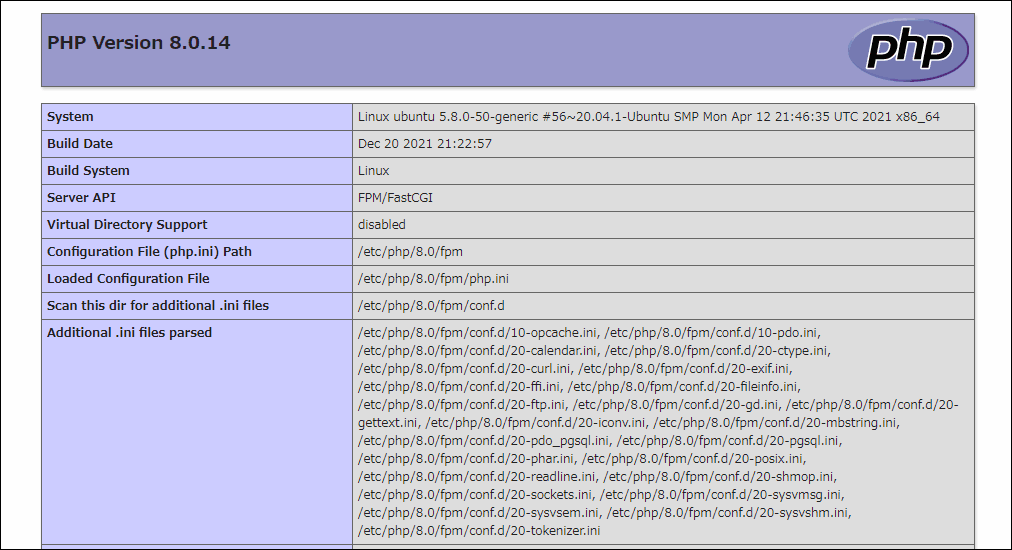
ヨシ!

その他、宣伝、誹謗中傷等、当方が不適切と判断した書き込みは、理由の如何を問わず、投稿者に断りなく削除します。
書き込み内容について、一切の責任を負いません。
このコメント機能は、予告無く廃止する可能性があります。ご了承ください。
コメントの削除をご依頼の場合はXのDM等でご連絡ください。


