- 記事一覧 >
- ブログ記事

OpenResty lua-resty-openidc phpでSSO Webアプリ環境作成
はじめに
OpenResty と lua-resty-openidc を使って、Apache ではなく、Nginx 系のシングルサインオン(SSO)の Web アプリ動作環境を作成しましたので、その手順を紹介します。構成は、以下です。
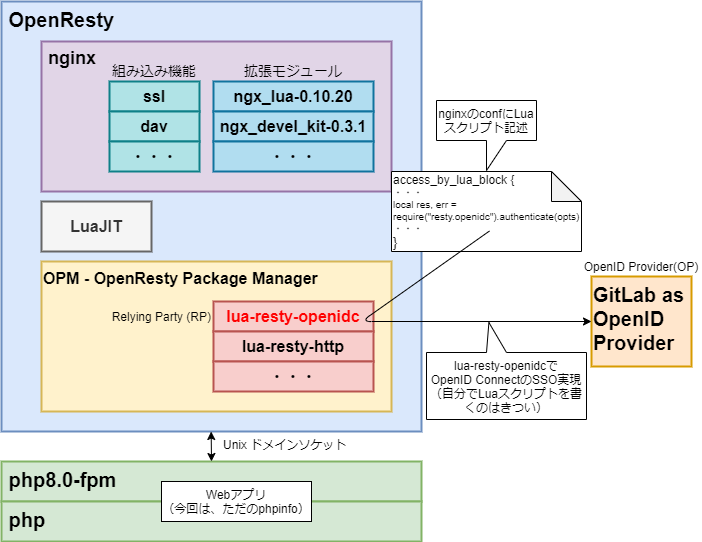
SSO は、OpenID Connect の仕組みを利用し、OpenID Connect の OpenID Provider(OP)/Identity Provider(IdP)は、GitLab を利用します。GitLab を OpenID Provider として利用する手順は、以下の別記事を参考にしてください。この記事では、GitLab 側の説明は省略します。
「GitLab as OpenID Connect identity provider をやってみた」
SSO、OpenID Connect とは何かの説明は省略します。
【検証環境】
Ubuntu 20.04.2 LTS(今回作業する側)
nginx openresty/1.19.9.1
PHP 8.0.14
Ubuntu 20.04.2 LTS(OpenID Provider側)
GitLab v13.11.2
用語紐解き
OpenID Connect の Relying Party(RP)として、これまでの記事では、mod_auth_openidc を使ってきました。
mod_auth_openidc は、Apache 系のモジュールですので、lua-resty-openidc を使えば nginx 系で Relying Party(RP)の機能が実現できることが分かりました。
備忘録としても、こうなった経緯と、用語を一旦整理します。
● 経緯
nginx でも mod_auth_openidc みたいなことをしたい。
↓
lua-resty-openidc を使おう!
↓
lua-resty-openidc の Lua とは、プログラミング言語のこと。
↓
lua-resty-openidc は、Lua で OpenID Connect の処理が書いてある nginx に組み込むライブラリ
↓
lua-resty-openidc の公式サイトでは「いろいろ依存しているけど、OpenResty を使えば悩むこと無いよ。」と言っている。
↓
OpenResty は、Lua 実行環境等いろいろ組み込まれた nginx のこと。(ビルドで同じようなものを構築できない事はない。)
↓
lua-resty-openidc は、Lua パッケージ管理システムで管理されている。
↓
パッケージ管理システムは、OPM と LuaRocks がある。
↓
OpenResty 公式サイトでは、「OpenResty は独自のパッケージマネージャーである OPM を提供しているため、OpenResty で LuaRocks を使用することは強くお勧めしません。」と言っている。
↓
パッケージ管理システムは、OPM に決まり。
↓
opm install zmartzone/lua-resty-openidc
だけで依存関係を自動で解消しつつ、lua-resty-openidc をインストール。
ビルドしなくて良かった...。
● 用語
【 lua-resty-openidc 】
lua-resty-openidc は、OpenID Connect Relying Party(RP)、OAuth 2.0 Resource Server(RS)機能を実装する Nginx 用のライブラリです。
【 Lua 】
Lua(ルア)はスクリプト言語およびその処理系のことです。
手続き型言語として、またプロトタイプベースのオブジェクト指向言語としても利用することができ、関数型言語としての要素も併せ持っています。
Lua は、C 言語のホストプログラムに組み込まれることを目的に設計されており、高速な動作と、高い移植性、組み込みの容易さが特徴です。
コルーチン(coroutine)を持っています。
【 コルーチン(coroutine) 】
コルーチンとはいったん処理を中断した後、続きから処理を再開できるプログラミングの構造のことです。※Lua だけの用語ではないです。
【 OpenResty 】
OpenResty は、lua-nginx-module を始めとする多数のサードパーティモジュールを内包した Nginx であり、Web プラットフォームです。
既存の Nginx C モジュールと Lua モジュールを使用して、高性能な Web アプリケーションを構築できます。
LuaJIT エンジンを使用して Lua スクリプトを実行できます。
【 lua-nginx-module 】
C 言語で書かれた Nginx 拡張機能です。lua-nginx-module を使うと Lua のコードを通して Nginx を制御できます。Nginx 設定ファイルで扱える変数の定義/読み書きや、HTTP リクエストの操作、mysqld,memcached,redis といったストレージを組み合わせて使う方法もあります。
【 LuaJIT 】
LuaJIT は、Lua プログラミング言語用の Just-In-Time コンパイラ(JIT)です。
【 JIT 】
Just-In-Time Compiler 実行時コンパイラのことです。
【 LuaRocks 】
Lua プログラミング言語のパッケージマネージャーです。HTTP 通信機能など、Lua で作られた追加機能を簡単にインストールできます。node で言う npm、Python で言う pip、Perl で言う CPAN のようなものです。
【 OPM 】
OpenResty Package Manager の略称です。OpenResty 公式の Lua プログラミング言語のパッケージマネージャーです。
●lua-resty-openidc の依存関係
lua-resty-openidc は、以下に依存しています。OpenResty をインストールし、opm で lua-resty-openidc をインストールすると、自動的に依存関係は解決されます。
・Nginx
・ngx_devel_kit
C 言語で書かれた Nginx 拡張機能です。Nginx モジュール開発者が作成する必要のあるコードを削減するために設計されたものです。
・Lua or LuaJIT
Lua の実行時コンパイラです。
・lua-nginx-module
上記に説明があります。
・lua-cjson
Lua で json を扱うための Lua パッケージです。
・lua-resty-string
String ユーティリティとハッシュ関数の Lua パッケージです。
例えば、整数値の文字列型データを int 型の数値データに変換するときに使う関数 atoi やハッシュ生成の md5 などが実装されています。
・lua-resty-http
HTTP クライアント Lua パッケージです。
・lua-resty-session
セッション管理を行う Lua パッケージです。
・lua-resty-jwt
JWT を扱う処理を実装した Lua パッケージです。
lua-resty-jwt に関して、公式ページには、トークンの検証に"remote introspection"を使った OAuth 2.0 Resource Server の場合、必須ではないと書かれています。OPM では自動でインストールされます。
【 JWT 】
JSON Web Token の略称です。認証情報などの属性情報(Claim)が JSON データ構造で収められてるのをトークンと言いますが、その仕様のことです。
OpenResty インストール
タイムゾーンを Asia/Tokyo、LANG=ja_JP.UTF8 にします。(必須ではありません。)
# timedatectl set-timezone Asia/Tokyo
# apt install -y language-pack-ja
# update-locale LANG=ja_JP.UTF8
OpenResty をインストールします。
# apt update
# apt -y install --no-install-recommends wget gnupg ca-certificates
# wget -O - https://openresty.org/package/pubkey.gpg | sudo apt-key add ---no-install-recommendsはお勧めで入れておいた方が良い apt もインストールされるのを防ぎます。
ca-certificatesは、https://でwgetするために必要です。(最初から入っている可能性が高いです。)
gnupgは、暗号化ソフトで、無しでも問題無かったのですが、公式ブログの手順によると、入れているので、入れておきます。
wget -O -により、ファイルの主力先を標準出力(-O の後のマイナス記号)とし、パイプで、直接 apt-key に渡しています。
apt-key addにより、openrestyを信頼された apt パッケージとして登録します。
# echo "deb http://openresty.org/package/ubuntu $(lsb_release -sc) main" > openresty.list
# cp openresty.list /etc/apt/sources.list.d/
# apt update
# apt -y install --no-install-recommends openresty
# which openresty
/usr/bin/openresty
# file `which openresty`
/usr/bin/openresty: symbolic link to ../local/openresty/nginx/sbin/nginx
# openresty -V
nginx version: openresty/1.19.9.1
built with OpenSSL 1.1.1k  25 Mar 2021 (running with OpenSSL 1.1.1l  24 Aug 2021)
TLS SNI support enabled
configure arguments: --prefix=/usr/local/openresty/nginx --with-cc-opt='-O2 -DNGX_LUA_ABORT_AT_PANIC -I/usr/local/openresty/zlib/include -I/usr/local/openresty/pcre/include -I/usr/local/openresty/openssl111/include' --add-module=../ngx_devel_kit-0.3.1 --add-module=../echo-nginx-module-0.62 --add-module=../xss-nginx-module-0.06 --add-module=../ngx_coolkit-0.2 --add-module=../set-misc-nginx-module-0.32 --add-module=../form-input-nginx-module-0.12 --add-module=../encrypted-session-nginx-module-0.08 --add-module=../srcache-nginx-module-0.32 --add-module=../ngx_lua-0.10.20 --add-module=../ngx_lua_upstream-0.07 --add-module=../headers-more-nginx-module-0.33 --add-module=../array-var-nginx-module-0.05 --add-module=../memc-nginx-module-0.19 --add-module=../redis2-nginx-module-0.15 --add-module=../redis-nginx-module-0.3.7 --add-module=../ngx_stream_lua-0.0.10 --with-ld-opt='-Wl,-rpath,/usr/local/openresty/luajit/lib -L/usr/local/openresty/zlib/lib -L/usr/local/openresty/pcre/lib -L/usr/local/openresty/openssl111/lib -Wl,-rpath,/usr/local/openresty/zlib/lib:/usr/local/openresty/pcre/lib:/usr/local/openresty/openssl111/lib' --with-pcre-jit --with-stream --with-stream_ssl_module --with-stream_ssl_preread_module --with-http_v2_module --without-mail_pop3_module --without-mail_imap_module --without-mail_smtp_module --with-http_stub_status_module --with-http_realip_module --with-http_addition_module --with-http_auth_request_module --with-http_secure_link_module --with-http_random_index_module --with-http_gzip_static_module --with-http_sub_module --with-http_dav_module --with-http_flv_module --with-http_mp4_module --with-http_gunzip_module --with-threads --with-stream --with-http_ssl_module
# /usr/local/openresty/luajit/bin/luajit -v
LuaJIT 2.1.0-beta3 -- Copyright (C) 2005-2021 Mike Pall. https://luajit.org/
--add-module=../ngx_devel_kit-0.3.1
--add-module=../ngx_lua-0.10.20
--with-http_ssl_module
により、lua-resty-openidcの要件に含まれるものが組み込まれたnginxと分かります。
LuaJITもインストールされています。
openrestyを起動します。
# systemctl start openresty
# ps aux|grep nginx
root        9604  0.0  0.0  11796  1364 ?        Ss   14:25   0:00 nginx: master process /usr/local/openresty/nginx/sbin/nginx -g daemon on; master_process on;
nobody      9605  0.0  0.1  12476  4028 ?        S    14:25   0:00 nginx: worker process
root        9915  0.0  0.0  18720   724 pts/0    S+   14:26   0:00 grep --color=auto nginx
openresty サービス=/usr/local/openresty/nginx/sbin/nginxと分かります。
# apt -y install curl
# curl 127.0.0.1/
<!DOCTYPE html PUBLIC "-//W3C//DTD XHTML 1.0 Transitional//EN" "http://www.w3.org/TR/xhtml1/DTD/xhtml1-transitional.dtd">
<html xmlns="http://www.w3.org/1999/xhtml">
  <head>
    <meta http-equiv="Content-Type" content="text/html; charset=UTF-8" />
    <title>Apache2 Debian Default Page: It works</title>
・・・(略)・・・
nginx は正常に起動しています。
続いて、restyコマンドをインストールします。
restyコマンドは、Lua のスクリプトを直接起動できるコマンドユーティリティ(Resty CLI)です。必須ではありません。
# apt -y install openresty-resty
# which resty
/usr/bin/resty
# resty -e 'print("Hello Resty")'
Hello Restyパッケージ管理のopmコマンドをインストールします。
# apt -y install openresty-opm
# opm list
最初、パッケージは、何も入っていません。
lua-resty-openidcパッケージをインストールします。
# opm install zmartzone/lua-resty-openidc
# opm list
ledgetech/lua-resty-http       0.16.1
cdbattags/lua-resty-jwt        0.2.0
zmartzone/lua-resty-openidc    1.7.5
openresty/lua-resty-string     0.11
jkeys089/lua-resty-hmac        0.06
bungle/lua-resty-session 3.8lua-resty-openidcの依存パッケージも適切なバージョンで同時にインストールされます。
php インストール
Webアプリ実行用に、php8をインストールします。(今回の記事の場合、 Webアプリ=phpinfo()実行 だけです。)
「Ubuntu 20.04.2.0 に apache2,php,postgresql をインストール」に詳しい説明付きの手順がありますので、詳しい説明は、端折ります。
# apt update
# add-apt-repository ppa:ondrej/php
# apt update
# apt -y install php8.0 php8.0-gd php8.0-mbstring php8.0-common php8.0-curl
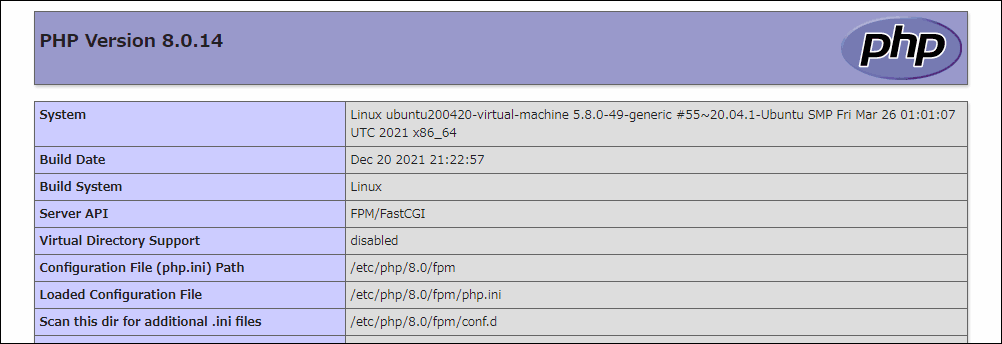
# php -v
PHP 8.0.14 (cli) (built: Dec 20 2021 21:22:57) ( NTS )apache2 が同時インストールされますが、今回要らないため、削除します。
# apt list --installed | grep apache2

WARNING: apt does not have a stable CLI interface. Use with caution in scripts.

apache2-bin/focal-updates,now 2.4.41-4ubuntu3.8 amd64 [インストール済み、自動]
apache2-data/focal-updates,focal-updates,now 2.4.41-4ubuntu3.8 all [インストール済み、自動]
apache2-utils/focal-updates,now 2.4.41-4ubuntu3.8 amd64 [インストール済み、自動]
apache2/focal-updates,now 2.4.41-4ubuntu3.8 amd64 [インストール済み、自動]
libapache2-mod-php8.0/focal,now 8.0.14-1+ubuntu20.04.1+deb.sury.org+1 amd64 [インストール済み、自動]
# apt -y remove apache2-*
php-fpmをインストールします。
php-fpm については、「GitLab バンドル nginx を利用して php の独自 Web アプリを同居させる手順」に詳しい説明付きの手順がありますので、詳しい説明は、端折ります。
# apt install -y php-fpm
# vi /etc/php/8.0/fpm/pool.d/www.conf
listen = /run/php/php8.0-fpm.sock
# vi /usr/local/openresty/nginx/conf/fastcgi_paramsSCRIPT_FILENAMEを追加します。追加しないと、PHP FPM から見たスクリプトの場所が分からなくなり、以下のエラーになります。
[error] 14457#14457: *4 FastCGI sent in stderr: "Primary script unknown" while reading response header from upstream, client: 192.168.11.5, server: webapp.example.com, request: "GET /info.php HTTP/1.1", upstream: "fastcgi://unix:/run/php/php8.0-fpm.sock:", host: "webapp.example.com"
(画面の表示は、「File not found.」)
fastcgi_param  SCRIPT_NAME        $fastcgi_script_name;
↓
fastcgi_param  SCRIPT_FILENAME    $document_root$fastcgi_script_name;
fastcgi_param SCRIPT_NAME $fastcgi_script_name;openrestyがnobody:nogroupで起動するため、nobody:nogroup でドキュメントルートを作成しておきます。
# mkdir -p /opt/webapp/www/html
# chown -R nobody:nogroup /opt/webapp
# mkdir /var/log/webapp
php-fpm のユーザーもnobody:nogroupに合わせます。
合わせないと、以下のエラーになります。
[crit] 14457#14457: *1 connect() to unix:/run/php/php8.0-fpm.sock failed (13: Permission denied) while connecting to upstream, client: 192.168.11.5, server: webapp.example.com, request: "GET /info.php HTTP/1.1", upstream: "fastcgi://unix:/run/php/php8.0-fpm.sock:", host: "webapp.example.com"
(画面の表示は、「502 Bad Gateway」)
# vi /etc/php/8.0/fpm/pool.d/www.confuser = nobody
group = nogroup
と
listen.owner = nobody
listen.group = nogroupWebアプリ の nginx conf を作成します。
ここでは、ホスト名をwebapp.example.com
ドキュメントルートを/opt/webapp/www/html
とします。
# vi /usr/local/openresty/nginx/conf/webapp.confserver
{
listen 80;
server_name webapp.example.com;
access_log /var/log/webapp/access.log;
error_log /var/log/webapp/error.log;
root /opt/webapp/www/html;
location /
{
index index.html index.htm index.php;
}
location ~ [^/]\.php(/|$)
{
fastcgi_split_path_info ^(.+?\.php)(/.*)$;
if (!-f $document_root$fastcgi_script_name)
{
return 404;
}
client_max_body_size 100m;
# Mitigate https://httpoxy.org/ vulnerabilities
fastcgi_param HTTP_PROXY "";
# fastcgi_pass 127.0.0.1:9000;
fastcgi_pass unix:/run/php/php8.0-fpm.sock;
fastcgi_index index.php;
# include the fastcgi_param setting
include fastcgi_params;
# SCRIPT_FILENAME parameter is used for PHP FPM determining
# the script name. If it is not set in fastcgi_params file,
# i.e. /etc/nginx/fastcgi_params or in the parent contexts,
# please comment off following line:
# fastcgi_param SCRIPT_FILENAME $document_root$fastcgi_script_name;
}
}Webアプリ の conf を include します。(include webapp.conf行追加)
# vi /usr/local/openresty/nginx/conf/nginx.conf・・・(略)・・・
# location / {
# root html;
# index index.html index.htm;
# }
#}
include webapp.conf;
}php.ini の調整(任意)と自ホストの名前解決ができない場合、hosts の調整を行います。
# vi /etc/php/8.0/fpm/php.inidisplay_errors = On
display_startup_errors = On# vi /etc/hosts192.168.12.200 webapp.example.comopenrestyとphp-fpmを再起動します。
# systemctl restart openresty
# systemctl restart php8.0-fpmドキュメントルートにphpinfo()を出力させる info.php を配置して、動作確認します。(この時点では、Open ID Connect の SSO 認証無しです。)
# vi /opt/webapp/www/html/info.php<?php
phpinfo();http://webapp.example.com/info.phpにアクセスします。
ヨシ!
https 化 openidc 設定追加
OpenID Provider 側の説明は省略します。ここでは、以下を実施済みとします。
Webアプリ サーバーをhttp://→https://に変更します。
自己署名証明書を作成します。
自己署名証明書作成については、「CentOS8 & Apache の自己署名証明書作成と証明書エラー回避」に詳しい説明付きの手順がありますので、詳しい説明は、端折ります。
# openssl genrsa -out ca.key 2048
# openssl req -new -key ca.key -out ca.csr
Country Name (2 letter code) [AU]:JP
State or Province Name (full name) [Some-State]:Aichi
Locality Name (eg, city) []:Toyota
Organization Name (eg, company) [Internet Widgits Pty Ltd]:
Organizational Unit Name (eg, section) []:
Common Name (e.g. server FQDN or YOUR name) []:webapp.example.com
Email Address []:

Please enter the following 'extra' attributes
to be sent with your certificate request
A challenge password []:
An optional company name []:
# echo "subjectAltName=DNS:*.example.com,IP:192.168.12.200" > san.txt
# openssl x509 -req -days 365 -in ca.csr -signkey ca.key -out ca.crt -extfile san.txt
Signature ok
subject=C = JP, ST = Aichi, L = Toyota, O = Default Company Ltd, CN = webapp.example.com
Getting Private key
# mkdir -p /etc/pki/tls/certs
# mkdir /etc/pki/tls/private
# cp ca.crt /etc/pki/tls/certs/ca.crt
# cp ca.key /etc/pki/tls/private/ca.key
# cp ca.csr /etc/pki/tls/private/ca.csr
GitLab as OpenID Connect identity provider の URL を名前解決するため、hosts の調整を行います。
# vi /etc/hosts192.168.12.200 gitlab-test.itccorporation.jpwebapp.confの設定を変更します。
# vi /usr/local/openresty/nginx/conf/webapp.confresolver 127.0.0.53 ipv6=off;
lua_package_path '$prefixlua/?.lua;;';
lua_ssl_trusted_certificate /etc/pki/tls/certs/ca.crt;
server
{
#listen 80;
listen 443 ssl;
ssl_certificate /etc/pki/tls/certs/ca.crt;
ssl_certificate_key /etc/pki/tls/private/ca.key;
server_name webapp.example.com;
access_log /var/log/webapp/access.log;
error_log /var/log/webapp/error.log;
root /opt/webapp/www/html;
index index.html index.htm index.php;
access_by_lua_block {
local opts = {
ssl_verify = "no",
scope = "openid email",
session_contents = {id_token=true},
use_pkce = true,
redirect_uri = "https://webapp.example.com/oidc_callback",
discovery = "https://gitlab-test.itccorporation.jp/.well-known/openid-configuration",
client_id = "48b10a860b20a2eec4a7682bb88fd51fd786e78d6d84a0aabe4beafce9b50952",
client_secret = "1aa56da3e07bbc7779406856023c4c5b34371bc64fef8d8a386aef64cc04eba1",
}
local res, err = require("resty.openidc").authenticate(opts)
if err then
ngx.status = 500
ngx.say(err)
ngx.exit(ngx.HTTP_INTERNAL_SERVER_ERROR)
end
ngx.req.set_header("X-USER", res.id_token.email)
}
location ~ [^/]\.php(/|$)
{
fastcgi_split_path_info ^(.+?\.php)(/.*)$;
if (!-f $document_root$fastcgi_script_name)
{
return 404;
}
client_max_body_size 100m;
# Mitigate https://httpoxy.org/ vulnerabilities
fastcgi_param HTTP_PROXY "";
# fastcgi_pass 127.0.0.1:9000;
fastcgi_pass unix:/run/php/php8.0-fpm.sock;
fastcgi_index index.php;
# include the fastcgi_param setting
include fastcgi_params;
# SCRIPT_FILENAME parameter is used for PHP FPM determining
# the script name. If it is not set in fastcgi_params file,
# i.e. /etc/nginx/fastcgi_params or in the parent contexts,
# please comment off following line:
# fastcgi_param SCRIPT_FILENAME $document_root$fastcgi_script_name;
}
}【webapp.conf追加部分説明】
resolver 127.0.0.53 ipv6=off;discovery = "https://gitlab-test.itccorporation.jp/.well-known/openid-configuration"部分で/etc/hosts に書いただけでは、名前解決されず、Ubuntu のデフォルトの DNS サーバー127.0.0.53の設定が必要でした。さらに、ipv6=off にしないと、ipv6 で名前解決しようとしてエラーになりました。
エラー内容:
[error] 1892#1892: *9 [lua] openidc.lua:577: openidc_discover(): accessing discovery url (https://gitlab-test.itccorporation.jp/.well-known/openid-configuration) failed: no resolver defined to resolve "gitlab-test.itccorporation.jp", client: 192.168.11.5, server: webapp.example.com, request: "GET / HTTP/1.1", host: "webapp.example.com"
lua_package_path '$prefixlua/?.lua;;';lua パッケージ読み取り先パスの設定です。今回の場合、require("resty.openidc")のところが読み取っているところです。
最初、どこかのサイトに書いてあったのを真似して、
'./lua/?.lua;;';
あるいは、
'~/lua/?.lua;;';
と設定して、
どこかからの相対パス+標準パスのつもりで書きましたが、./や~/は、どこにも該当しませんでした。
lua_package_path '$prefixlua/?.lua;;';
の場合、
$prefixが/usr/local/openresty/nginx/に置き換わり、
/usr/local/openresty/nginx/lua/*.lua
が読み取られるようになりました。
?の部分は、読み取りたいパッケージ名に置き換わります。(*のような意味です。)
なお、";;"はデフォルトの読み取り先を意味し、誤植ではありません。
今回のインストールでは、以下がデフォルトの読み取り先のようでした。
/usr/local/openresty/site/lualib/resty/openidc.ljbc
/usr/local/openresty/site/lualib/resty/openidc/init.ljbc
/usr/local/openresty/lualib/resty/openidc.ljbc
/usr/local/openresty/lualib/resty/openidc/init.ljbc
/usr/local/openresty/site/lualib/resty/openidc.lua
/usr/local/openresty/site/lualib/resty/openidc/init.lua
/usr/local/openresty/lualib/resty/openidc.lua
/usr/local/openresty/lualib/resty/openidc/init.lua
./resty/openidc.lua
/usr/local/openresty/luajit/share/luajit-2.1.0-beta3/resty/openidc.lua
/usr/local/share/lua/5.1/resty/openidc.lua
/usr/local/share/lua/5.1/resty/openidc/init.lua
/usr/local/openresty/luajit/share/lua/5.1/resty/openidc.lua
/usr/local/openresty/luajit/share/lua/5.1/resty/openidc/init.lua
/usr/local/openresty/site/lualib/resty/openidc.so
/usr/local/openresty/lualib/resty/openidc.so
./resty/openidc.so
/usr/local/lib/lua/5.1/resty/openidc.so
/usr/local/openresty/luajit/lib/lua/5.1/resty/openidc.so
/usr/local/lib/lua/5.1/loadall.so
/usr/local/openresty/site/lualib/resty.so
/usr/local/openresty/lualib/resty.so
./resty.so
/usr/local/lib/lua/5.1/resty.so
/usr/local/openresty/luajit/lib/lua/5.1/resty.so
/usr/local/lib/lua/5.1/loadall.so$prefixlua/?.lua部分の設定は必要ありません。そもそも、lua_package_pathをあえて設定する必要はありません。
lua_ssl_trusted_certificate /etc/pki/tls/certs/ca.crt;Lua からhttps://にアクセスするための証明書置き場の設定です。(今回、証明書エラーを無視するため、適当に指定しています。)
  #listen 80;
  listen 443 ssl;
  ssl_certificate /etc/pki/tls/certs/ca.crt;
ssl_certificate_key /etc/pki/tls/private/ca.key;https://で接続されるための設定です。
  access_by_lua_block {
    local opts = {
      ssl_verify = "no",
      scope = "openid email",
      session_contents = {id_token=true},
      use_pkce = true,
      redirect_uri = "https://webapp.example.com/oidc_callback",
      discovery = "https://gitlab-test.itccorporation.jp/.well-known/openid-configuration",
      client_id = "48b10a860b20a2eec4a7682bb88fd51fd786e78d6d84a0aabe4beafce9b50952",
      client_secret = "1aa56da3e07bbc7779406856023c4c5b34371bc64fef8d8a386aef64cc04eba1",
    }
    local res, err = require("resty.openidc").authenticate(opts)

    if err then
      ngx.status = 500
      ngx.say(err)
      ngx.exit(ngx.HTTP_INTERNAL_SERVER_ERROR)
    end

    ngx.req.set_header("X-USER", res.id_token.email)
  }
opts のssl_verify = "no",は、
discovery = "https://gitlab-test.itccorporation.jp/.well-known/openid-configuration",の URL が自己署名証明書のサイトのため、自己署名でも構わず接続するために必要です。設定しない場合、以下のエラーになります。
[error] 1884#1884: *3 [lua] openidc.lua:577: openidc_discover(): accessing discovery url (https://gitlab-test.itccorporation.jp/.well-known/openid-configuration) failed: 18: self signed certificate, client: 192.168.11.5, server: webapp.example.com, request: "GET / HTTP/1.1", host: "webapp.example.com"
opts のscope = "openid email",は、
アプリケーションがどこまでの情報(アクセストークン)を要求するかの設定です。
今回の場合、GitLab as OpenID Connect identity provider 側で、openid email の要求を許可したとして、この設定になります。
opts のsession_contents = {id_token=true},は、
セッション情報にどれだけの情報を載せるかの設定です。
id_token, enc_id_token, user, access_tokenが指定できるようですが、id_tokenだけあれば良いので、id_token=trueとしています。
opts のuse_pkce = true,は、
PKCE を有効にします。PKCE は認可コードの横取り攻撃の対策として定義されています。必須ではありません。
opts のredirect_uri = "https://webapp.example.com/oidc_callback",は、
GitLab as OpenID Connect identity provider 側で設定した、コールバック URL です。
opts のclient_id = "48b10a860b20a2eec4a7682bb88fd51fd786e78d6d84a0aabe4beafce9b50952",は、
GitLab as OpenID Connect identity provider 側で設定した、アプリケーション ID です。
opts のclient_secret = "1aa56da3e07bbc7779406856023c4c5b34371bc64fef8d8a386aef64cc04eba1",は、
GitLab as OpenID Connect identity provider 側で設定した、秘密です。
local res, err = require("resty.openidc").authenticate(opts)は、
lua-resty-openidc を読み込んで認証処理を実行しています。
if err thenのところは、エラーが発生した場合、500 Internal Server Error を返しています。
ngx.req.set_header("X-USER", res.id_token.email)のところは、認証が成功して id_token から得られた email を X-USER-ヘッダにセットしています。
openresty を再起動して、動作確認します。
# systemctl restart openrestyhttps://webapp.example.com/info.phpにアクセスします。
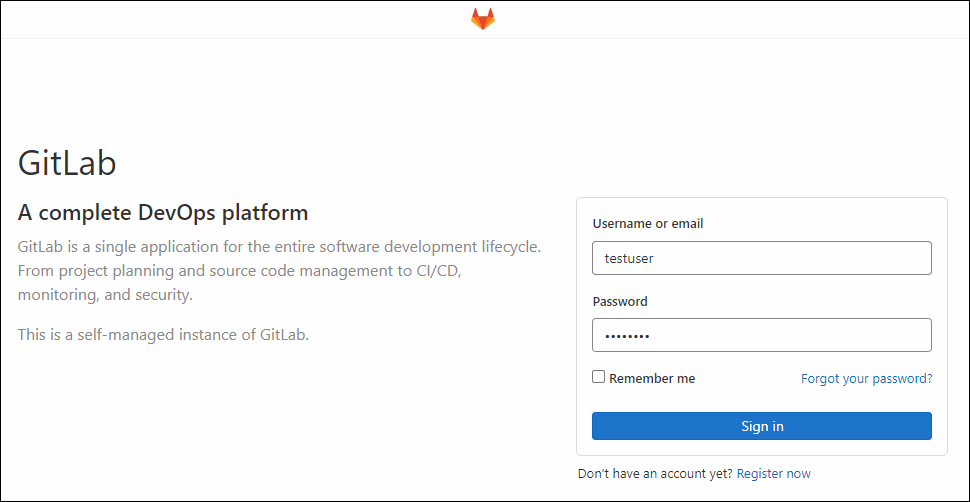
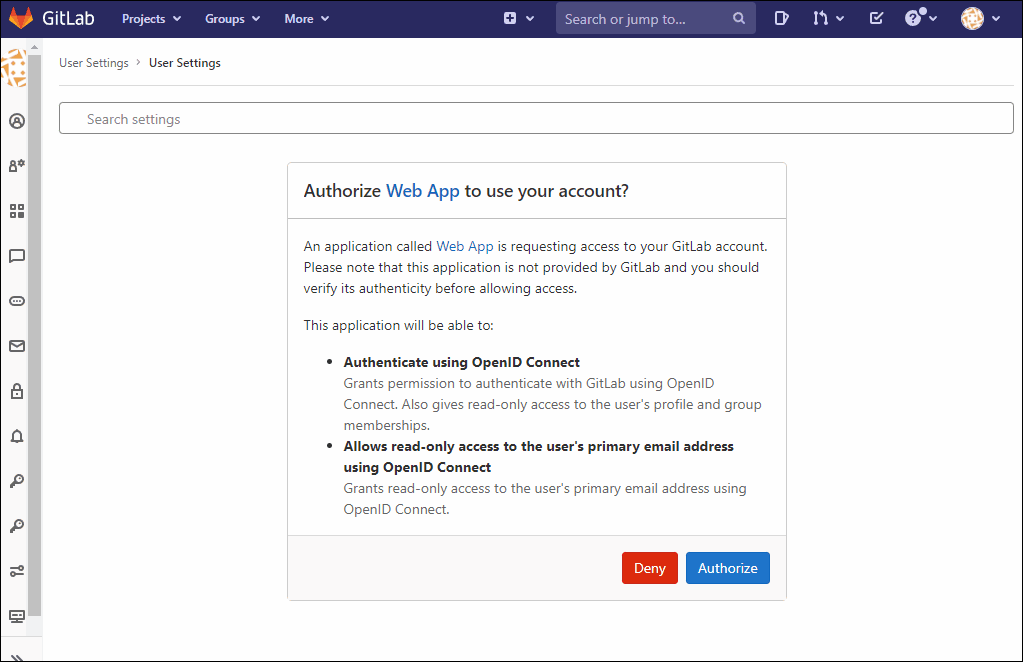
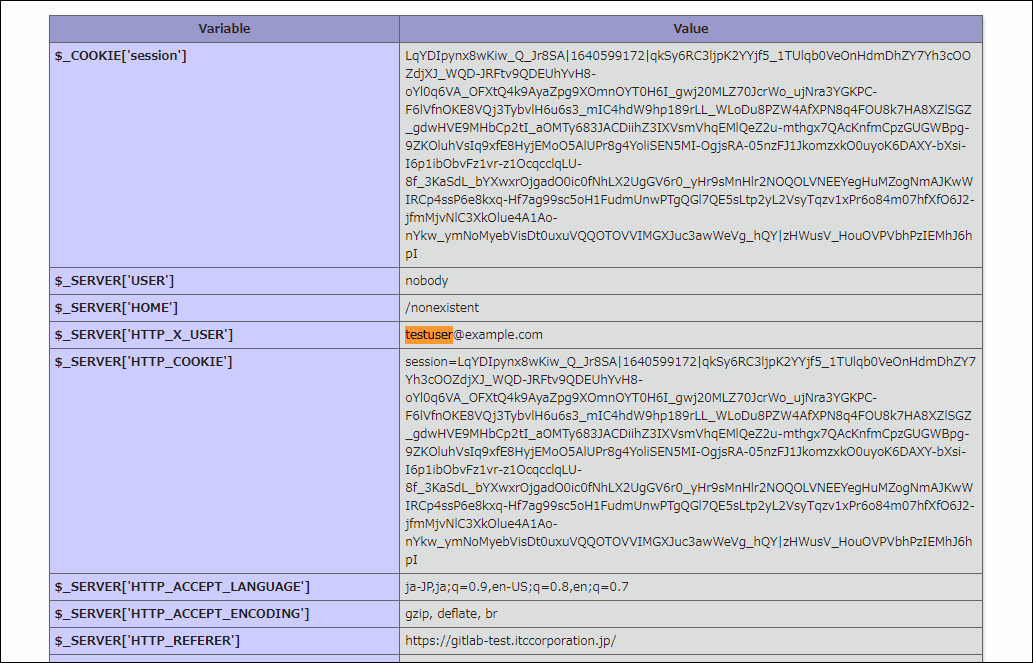
ヨシ!

その他、宣伝、誹謗中傷等、当方が不適切と判断した書き込みは、理由の如何を問わず、投稿者に断りなく削除します。
書き込み内容について、一切の責任を負いません。
このコメント機能は、予告無く廃止する可能性があります。ご了承ください。
コメントの削除をご依頼の場合はXのDM等でご連絡ください。


